Revitalizing your home décor can have a tremendous impact, but where does one begin? For inspiration, contemplate incorporating a wall planter.
These innovative contraptions offer a way to invite nature into your home, and they enhance your interiors regardless of your area’s size. Notably, wall planters function effectively both inside your living spaces and outdoor areas.
The best part about wall planters is that they can be used in any room and will always look great. You’ll feel like you’re taking care of your home while creating an environment where plants are encouraged to flourish. In this blog post, we will share 32 DIY wall planter projects that you can try at home.
Table of Contents
1. DIY Wall Planter Projects: Pallet Material
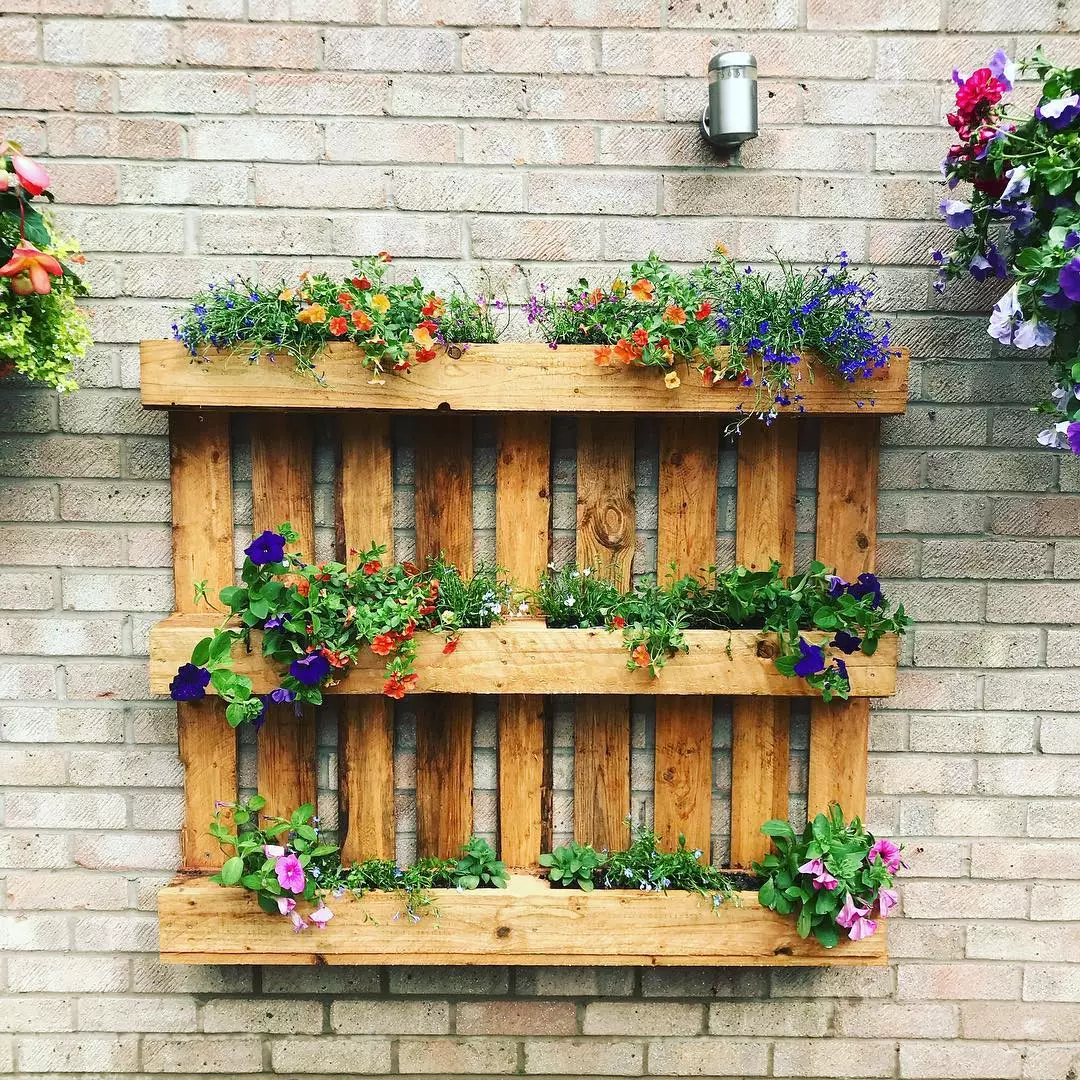
Pallets are easy to find and usually free, and they can be used to create all sorts of different styles of wall planters.
For example, a pallet can be painted or stained and then hung on the wall with plants hanging from it. Or, the slats of the pallet can be used to create pockets for plants, which can then be mounted on the wall.
2. Anthropologie Inspired DIY Wall Planter
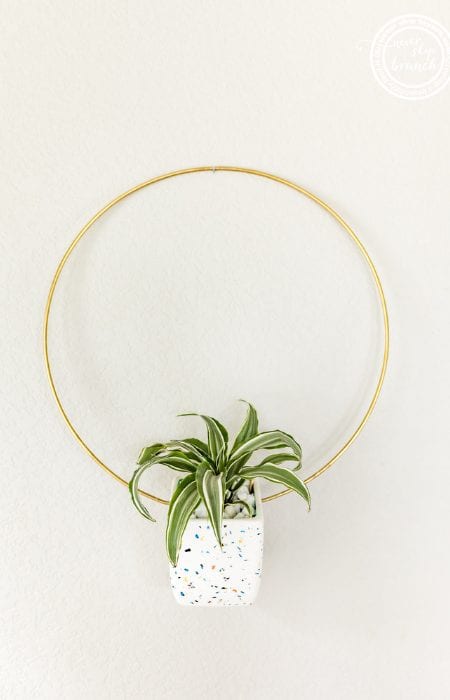
Inspired by Anthropologie, this DIY wall planter is a stylish and easy-to-make solution. Add a touch of elegance to the planter through the gold hint will be a perfect choice.
Start by picking out the following materials:
- Ceramic or Terra Cotta Plant pot, about 6″ wide*
- Macrame Hoop 15-19″ diameter
- Plant, Rocks & Dirt for pot
- Rust-Oleum Metallic Aged Vintage Gold Spray Paint
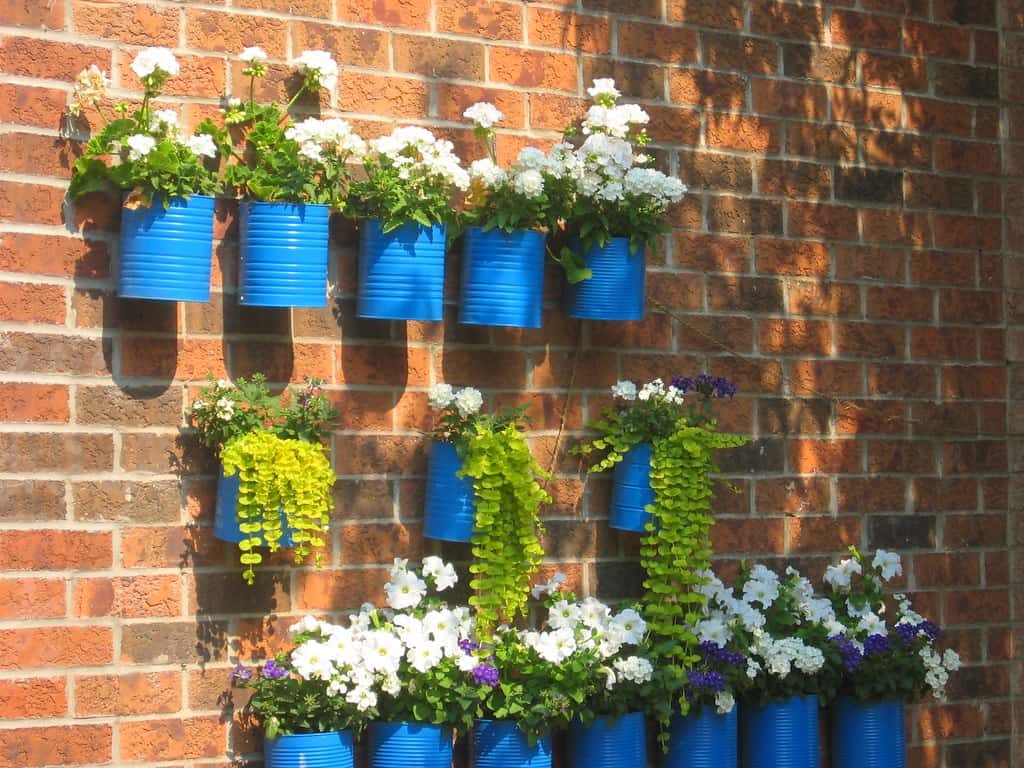
3. DIY Mounted Jugs
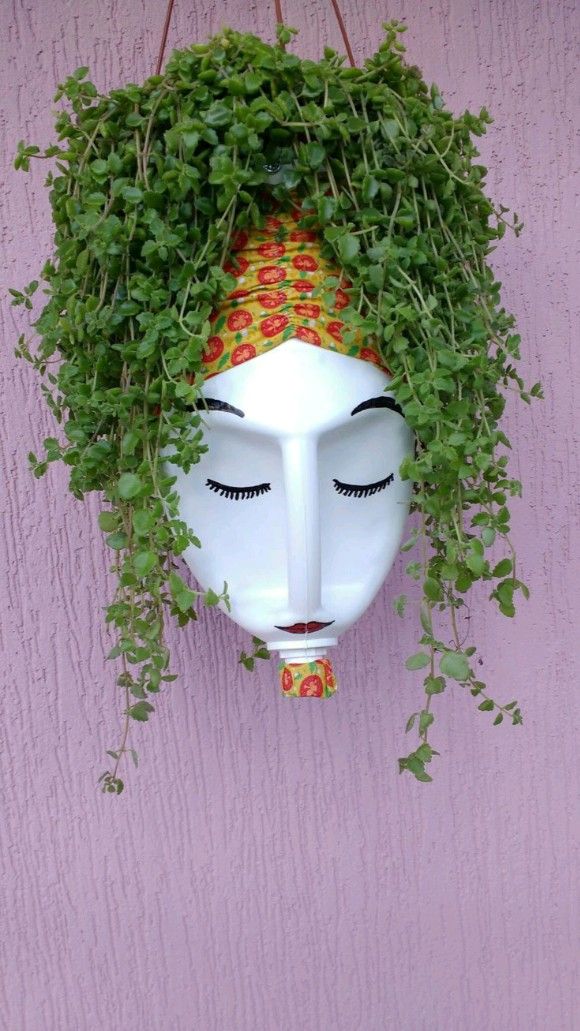
For this project, all you need are some old jugs and a few other inexpensive supplies.
First, clean and dry your jugs. You can also make it look adorable by painting it as you desire. Then, use a drill to make two holes in the bottom of each jug, near the handle. Next, thread some rope or twine through the holes and knot it securely. Finally, fill the jugs with potting soil and your favorite plants. Hang them on a nail or screw near a sunny window, and enjoy your new mini garden.
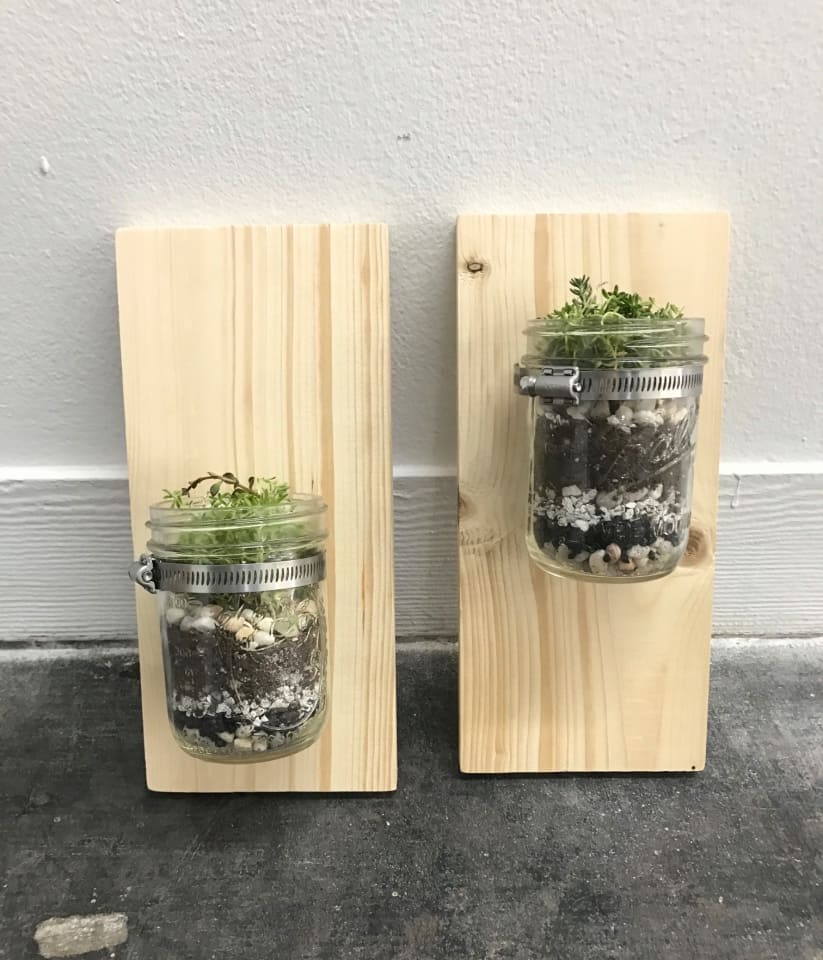
4. Mason Jar Wall Planters
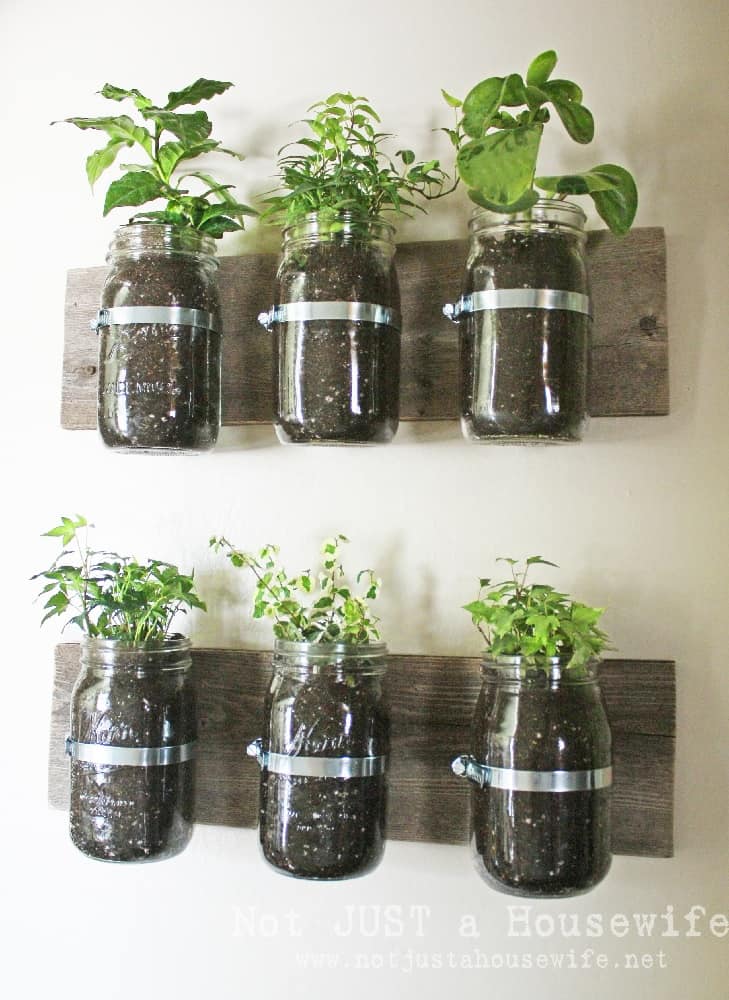
Mason jar wall planters are a fun and easy DIY project that can add a touch of whimsy to any room. All you need are some mason jars, some plants, and a little bit of imagination.
You can start to fill your jars with potting soil and then add your plants. You can use any type of plant you like, but succulents work well because they don’t need much water. Once your jars are planted, all that’s left is to hang them on your wall. You can use nails, screws..
5. Mini Bucket Wall Planter
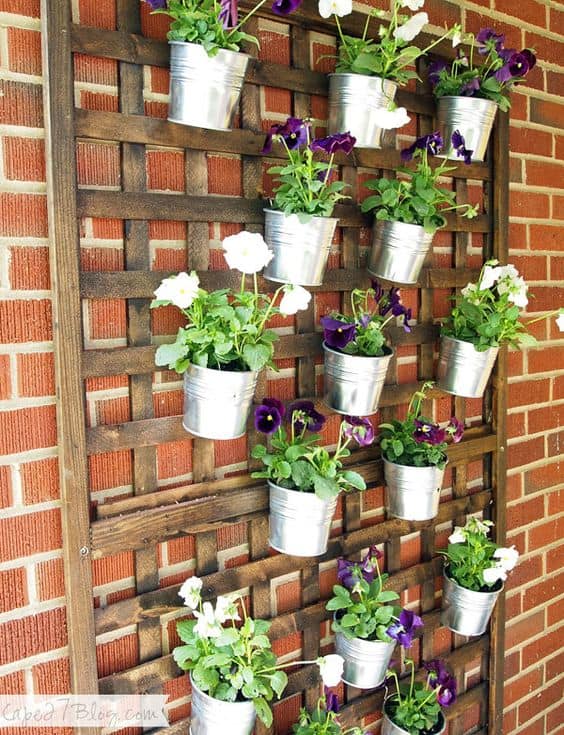
This wall planter project is a great way to add some greenery to your home without taking up too much space. All you need is a few mini buckets, some soil, and some plants.
You can either buy mini buckets or repurpose some from other projects. Once you have your buckets, drill a few holes in the bottom for drainage and fill with potting soil. Then, add your plants and hang on your wall.
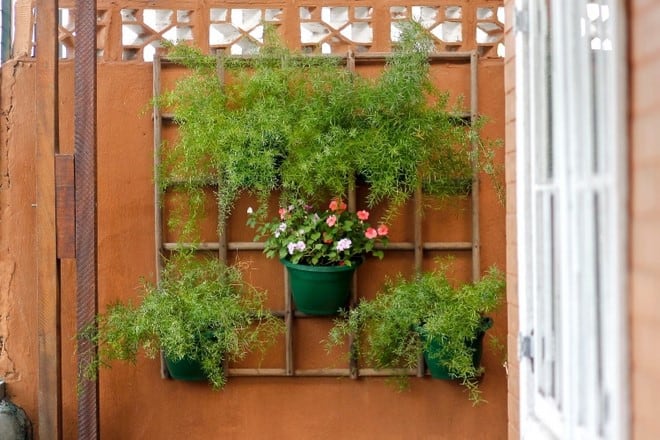
6. Reclaimed Wood Plant Hanger
This particular project uses reclaimed wood to create a beautiful and rustic plant hanger. To get started, you’ll need to gather a few supplies. Reclaimed wood, of course, is the main material you’ll need.
You’ll also need some wire or twine, a saw, and a drill. Once you have your supplies, the first step is to cut the wood into pieces that are the same length. Next, you’ll need to drill holes in each piece of wood, spacing them evenly apart. Once the holes are drilled, thread the wire or twine through the holes to create a “web” effect. Finally, add your plants.
7. Wooden Window Boxes
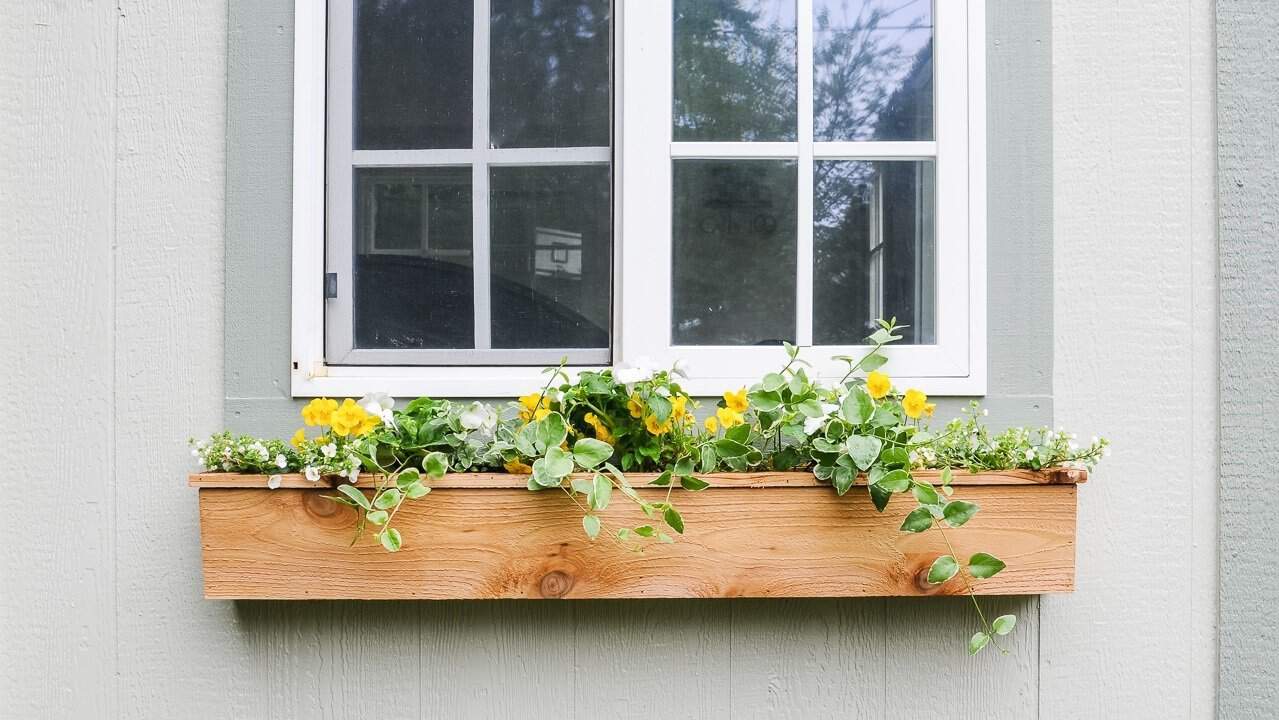
Wooden window boxes are one type of wall planter that’s relatively easy to make, and they look great when filled with plants or flowers. The first step is to measure and cut the wood to size. Then, you’ll need to drill pilot holes and attach the pieces together with screws or nails.
Once the box is assembled, you can add a coat of paint or stain if desired. Then, attach the box to the wall using brackets or hangers. Fill it with soil and plants, and water as needed.
8. Tiered Succulent Planter Project
It’s easy to make and is a great way to show off your plants.
Here’s what you’ll need:
- Wooden dowels
- Drill
- 3 small pots or containers
- Potting soil
- Succulents
- Moss
First, drill holes in the wooden dowels. Then, insert the dowels into the holes in the pots or containers. Make sure that the dowels are evenly spaced so that the pots will be level when they’re hung on the wall.
Next, fill the pots with potting soil and plant your succulents. Once the plants are in place, cover the soil with moss. This will help to hold moisture in and keep the roots healthy.
Finally, hang your pots on the wall using nails or screws.
9. Air Plant Frames with Driftwood
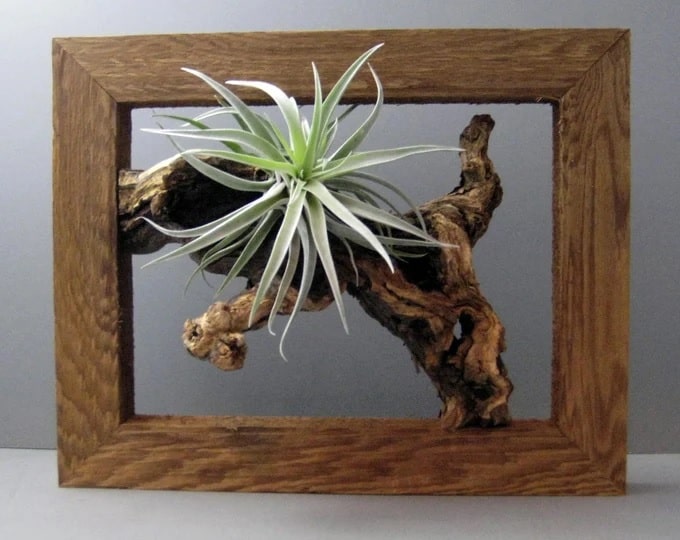
To highlight the natural look, try combining the air plant and the driftwood. This project will bring a rustic and modern touch to any room.
These air plant frames are simple to make and really show off the beauty of air plants. To make one, gather some driftwood pieces and arrange them into a frame. Then, use wire or string to secure the frame to a piece of cork. Finally, add your air plants and Hang your new wall planter on a sunny wall and water regularly. With a little care, it will thrive for years to come.
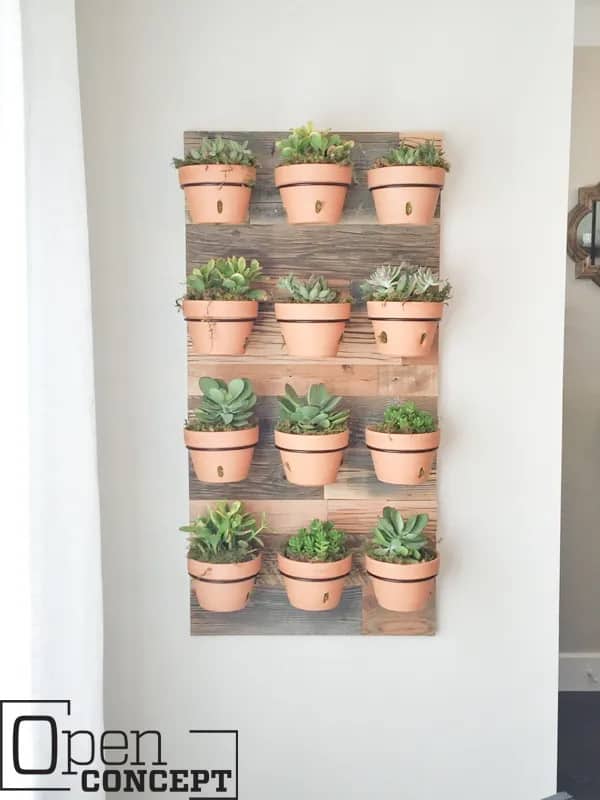
10. Succulent Planter
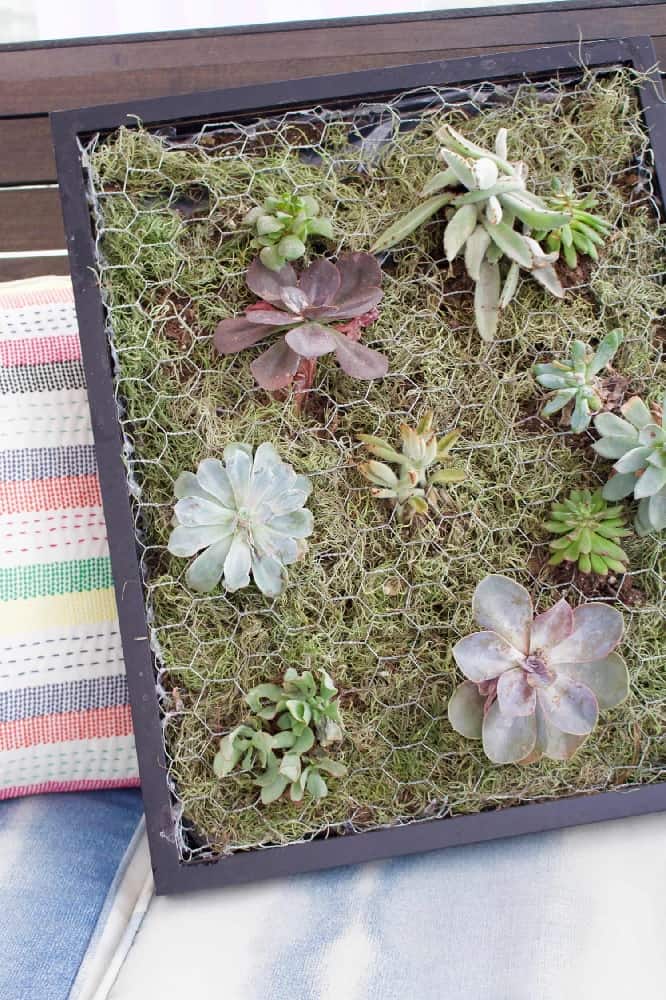
Succulents is one of the best option if you want to add a touch of greenery flair to your house. With these low-maintenance plants, you will bring a fresh life without having to worry about time and energy invested in taking care of them.
All you need is a wood panel, some wire mesh, potting soil, and of course, succulents. Once you have all of your materials, simply attach the wire mesh to the back of the wood panel and fill it with potting soil. Then, start planting your succulents.
11. Wall Of Terrariums
A wall of terrariums is a simple and stylish way to create your own mini indoor garden. All you need is a selection of small succulents or cacti, some potting soil, and some clear glass jars or containers.
You can choose a spot on your wall where you’d like your terrariums to go. Then, use a drill or screwdriver to make a small hole in the bottom of each jar. Next, fill each jar with potting soil and arrange your plants however you like. Once you’re happy with the arrangement, just screw the lids onto the jars and Hang them up on your chosen wall using nails or screws.
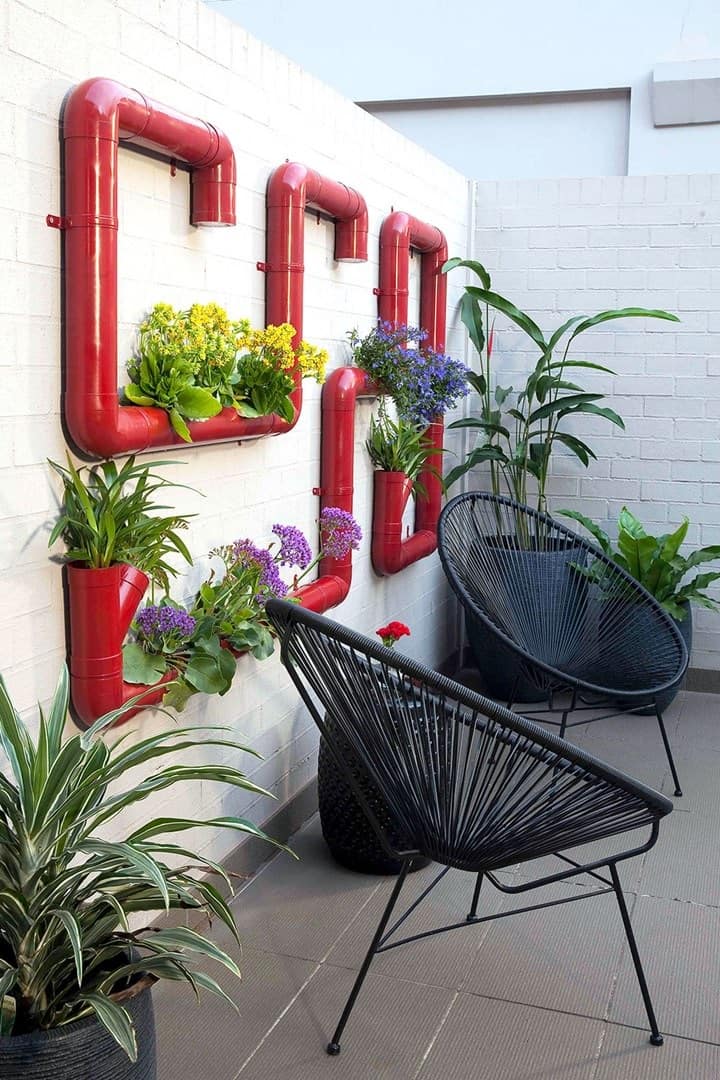
12. Industrial Wall Planter
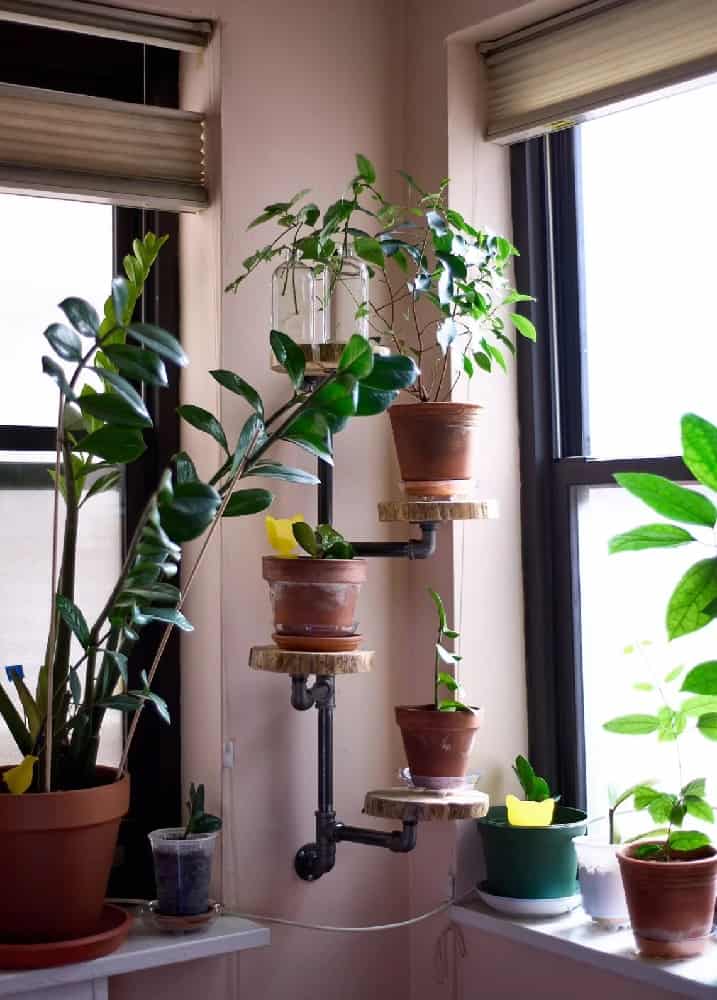
This easy DIY project can be completed in just a few hours, and it’s a great way to add a touch of nature to any space.
To get started, you’ll need some basic supplies like pipes, fittings, sliced woods, a drill, screwdriver, and measuring tape. You’ll also need a few plants of your choice. Once you have your supplies gathered, you can begin attaching the planter to the wall.
Start by drilling holes into the wall, then use screws to secure the flanges to the wall. Next, measure and mark the placement of the pipes. Drill pilot holes for these as well, then use screws to attach the pipes to wall. Finally, attach the sliced wood to the pipes, fill the planter with soil and plants, then put the plants on it.
13. Recycled Plastic Bottles Wall Planters
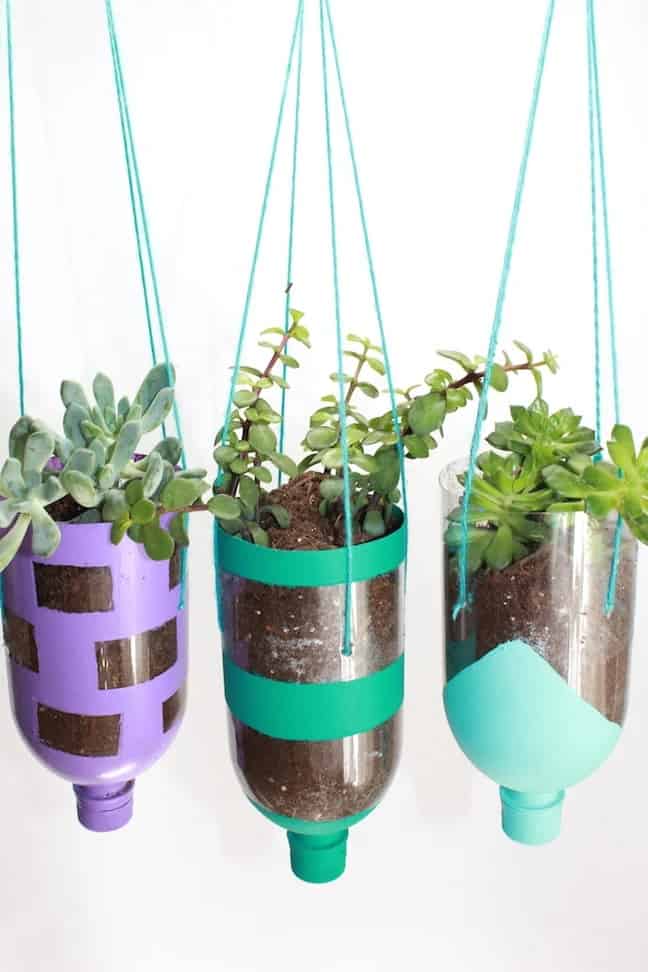
To make a recycled plastic bottle wall planter, you will need:
- 3 plastic bottles (1 liter or 2 liter size)
- A sharp knife or scissors
- A drill with a large bit
- Potting soil
- Small plants or succulents
- Paint
- Paintbrush
- Painter’s tape
Start by cutting the bottom off of each plastic bottle. Next, use the drill to make 3 holes in the back of the bottles. Make sure the holes are evenly spaced and large enough for your plants to fit through. When the holes are drilled, thread some string through each one and tie knots on the inside of the bottle. This will create a hanger for your wall planter. Finally, fill each bottle with potting soil and add the succulents.
14. Embroidery Hoop Hanging Planter
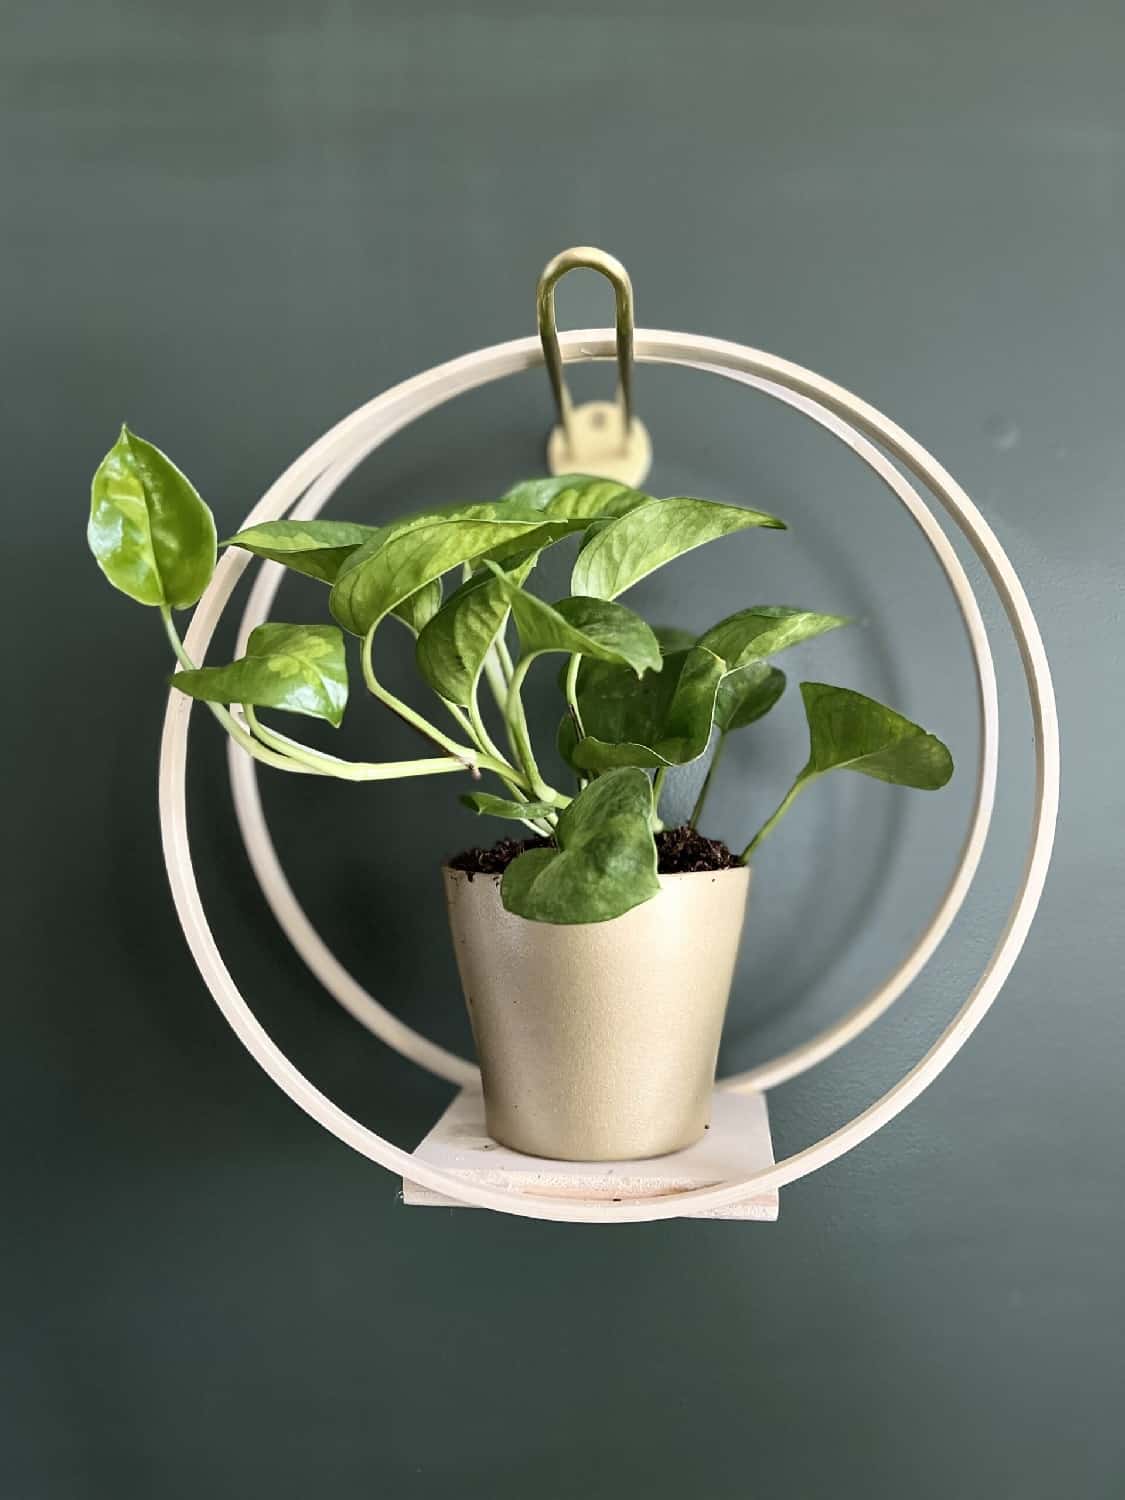
This embroidery hoop hanging planter is a great project for beginners, and it’s sure to add a touch of aesthetic appeal to any space.
You’ll need an embroidery hoops, plywood cut, wood glue, painter’s tape, clamp, some potting soil, and a plant of your choice. Simply apply glue to the side of wood where you will stick the hoop, then clamp in place. When it perfectly dries, paint or stain as you desire. Now you can put your favorite plant. Once your plant is in place, hang the hoops on your wall using nails or screws.
15. PVC Pipe Planters
Using PVC pipe planters to grow your plants can be the best option to consider. It is easy to make, affordable and also durable.
To begin, all you need is some PVC pipe, a drill, and some paint or stain. Once you have your materials, measure and cut the pipe to the desired length. Drill holes in the sides for drainage, then add your plants and soil. To make it eye-catching, consider painting it with the bright color.
16. DIY Small Wall Planter
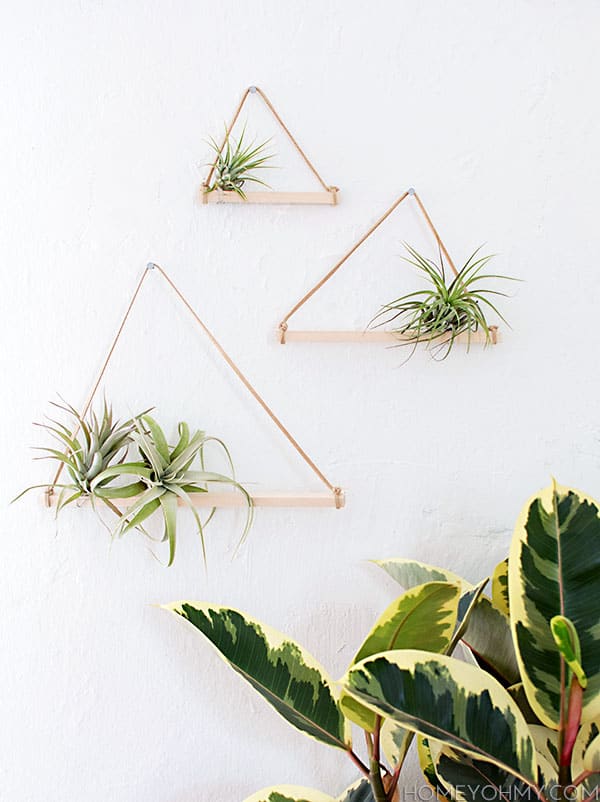
The wall planter will help you to deal with the limited space. And this small wall planter will make the look of the place more adorable without being stuffy.
For this project, you’ll need a few supplies:
- Square basswood dowel
- Suede lace
- Scissors
- Air plants
- wire
- Wire cutters
To start, cut the wooden board into four equal pieces. Then, cut the dowel rods to size and attach them to the board with wire. Next, add the hooks to the back of the board. Finally, add your plants or other items and enjoy your new wall planter.
17. The Beauty of Vertical Garden
Vertical gardens are a great way to add a pop of color to any room, and they’re perfect for small spaces.
Here’s what you’ll need:
- A piece of wood, cut to the desired width of your planter
- A drill
- 1/4″ dowel rods
- Paint or stain
- Potting soil
- Plants
To start, drill four evenly spaced holes in your piece of wood. Next, insert the dowel rods into the holes. If you’re using paint or stain, now is the time to apply it to the wood.
Once the paint is dry, fill each pot with potting soil and add your plants. Hang your vertical garden on a wall using nails or screws, and enjoy your handiwork.
18. Vertical Planter: Fulfill Your Herb’s Needs
This herb planter is the perfect way to grow fresh herbs indoors, even if you don’t have a lot of space. And the best part is that it’s easy to make with just a few supplies from your local hardware store.
What you will need:
- 12 broomsticks
- Dowels
- Drill
- Screw type L
- 4 cm nails
- Saw
- 10 mm wire
- Water-based varnish
- Measuring tape
19. Reclaimed Wood Wall Planter Shelf
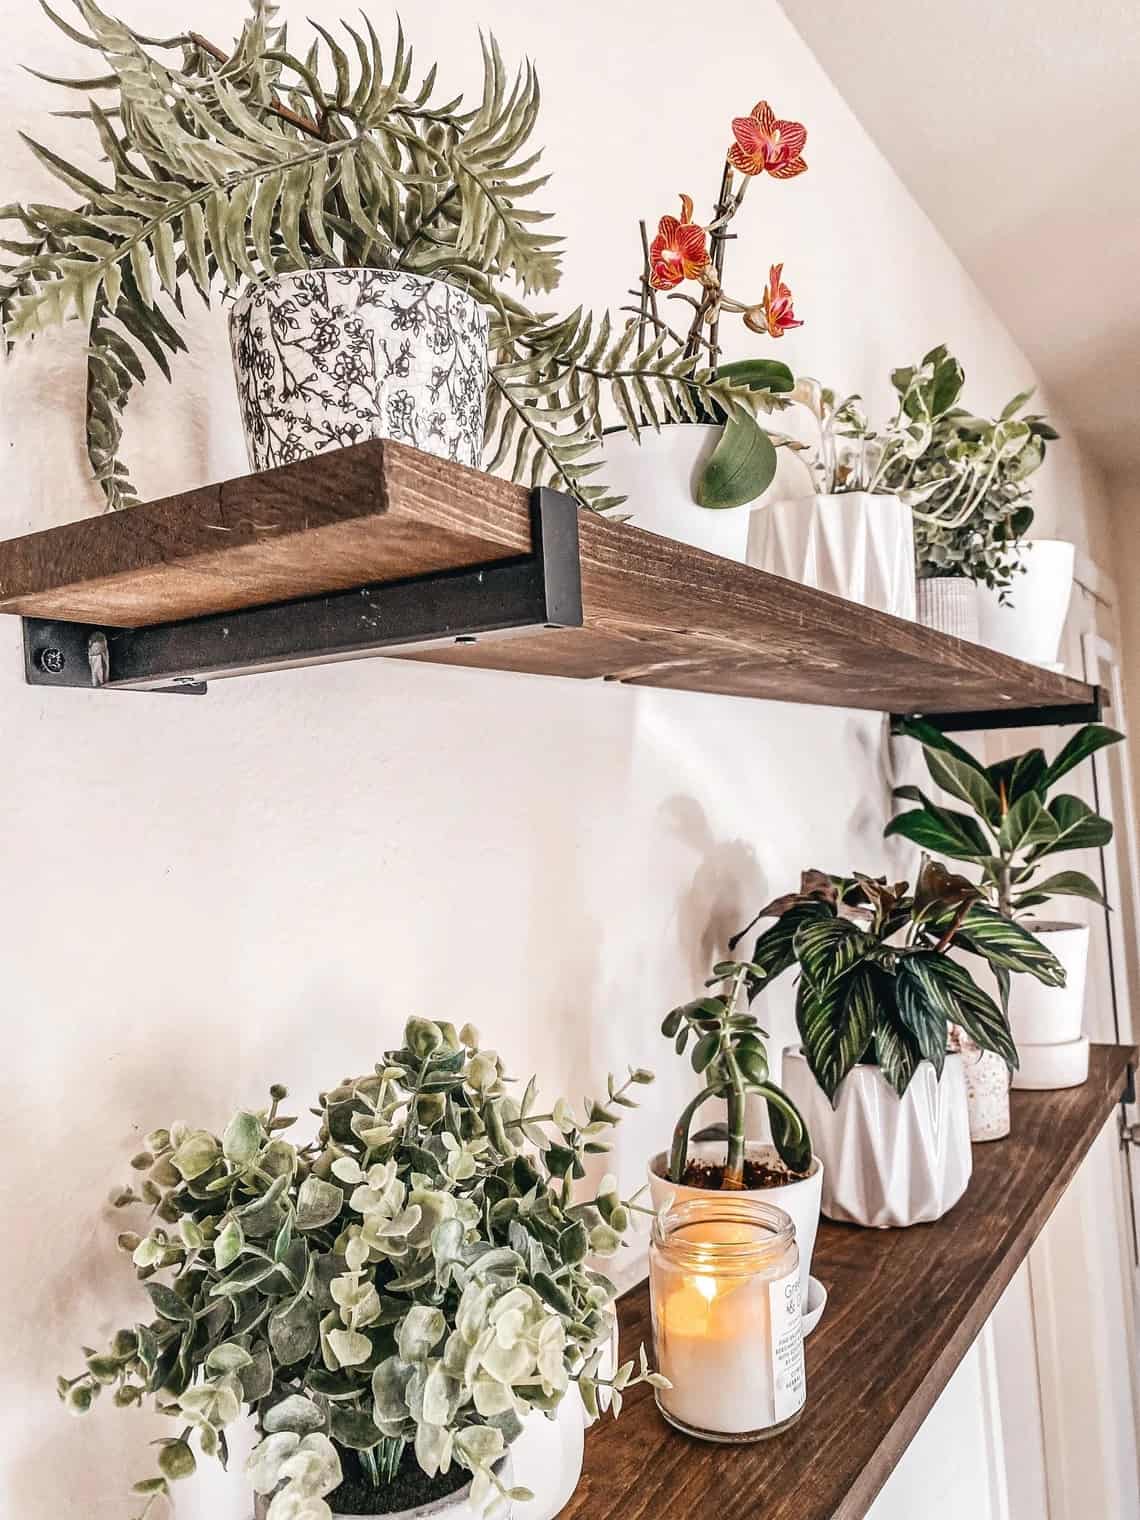
Using reclaimed wood, you can create a beautiful wall shelves that will hold several plants. Just make sure to select a spot that gets plenty of sunlight.
Start by measuring and cutting your wood to size. Then, use a drill to create pilot holes for your screws. Next, attach the brackets to the wall using screws and drywall anchors. Once the brackets are in place, simply slide your shelves into place and fill it with plants.
20. Bookcase-Turned-Wall Planters
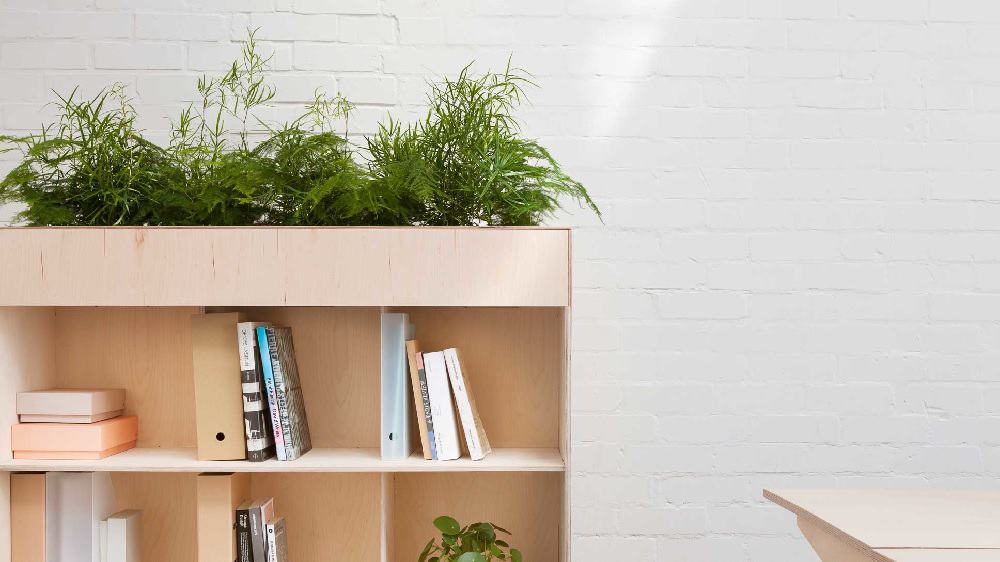
Bookcase-turned-wall planters are a creative way to repurpose an old piece of furniture and make it into something new and beautiful.
To start, remove the shelves from the bookcase and sand down the inside edges. Next, decide how many plants you want to include and measure the bookcase accordingly. Then, use a drill to make holes in the back of the bookcase for drainage. After that, line the bookcase with plastic sheeting and fill it with potting soil. Finally, add your plants.
21. Paint Cans Wall Planters
One of the most popular upcycling projects is taking old paint cans and transforming them into wall planters.
This project is relatively simple and can be done in just a few steps. First, remove the labels from the paint cans and give them a good wash. Next, use a drill to make holes in the bottom of the cans for drainage.
Once the cans are prepped, it’s time to start painting. Use whatever colors you like to create a cohesive look for your wall planter. Once the paint is dry, add some soil and plants, and you’re all set.
22. Copper Pipe Wall Planter Projects
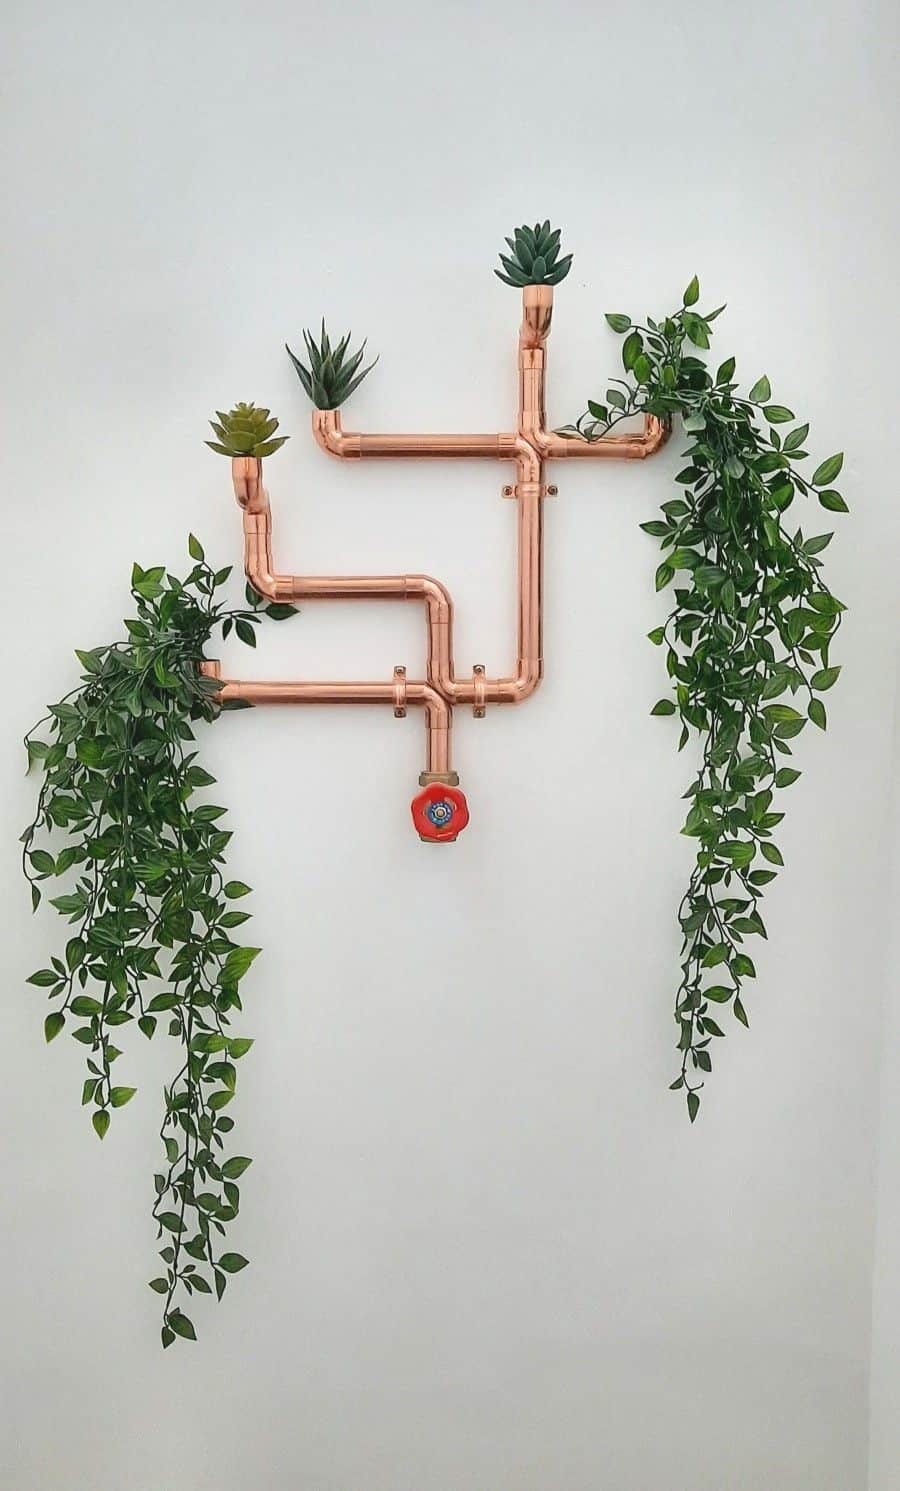
Copper is a beautiful material that can really make your plants stand out, and it’s surprisingly easy to work with. Simply cut a length of copper pipe to the desired size and shape, then use a hammer and nails to affix it to the wall.
Use a level to make sure that your planter is evenly spaced. Once you have hung your planter, fill it with soil and your favorite plants. These copper pipe wall planters are sure to add a touch of whimsy and style to any room in your home.
23. Macrame Wall Hanging Planter
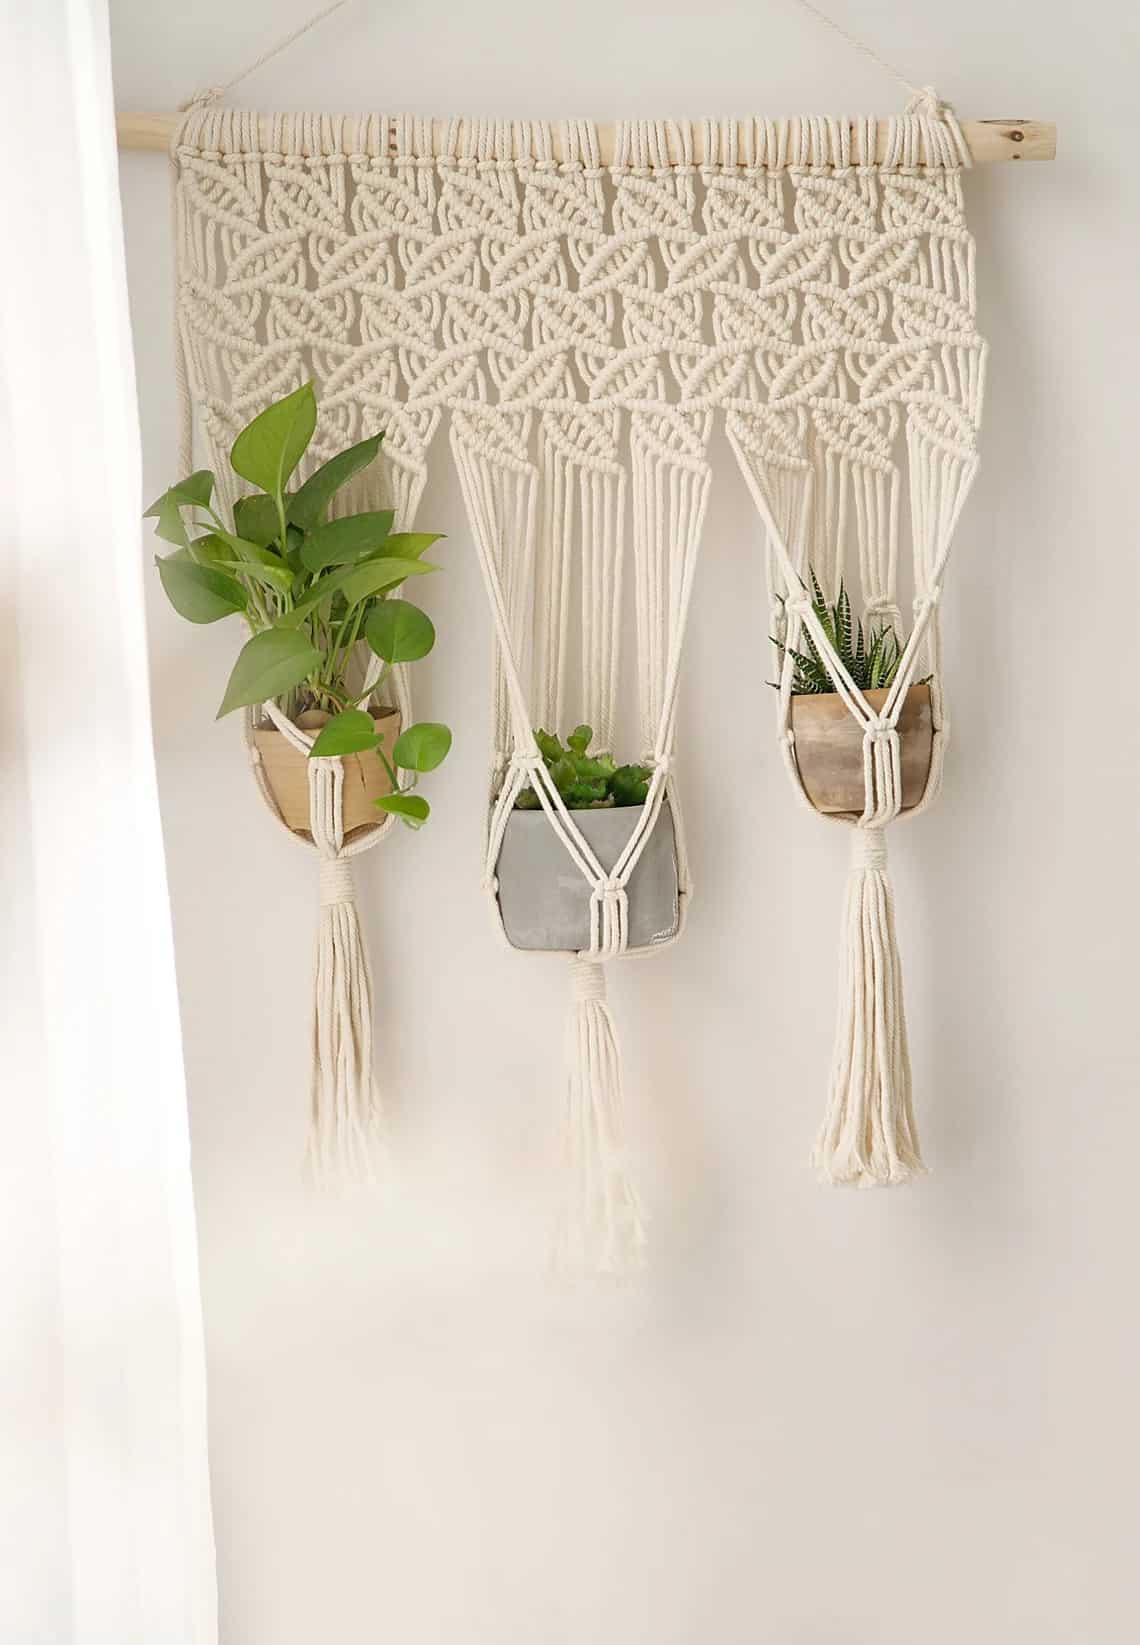
This DIY wall planter project is the perfect way to add a touch of bohemian style to your space, and it’s surprisingly easy to make.
All you need is some rope or twine, a few pots, and some plants. Start by creating a simple macrame hanger using a basic knotting technique. Then, attach your pots to the hanger using more rope or twine. Finally, fill the pots with plants of your choice.
24. Hanging Succulent Sphere
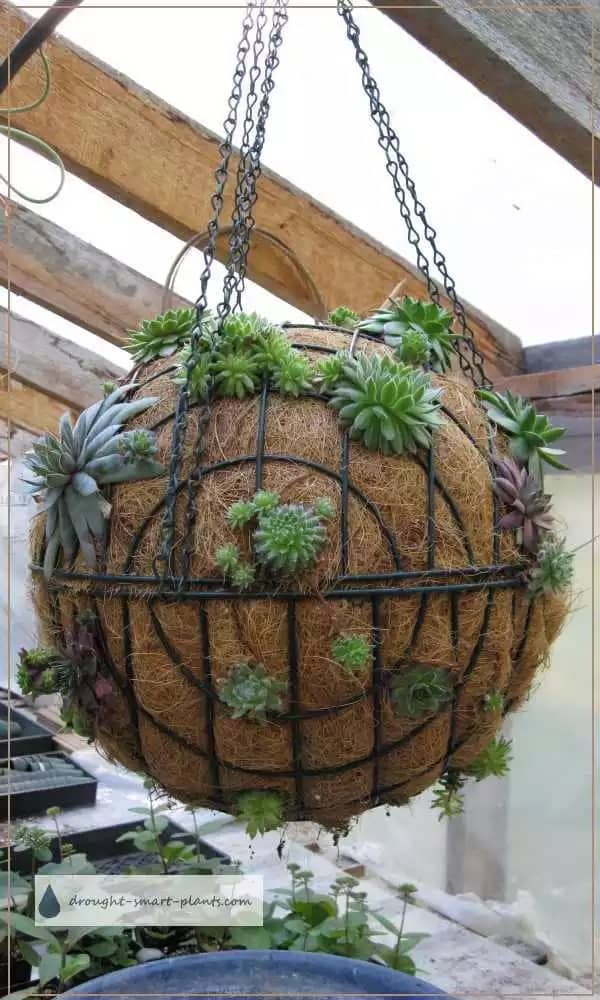
With this hanging succulent sphere, you can add a bit of green texture to any wall and accentuate the natural atmosphere.
A hanging succulent sphere is a beautiful and unusual way to display plants, and best of all, it’s easy to make! All you need is a styrofoam ball, some succulent cuttings, and some sphagnum moss. Simply stuff the moss into the ball, tucking the cuttings in as you go. Once the ball is full, water it well and allow it to drain.
25. Wine Bottle Teardrop Planters
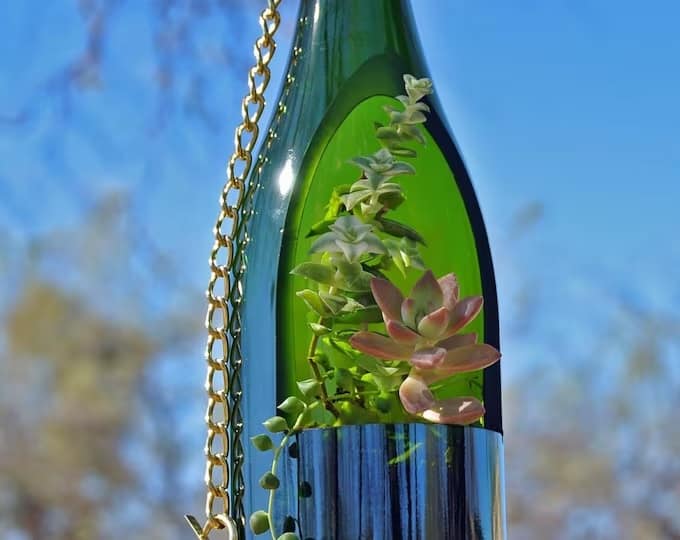
This DIY project is surprisingly easy to make, and it’s a great way to recycle old bottles.
First, remove the labels from the bottles and rinse them out. Then, use a hammer and nail to make two small holes in the bottom of each bottle. Next, thread a length of twine through the holes and tie it off. Finally, fill the bottles with soil and plants of your choice.
26. Upcycled Drawer Wall Planters
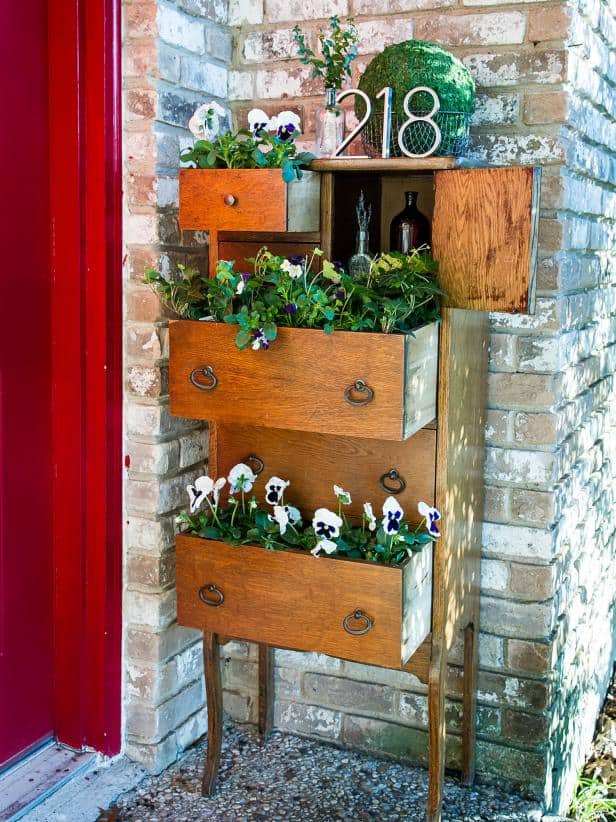
You can consider upcycling drawer and transform it into a unique wall planter to freshen up your living space.
For this project, you’ll need an old dresser drawer (or two, depending on the size of your wall). Just remove the drawer pulls and cut some holes in the front for your plants. Then, attach some brackets to the back and hang it on your wall. Add some soil and plants you desire.
27. Repurposed Tire Wall Planters

It’s a simple project that anyone can do, and it’s a great way to add some style to your home.
All you need is an old tire, some paint, and some plants. First, clean the old tire. Then, paint the tire any color you like. Once the paint is dry, screw the halves to the wall. Finally, add some plants and soil. Consider adding various of plants for a perfect look. Be sure you make some holes for a good drainage. Plus, water regularly and give your plants plenty of sunlight.
28. Colorful Cone Wall Planters
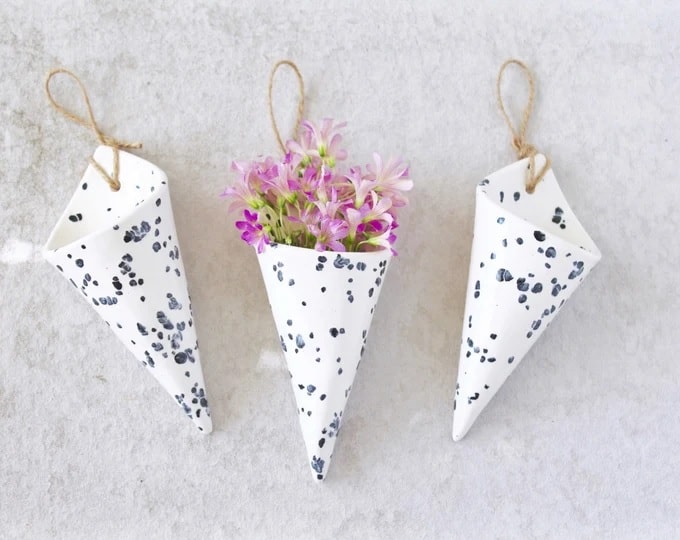
These fun and easy-to-make planters are perfect for adding a splash of color to any room. Plus, they’re great for small spaces since they don’t take up much space.
To make your own cone wall planters, you’ll need:
- Paper cones (you can find these at most craft stores)
- Potting soil -Small plants or flowers
- Paint
First, paint your paper cones if you’d like. Then, fill them with potting soil and add your plants or flowers. Once your plants are in place, simply hang your cone planters on the wall using small nails or adhesive hooks.
29. Modular Hanging Planter

Modular hanging planters are a great option if you don’t have a lot of space. They’re also very easy to make. All you need is some wire, some plants, and some succulent soil.
Start by creating a frame out of wire. Then, line the frame with succulent soil. Plant your chosen plants in the soil and hang it up on the wall. You can easily customize this project to fit any size or shape that you need.
30. Wall-Mounted Plant Stand
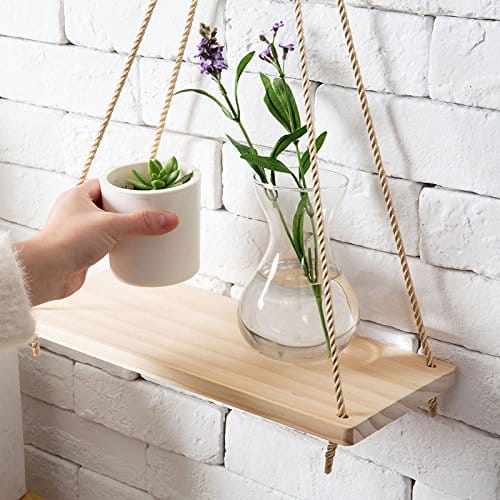
This project is perfect for small spaces, as it takes up minimal wall space while still allowing you to display a variety of plants. Plus, it’s easy to make all you need is a few supplies from your local hardware store.
Start by measuring the area where you want to mount the plant stand. Then, cut two pieces of wood to size and sand down any rough edges. Next, drill four holes in each piece of wood two at the top and two at the bottom. Thread a length of twine through the holes, knotting it securely at the top and bottom. Finally, Hang the wood on your chosen wall space and start adding your plants.
31. DIY Felt Pocket Wall Planters
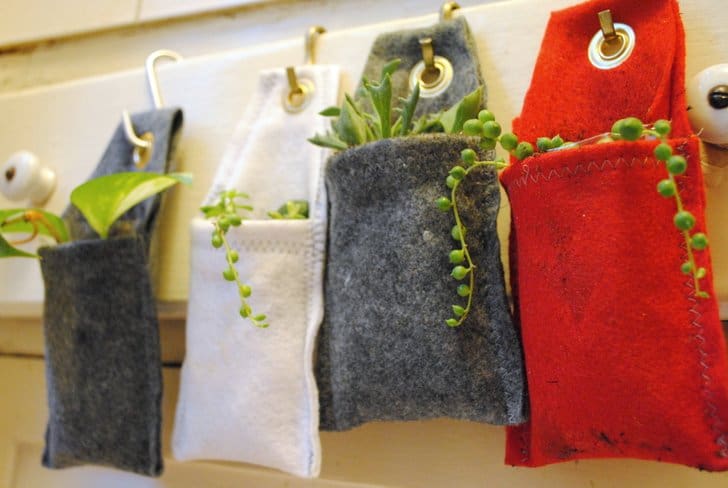
This project is easy enough for even the most novice crafter, and the results are sure to brighten up any room.
To get started, you’ll need some felt, a hot glue gun, scissors, and some plants. Cut the felt into rectangular shapes, and then use hot glue to attach them to the wall in a pleasing arrangement. If you’re using real plants, be sure to add some drainage holes to the bottom of each pocket.
32. Hanging Tea Cup Wall Planters
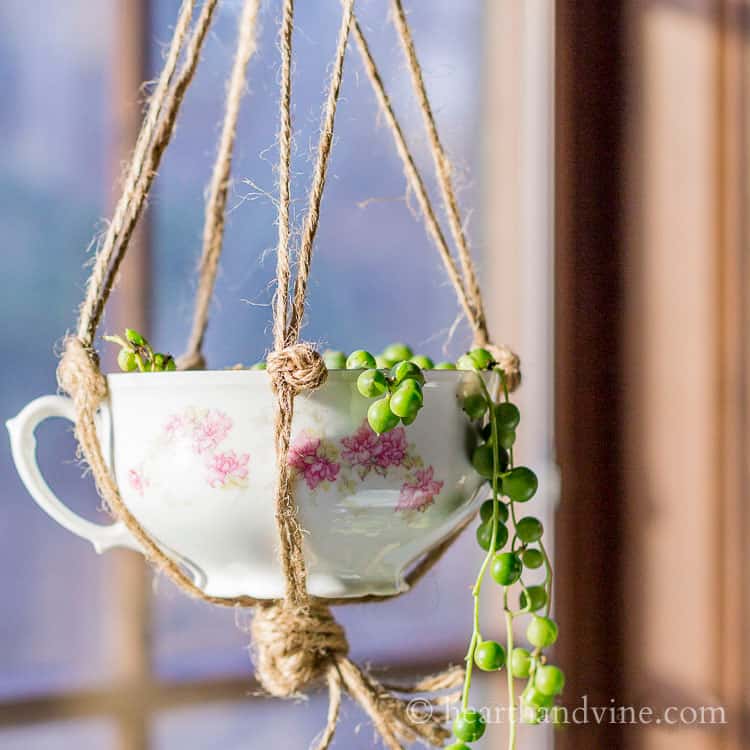
This project is easy to make, and you can use any size or style of tea cup that you like. Just make sure that the cup has a hole in the bottom so that water can drain out.
To make a hanging tea cup planter, start by drilling a small hole in the bottom of the tea cup. Then, thread a length of twine through the hole and knot it securely. Next, fill the cup with potting soil and plant your favorite trailing plant.
These 32 wall planter projects are easy, creative, and will definitely breathe some life into your home. By adding greenery indoors, you can improve your health in many ways including reducing stress, purifying the air, and lifting your mood. Plus, houseplants make great gifts for friends and family! So get crafty and add a little green to your walls today.