Napkins play an important role during mealtime. Not only do they protect your clothes from spills and stains, but they can also add a touch of personality to your dining table.
It is not a big deal to create your own napkin that will make your mealtime feel fancier. In this blog post, we will share 31 creative DIY napkin to spruce up the table decorations in your dining room.
Let’s figure out the list of ideas down below.
Table of Contents
1. An Easy To Make Project

To make your own napkins, you’ll need:
- Fabric (we recommend cotton or linen)
- Scissors
- Iron-on interfacing.
First, cut your fabric into squares of the desired size. We recommend about 16″x16″ for dinner napkins and 12″x12″ for cocktail napkins.
Next, cut a piece of interfacing that’s slightly smaller than your fabric square and iron it onto the wrong side of the fabric. This will help to keep your napkin from fraying.
Finally, hem all four sides of the fabric square using a sewing machine or needle and thread.
2. Infuse A Delightful Ambiance To Your Table
The colorful napkin will accentuate the cheerful ambiance to your mealtime. To make them, simply choose your favorite fabric in any pattern or color, then cut it into squares. You can either hem the edges or use bias tape for a clean finish. Once you’ve made your DIY napkins, they’ll be ready to use at your next meal. Not only will they add a pop of color, but they’ll also remind you of the personal touch you put into making them.
3. DIY Luxury Napkin
It can be used as an elegant addition to any dinner party or formal affair. The secret to making this DIY Luxury Napkin lies in its luxurious fabric and meticulous stitching. Use only the finest materials to make it, and your guests will be impressed by your attention to detail. With a little effort, you can create a DIY Luxury Napkin that looks like it came from a high-end store.
First, choose the fabric you want to use. You can find luxurious fabrics at your local fabric store, or you can use something more simple like cotton or linen. Next, cut the fabric into squares that are about 18 inches wide. Once you have your squares cut out, hem the edges with a sewing machine or manually. Then, fold the napkin in half and press it with an iron. Finally, fold the napkin in half again and press it one last time. After all, put the silver ring to add a luxury touch. That’s it!
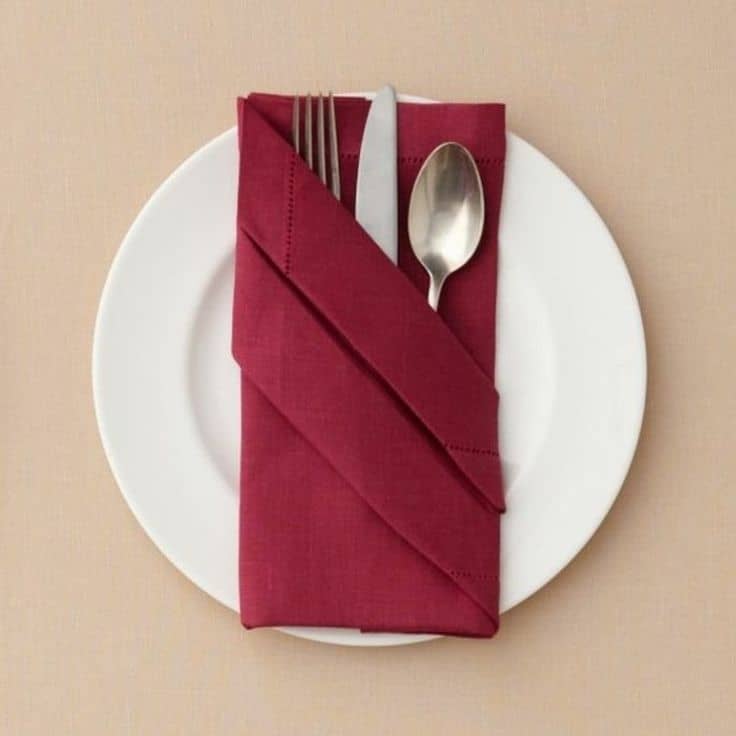
4. Rustic Style At Its Best
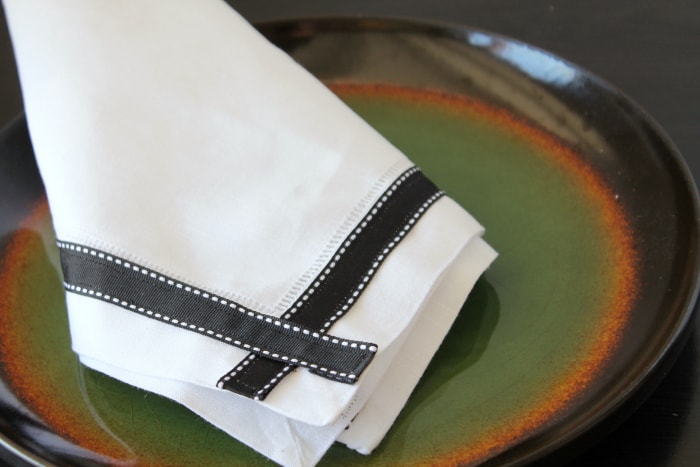
It is perfect for creating a cozy and beautiful atmosphere in your home. They are easy to make and can be customized to match your decor. All you need is a little fabric and some black ribbon. Start by cutting the fabric into squares. Then, stitch to attach the ribbon around the edge of the fabric square. Be sure to leave enough room at the top of the square so that you can fold it over and create a pocket for the napkin. Once the pocket is created, fold the napkin over and tuck it into the pocket. You can then decorate the napkin with whatever design you like.
5. DIY Elegant Napkin
To make your own elegant napkin, start by cutting a square of fabric that is about twice the size of a standard napkin. Fold the fabric in half diagonally to create a triangle, then fold the triangle in half again. Next, take the two top corners and fold them down to meet in the middle. Finally, tie a piece of ribbon around the center to secure the folds. For an extra touch of elegance, you can add a monogrammed initial or other embellishment to the center of the napkin. Now your Elegant Napkin is ready to use.
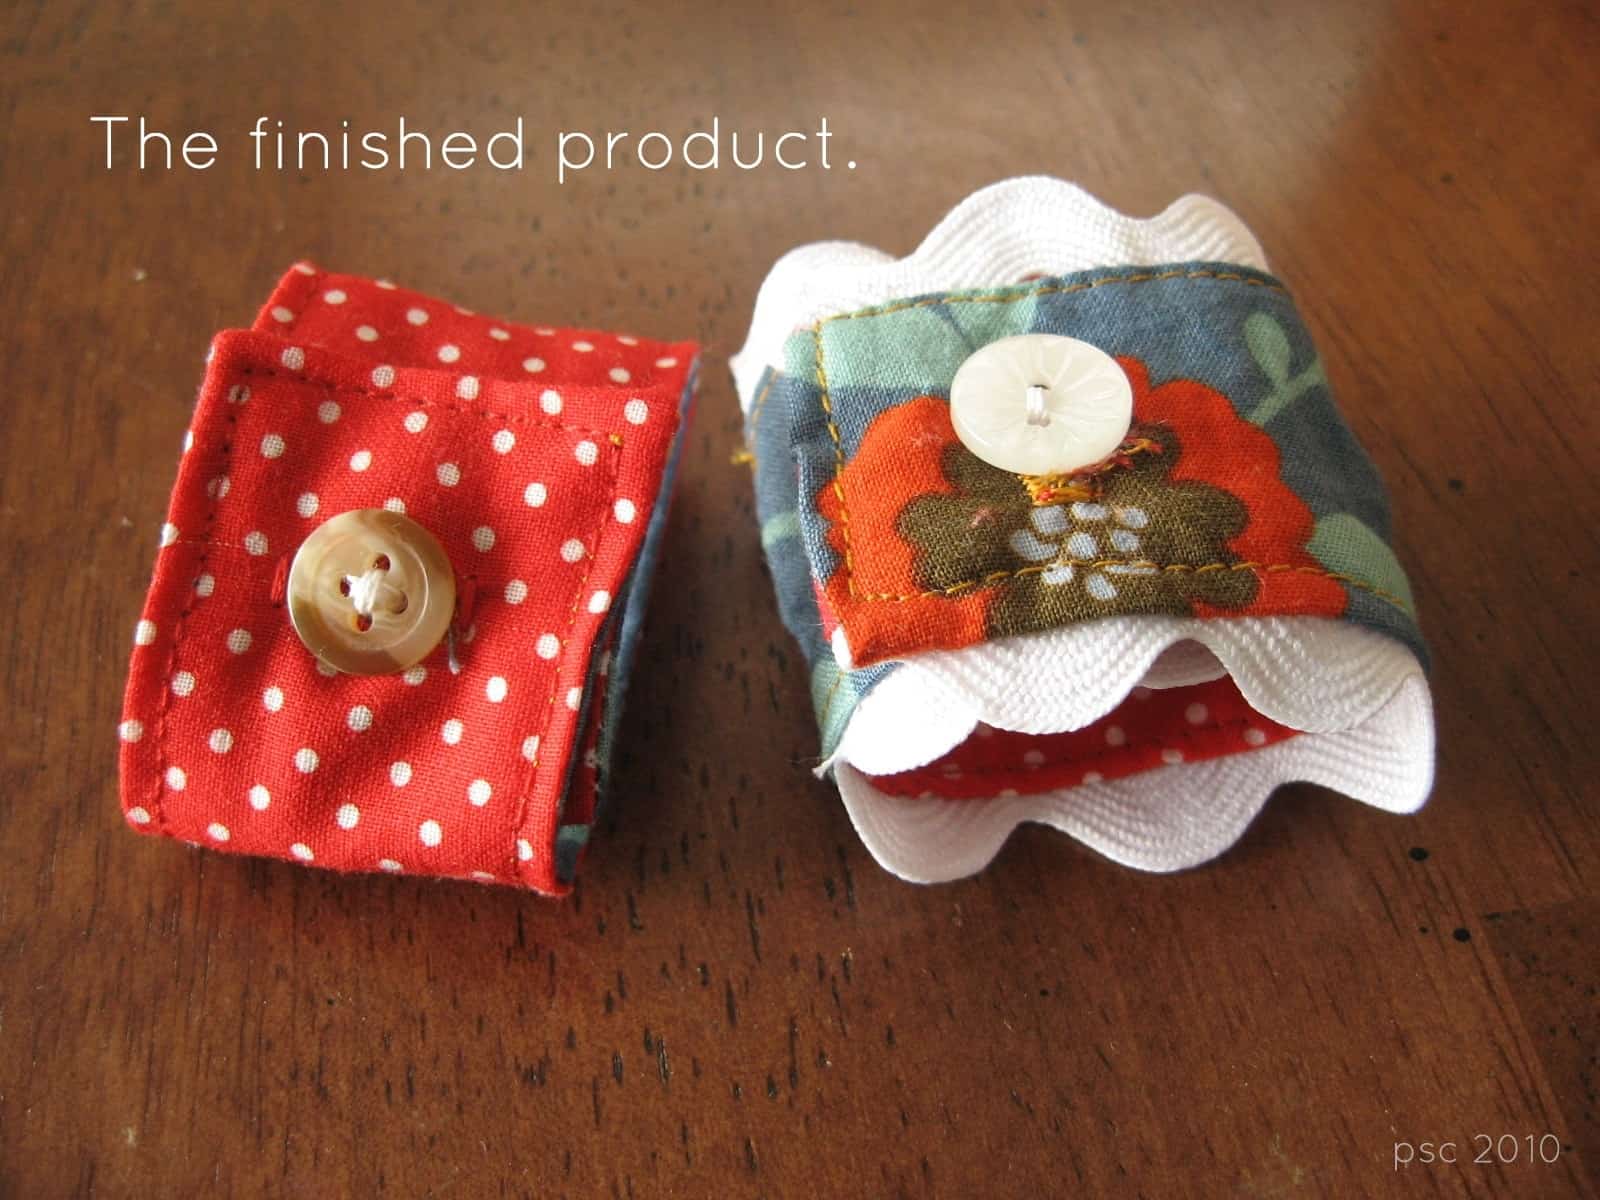
6. DIY Shabby Chic Napkin
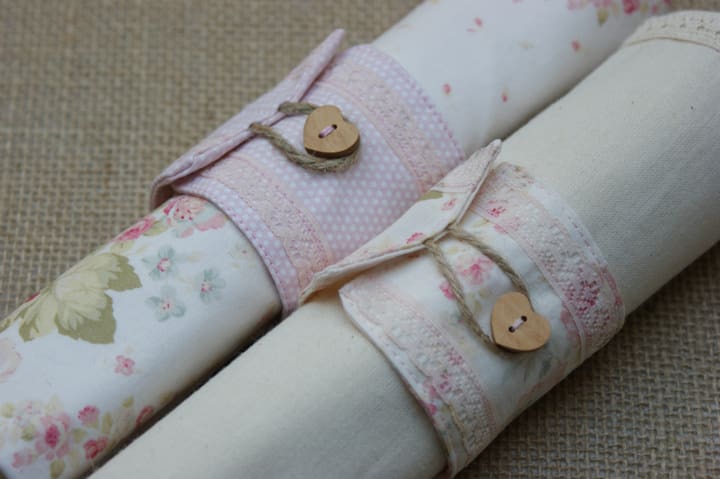
This style of napkin is perfect for those who want the beauty and traditional look without spending a lot of money. Plus, it’s easy to do! All you need is a floral patterned fabric, lace, wooden button, and the twine. Complement the napkin with the fabric ring that is beautified by the lace, and secure it with the heart-shaped wooden button. You can roll-up the napkin before use to for a better look.
7. Complement Your Romantic Moment
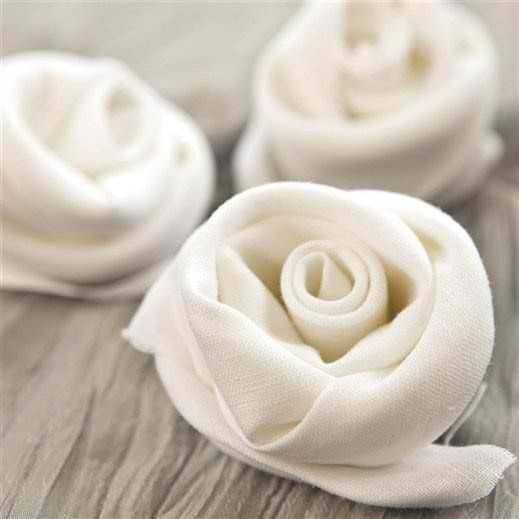
It is not only beautiful, but it is also very easy and fast to do. You only need a few supplies, some time and patience. DIY Napkin roses are perfect for decorating your table, as a gift or even as a boutonniere.
The steps are very simple: first, take your napkin and fold it in half vertically. Then, fold the napkin in half again horizontally. Next, take the top corner of the napkin and begin to roll it downwards tightly, making sure that the edges of the napkin are aligned. Once you reach the end of the napkin, tuck the end underneath the rose. Finally, fluff up the petals of the DIY Napkin rose to give it a more realistic look. They are a cool idea to add a touch of romance to your dinner table. So, grab a napkin and give it a try.
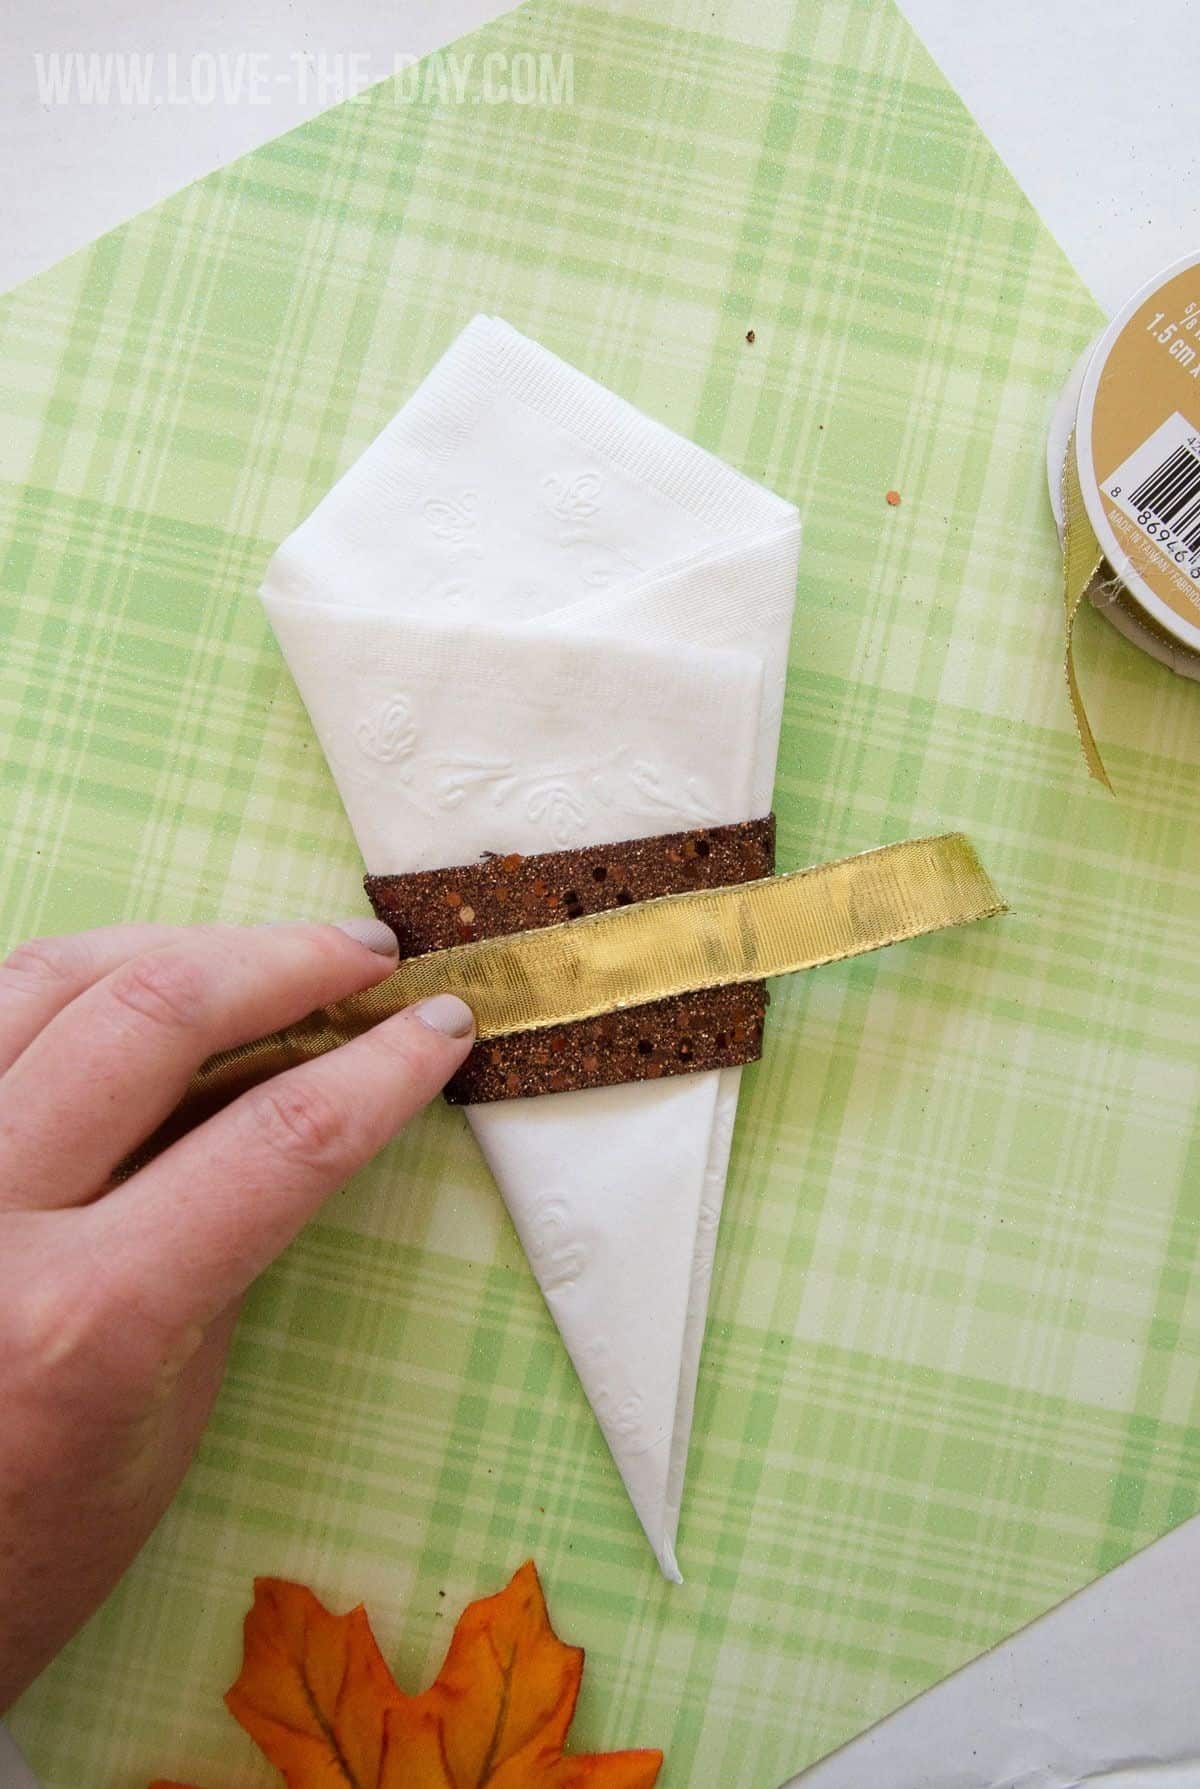
8. Brilliant Quick Christmas Napkin Folding
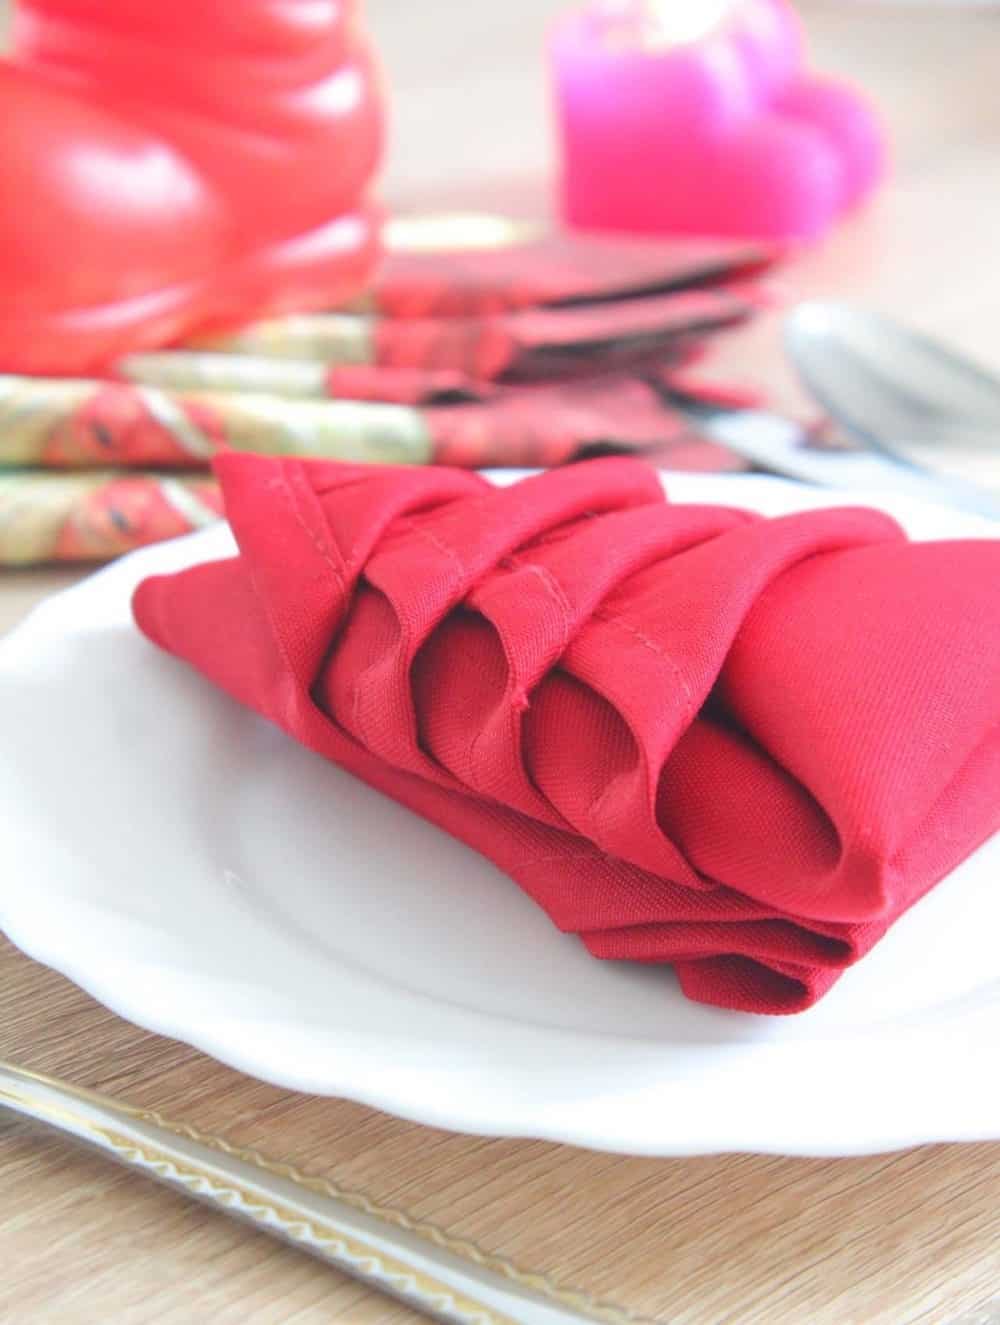
It is a smart choice to add a touch of elegance to your table setting. It is simple to make, and the finished product looks beautiful. This project is relatively simple and only requires a few supplies. Opt for the red fabric material, then follow the instruction below:
- Press your napkins well. This is optional, but it helps to make the fabric crispier, which in return will help with holding the tree shape later.
- Fold up the napkin in half, making sure the ends are smooth and are lining up.
- Fold in half again, to the right, making sure corners are smooth and lining up.
- Spin the napkin so the folded corner points away from you.
- Fold up each corner, then flip the napkin over.
- Fold outer corners to opposite sides, making sure the tops are parallel to you.
- Flip back again and fold up the corners again, tucking each under the one above them.
9. DIY Vintage Napkin
If you’re planning a vintage-themed event, consider DIYing your own napkins. With just a few simple supplies, you can create beautiful, one-of-a-kind napkins that will add an elegant touch to your table scape. Best of all, this project is easy to do and doesn’t require any sewing.
You can simply get the printed fabric, opt for the floral pattern. Both colorful or pale paint look best for the vintage look.
10. Sew The Lace
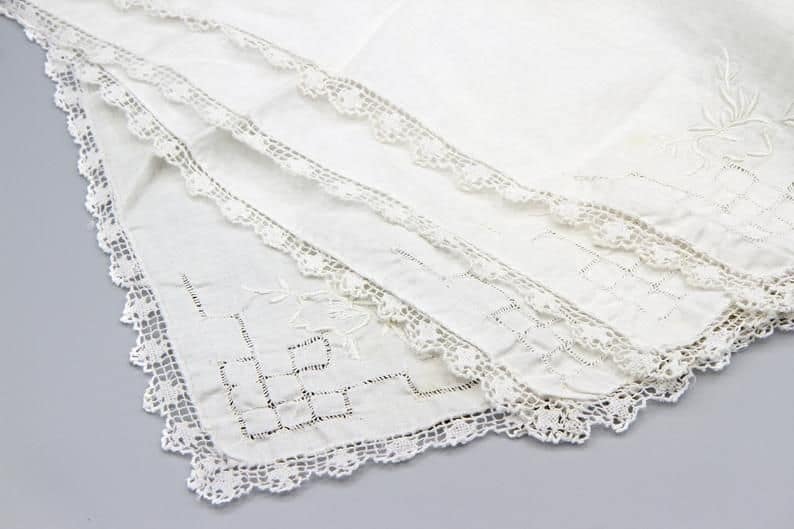
It is very easy and quick to make. It creates a cute and pretty look on your tablescape. It only requires a few supplies that you may already have on hand.
You will need:
- White linen
- Scissors
- Straight pins
- Iron
- Measuring tape or ruler
- Lace fabric
With these simple supplies, you can create DIY Lace Napkins in any color or style that you like. This napkin is perfect for any occasion, from formal dinners to casual picnics.
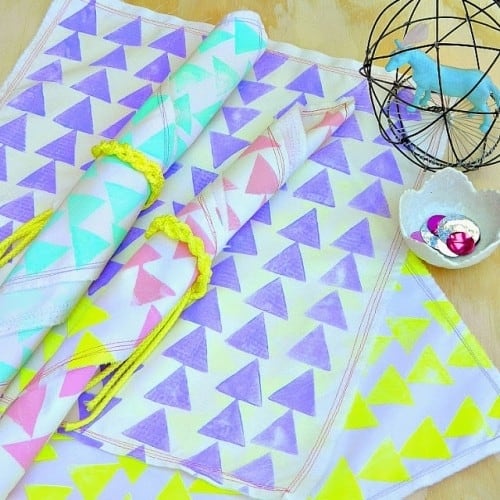
11. Upgrade Your Crochet Skills
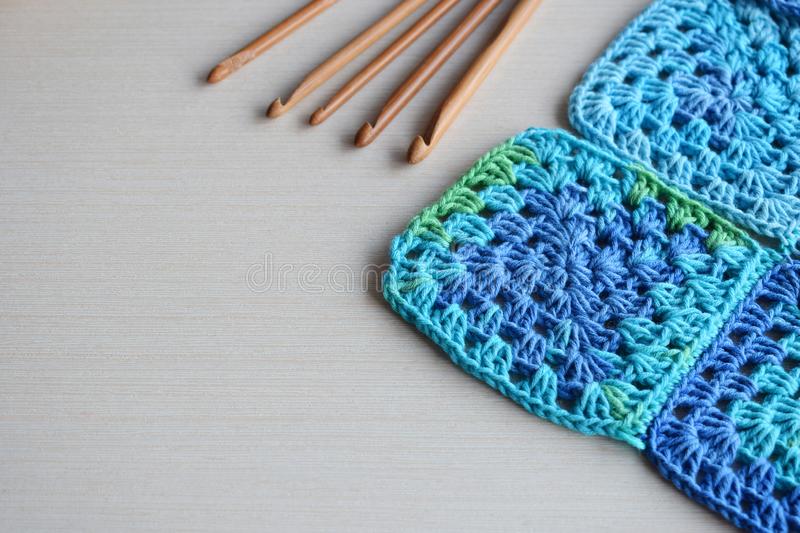
DIY Crochet Napkin creates a unique look for your DIY project. They are easy to follow and the final product looks great. With a little time and patience, you can have a beautiful new addition to your home decor. The first thing you need to do is find the right size crochet hook. You will also need some yarn and a tapestry needle. Once you have all of your supplies, you are ready to get started. Start by chaining twenty-four stitches. Then, single crochet in each stitch across. When you reach the end of the row, turn your work and chain one stitch. Single crochet in each stitch across again. Repeat this process until your DIY Crochet Napkin measures approximately eighteen inches square. Once you reach the desired size, cut your yarn and weave in any loose ends.
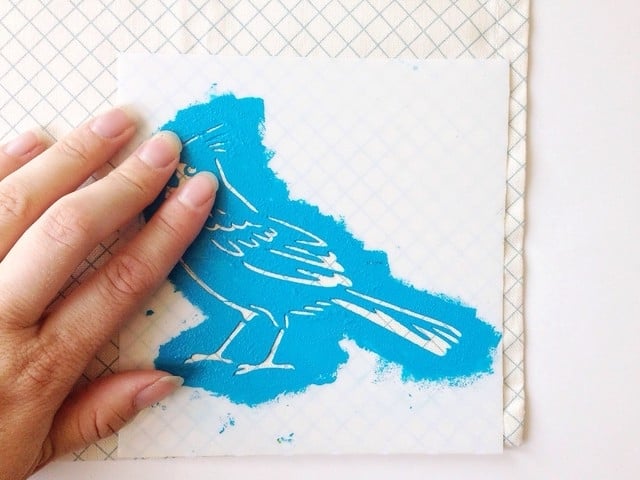
12. DIY Stenciled or Freehand Painted Fabric Napkins
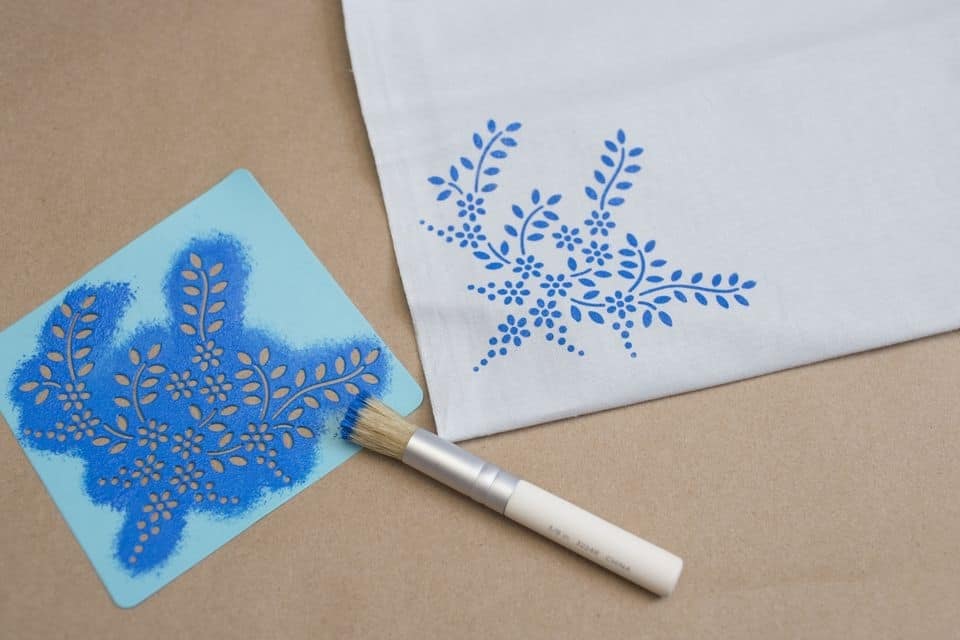
You can use any type of fabric paint or even regular acrylic paint. If using regular paint, add a few drops of fabric medium to the paint to help it adhere to the fabric. Choose a design or motif for your napkin. You can either freehand paint the design or use a stencil. If using a stencil, place it on the fabric and secure with painter’s tape. Paint over the stencil with your chosen paint color. Let the paint dry completely before removing the stencil. You can either iron the napkin to set the paint on or let it air dry. These make great gifts or party favors.
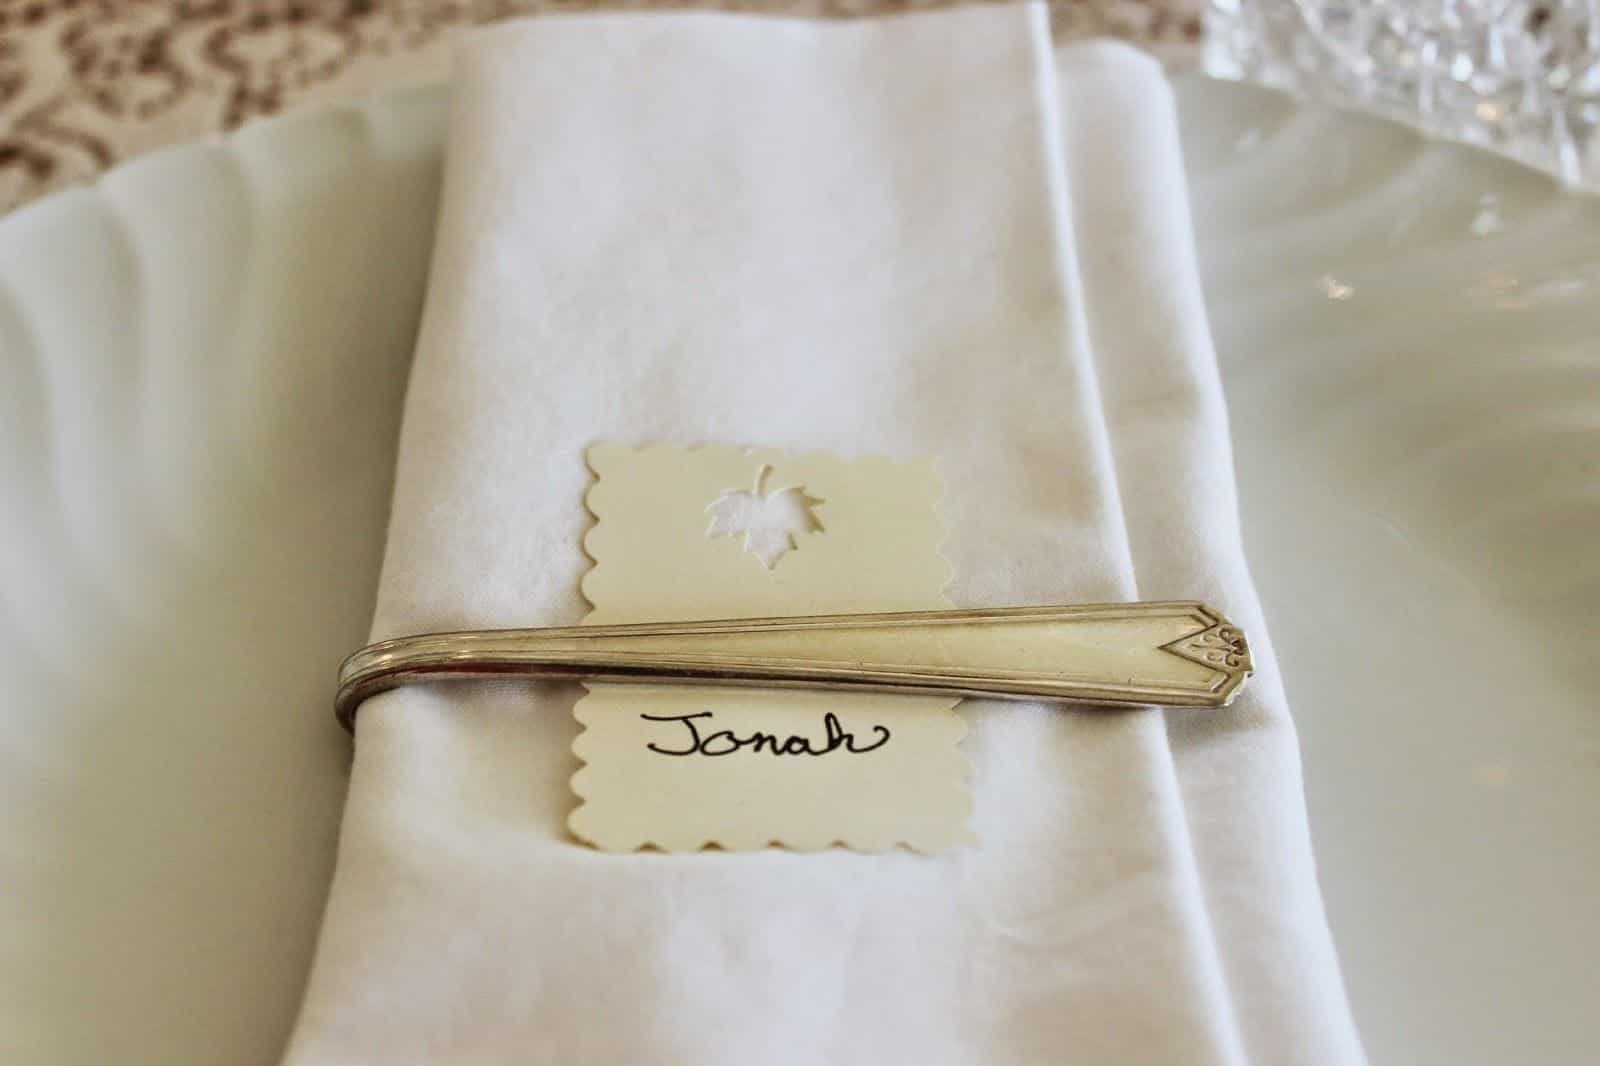
13. Make It Personalized
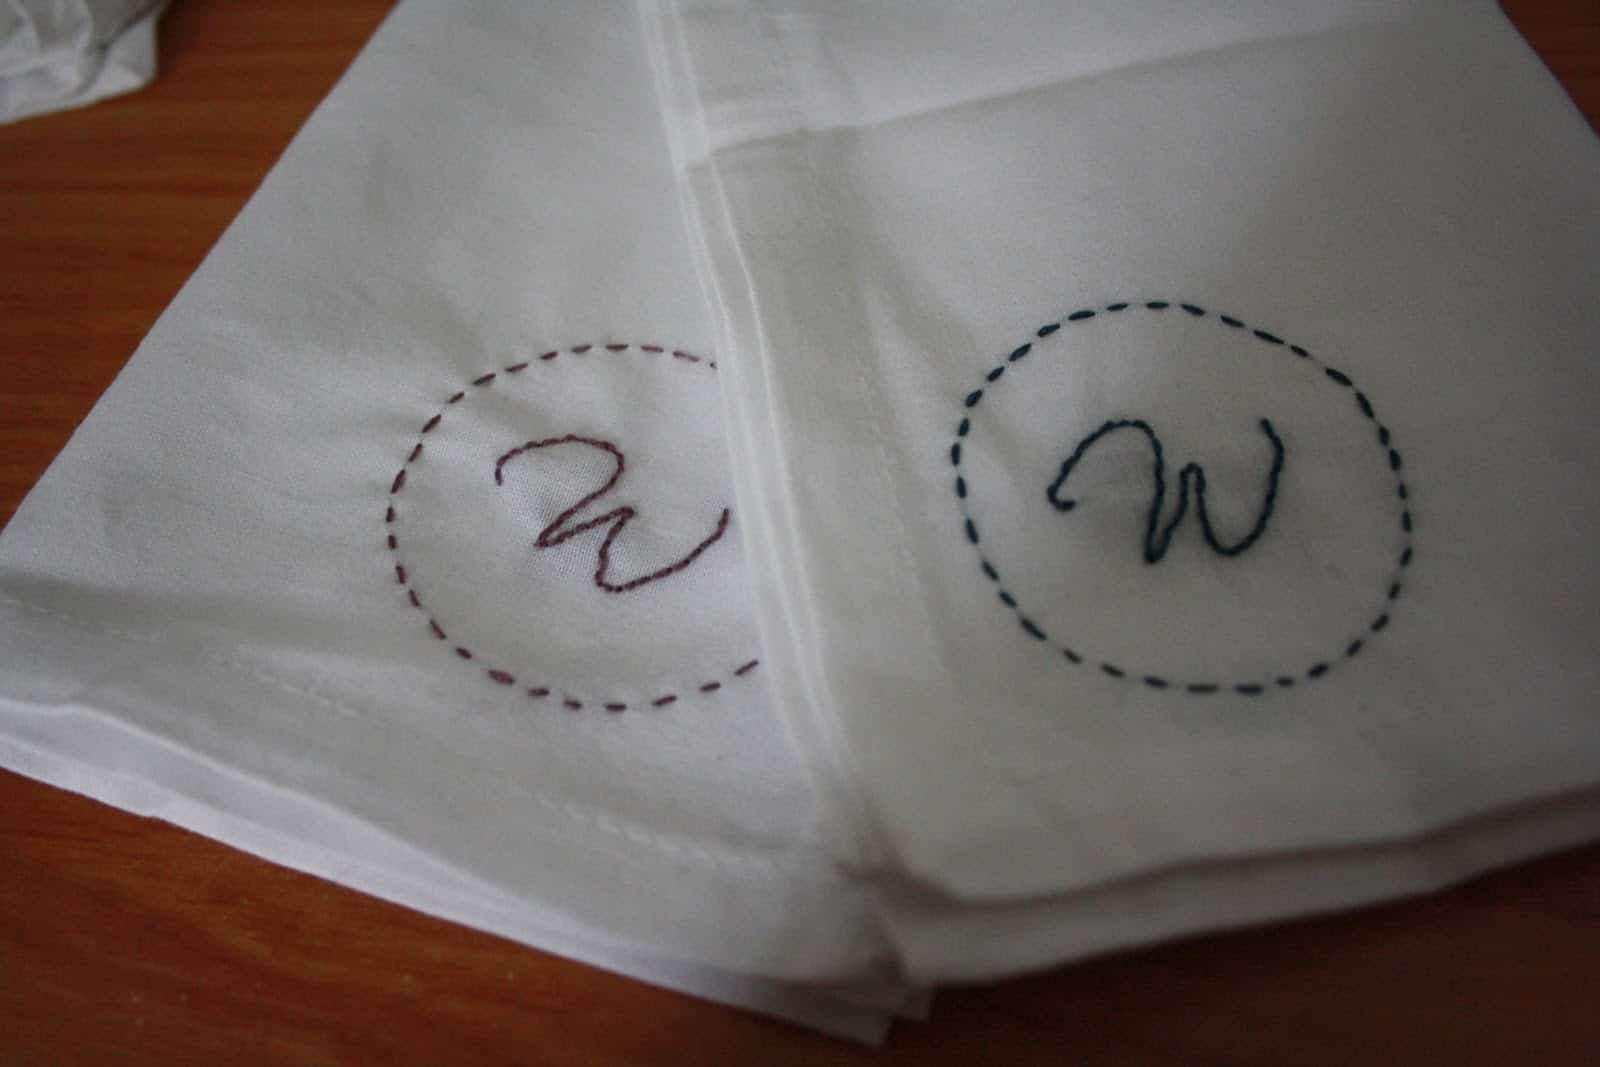
This DIY project is simple, quick, and relatively inexpensive. Whether you are hosting a dinner party or just want to add a special touch to your everyday meal, these napkins are a smart hack to do it. Plus, it’s a great way to add a personal touch to your holiday table. All you need to get started is a set of white napkins, some embroidery thread, and a needle. You can find all of these supplies at your local craft store. Once you have everything you need, simply choose a font and stitch your guests’ initials onto the corners of the napkins. For an extra special touch, try using metallic thread or adding a small decorative element like a sprig of holly.
14. DIY Painted Patterned Fabric Napkins
DIYing your own napkins is a great way to save money and get creative with your table décor. And, it’s actually quite simple to do! Start by choosing some fabric napkins that you love. Then, using a stencil and some fabric paint, add a little bit of color and pattern to the napkins. Once the paint is dry, simply hem the edges of the napkins to finish them off. Voila! You’ve just created some beautiful DIY painted patterned fabric napkins that are sure to impress your guests.
15. Stamp The Linen Fabric
Stamping your own dinner napkins is such a fun and creative activity to do with friends or family. You can make them in different shapes, sizes, colors – the possibilities are endless! To make DIY stamped linen cocktail/dinner napkins, you will need a piece of linen, a stamp, and some fabric paint. First, wash and iron the linen. Then, using the stamp and fabric paint, create a design on the linen. Once the paint is dry, cut the linen into squares and hem the edges. It is an inexpensive way to add style to your next dinner party.
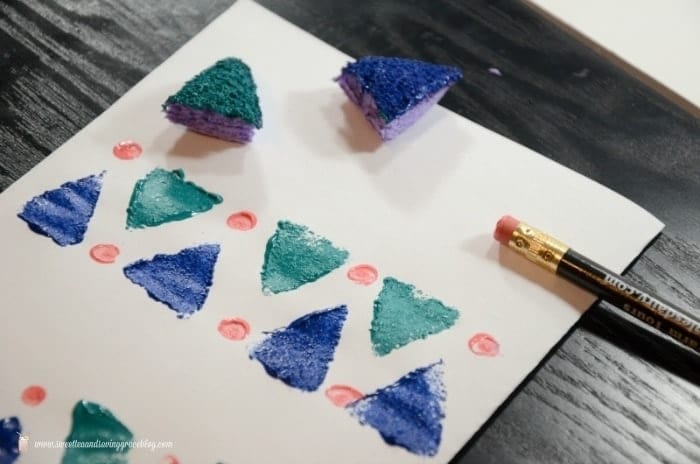
16. DIY Screen Printed or Block Printed Fabric Napkins
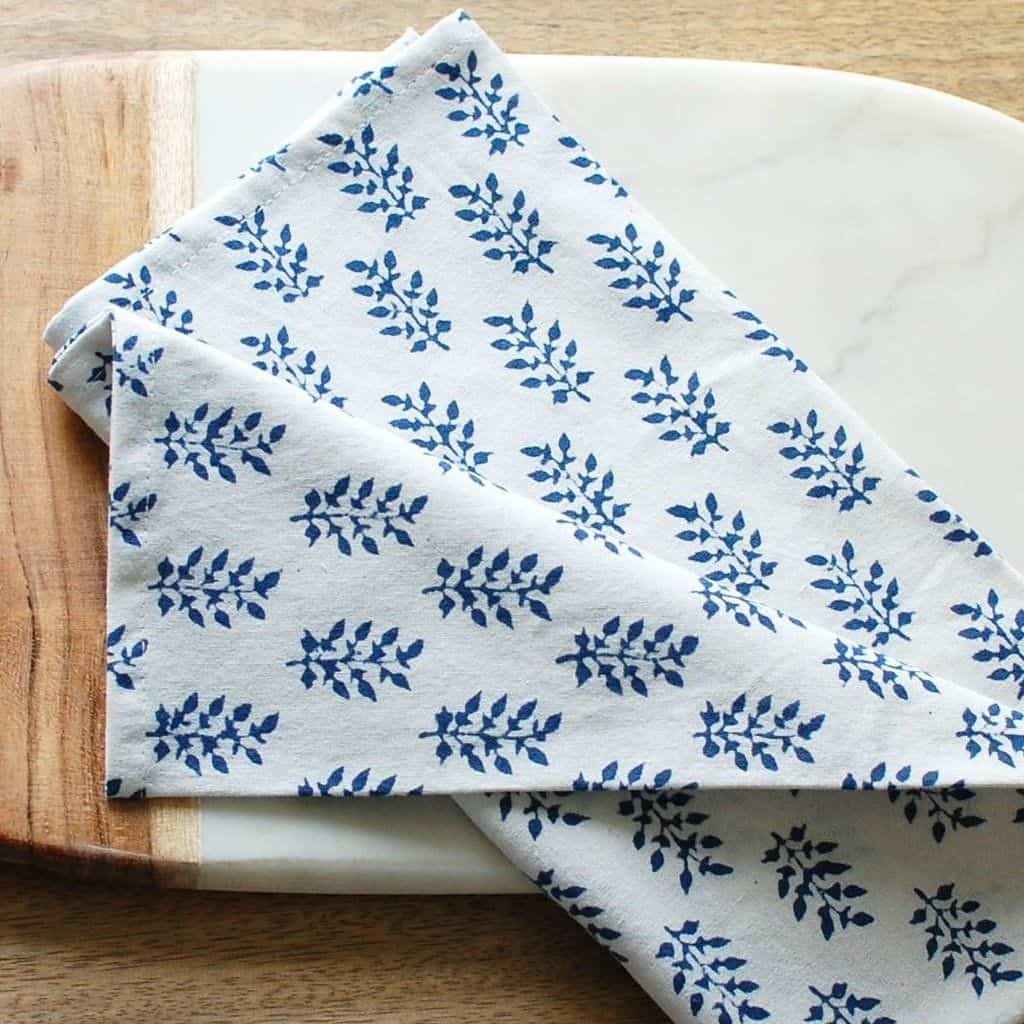
You can choose to screen print or block print your own design onto the fabric, or you can simply purchase pre-printed napkins. Either way, it is a fun and easy way to dress up your table. Screen printing is a great option if you want to create a complex design, or if you want to print multiple colors. Block printing is a simpler process, and it’s ideal for more simplistic designs. It is a good choice to add a personal touch to your dining room table. Whether you choose to screen print or block print your own design, DIY napkins are a brilliant way to dress up your table.
17. Natural Dyed Napkins
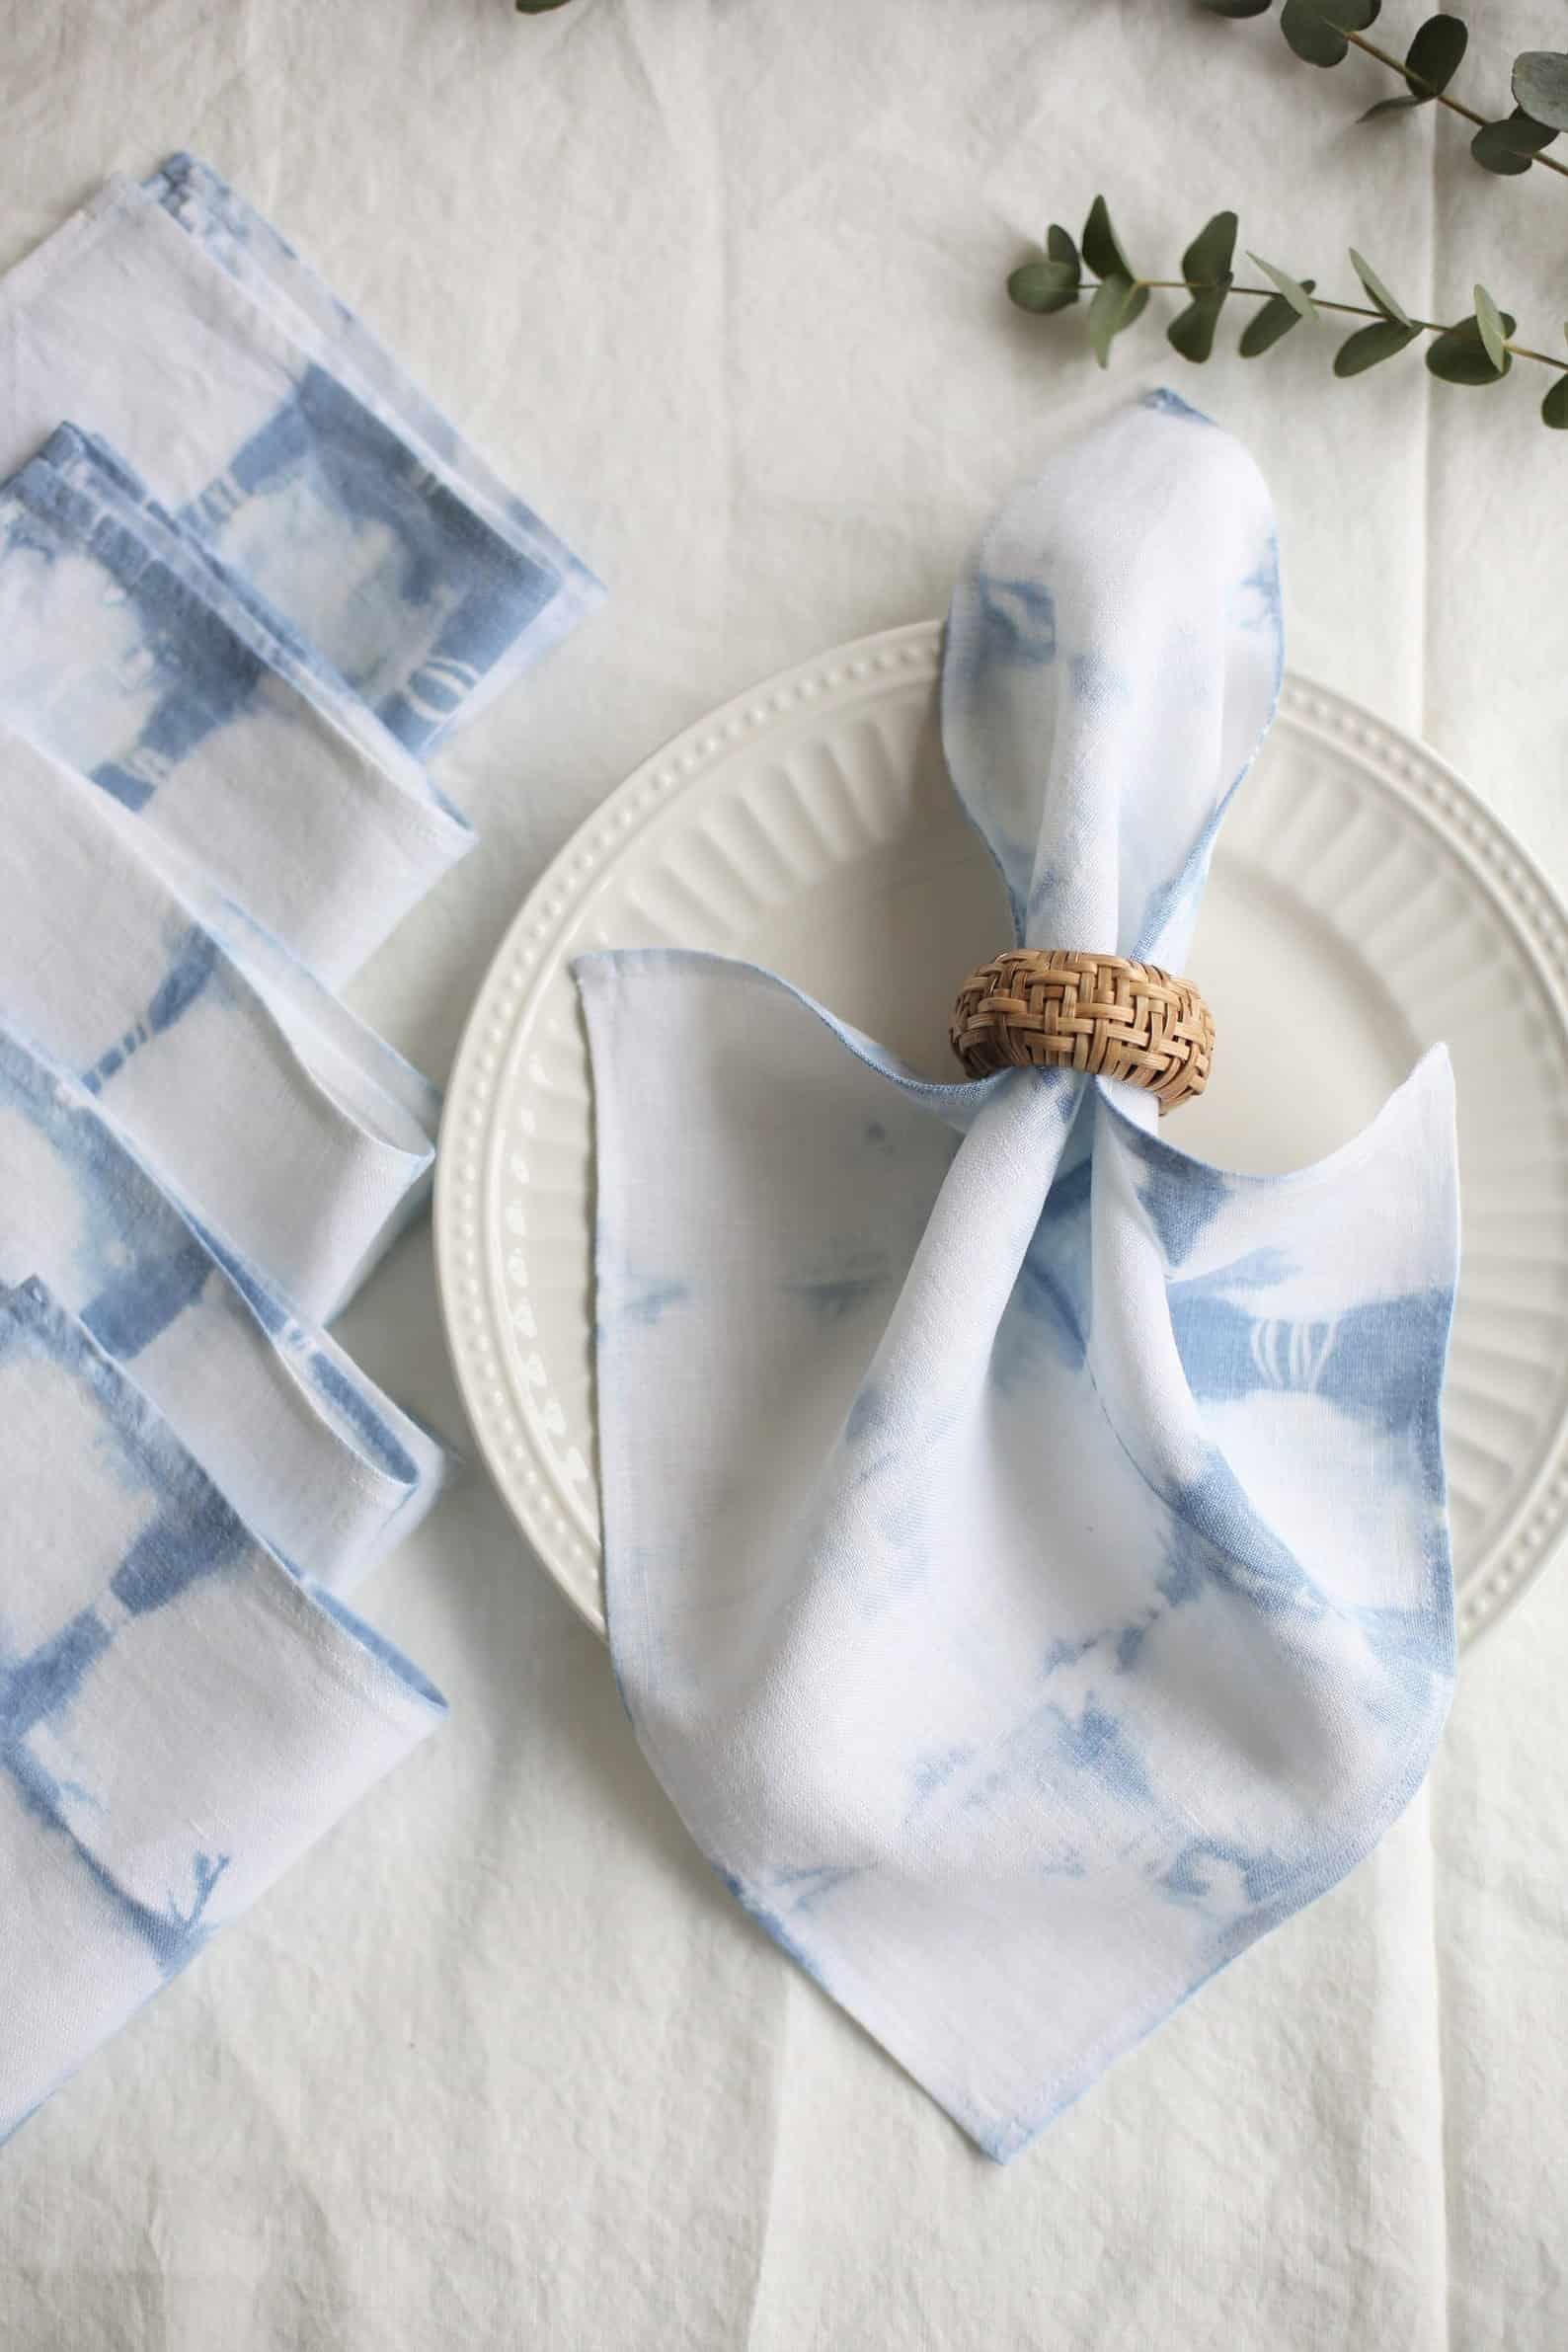
There’s definitely more than one way of making these little guys look nice, and adding your own personal touch is an easy task with some fabric paint or dye. You can make them in any color or pattern you like, and they’re much cheaper than buying ready-made napkins. Plus, it is a fun and easy project that even beginners can tackle. If you’re interested in making your own Bleached or Natural Dyed Fabric Napkins, here’s what you’ll need:
- White cotton fabric
- Bleach
- Natural dye (if desired)
- Scissors
- Sewing machine
First, cut your fabric into squares that are about 18 inches wide. If you’re using bleach, mix it according to the manufacturer’s directions and soak your fabric squares in the bleaching solution for about an hour. Rinse the fabric well and allow it to air dry. If you’re using natural dye, follow the package directions to prepare the dye bath.
Soak your fabric squares in the dye bath for about an hour, then rinse them and allow them to air dry. Once your fabric squares are dry, fold them in half and press with a hot iron. Then, fold each side in to meet in the middle and press again. Finally, fold in half once more and press. Now your napkins are ready to use!
18. Create An Affordable Napkin

One simple way to DIY Napkin is to tie-on a cute fabric bow or flower. This method works best with rectangular or square napkins, but you could even use it on a round one if you were feeling especially brave. Simply fold your napkin in half lengthwise, and then in half again. Tie a piece of string or ribbon around the center, and then fluff out the ends to create a fuller look. You can also make DIY No-sew Fabric Napkin Rings by simply hot gluing a strip of fabric around a store-bought napkin ring. Just be sure to use a low-temp glue gun so you don’t damage the napkin ring.
19. DIY Fabric Napkin Rings with Buttons
DIY Fabric Napkin Rings with Buttons can be made using any type of fabric, and they are a cool idea to use up scrap fabric that you may have leftover from other projects. To make DIY Fabric Napkin Rings with Buttons, simply cut strips of fabric that are about 2 inches wide and 8 inches long. Then, fold the strip in half lengthwise and sew the long edges together. Next, turn the strip right-side out and sew a button onto each end.
20. DIY Beaded Napkin Rings
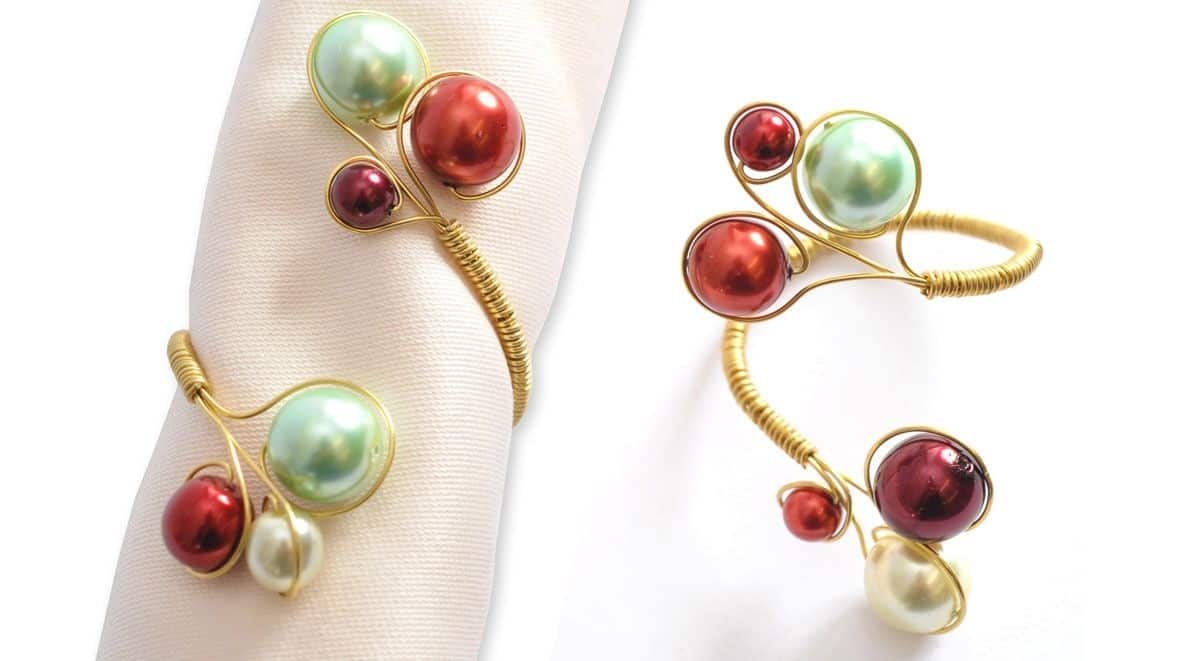
Add some sparkle to your holiday table with these DIY beaded napkin rings. They’re easy to make and can be customized to match any décor. Simply thread beads onto wire or string, and then wrap the wired napkin around silverware. For a more elegant look, try using Swarovski crystals or other jeweled beads. You can find these at your local craft store.
Adding some sparkle to your holiday table with these DIY beaded napkin rings. They’re easy to make and can be customized to match any décor. Simply thread beads onto wire or string, and then wrap the wired napkin around silverware. For a more elegant look, try using Swarovski crystals or other jeweled beads.
21. Sequinned Fabric Napkin Rings
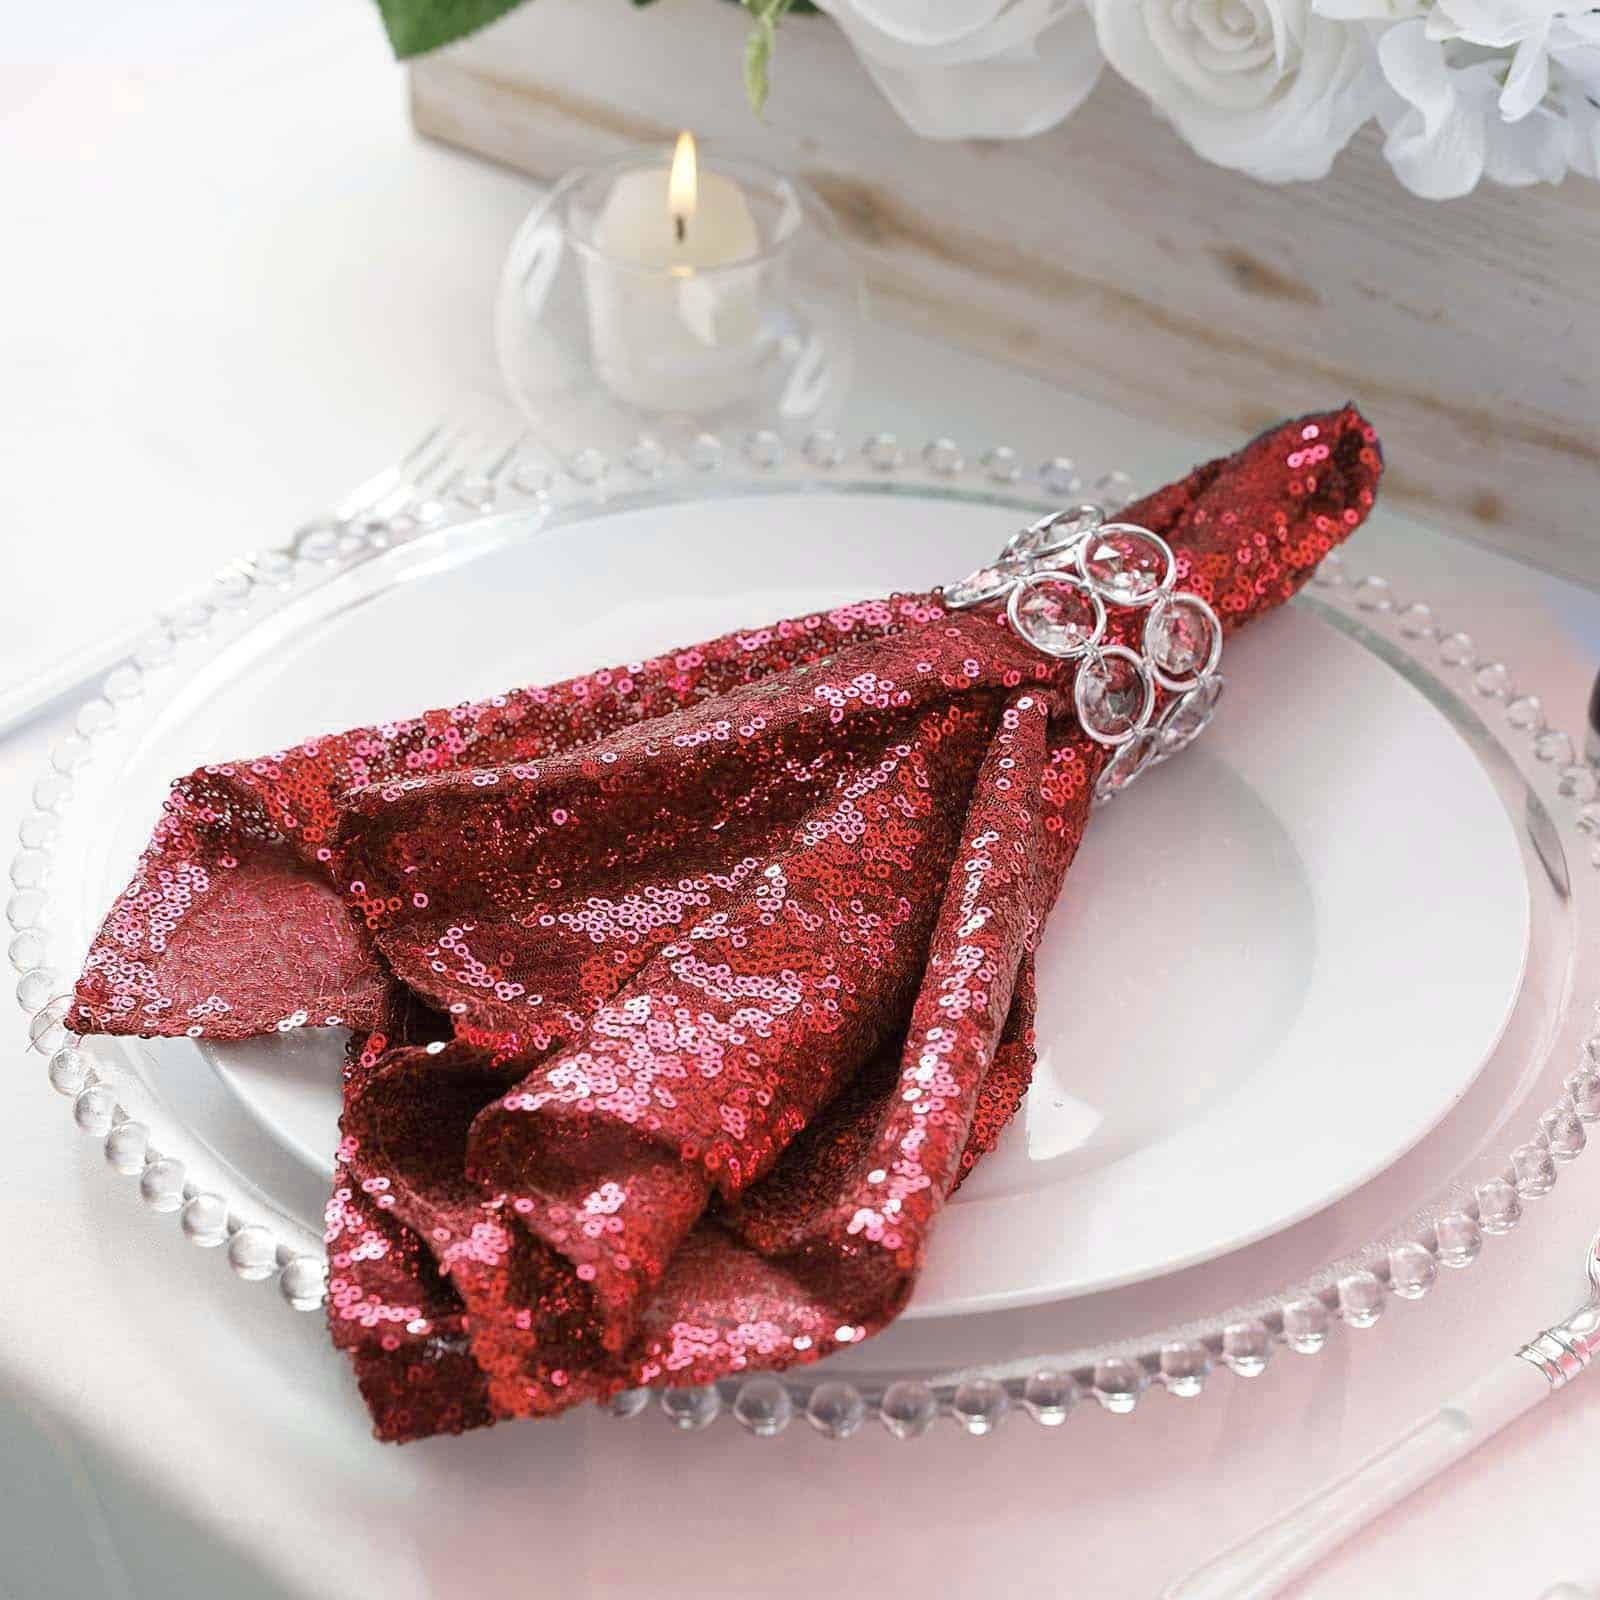
This is a quick and easy project that will dress up any table setting, whether it’s for a holiday meal or everyday dinner napkin rings. All you need is some fabric scraps, glue, and glitter or sequins. Simply cut the fabric into strips, glue on the glitter or sequins, and let dry. Then wrap the strips around the napkins and secure with a piece of ribbon or twine.
22. DIY Feather or Faux Fur Trimmed Fabric Napkin Rings
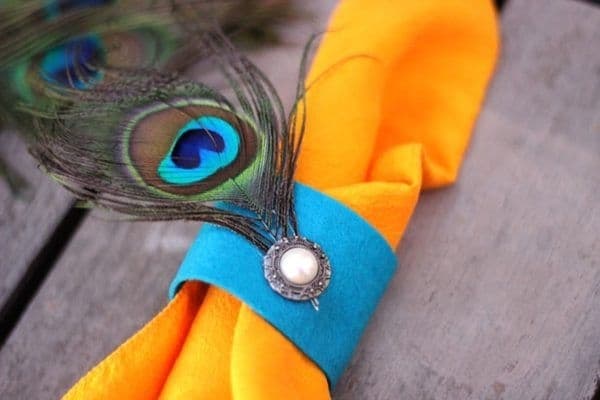
It is such a smart option to make use of faux fur fabric napkin ring. They are also easy to make, and you can use any fabric, trims, and embellishments you like. To make these DIY napkin rings, you will need:
- Scissors
- Fabric glue
- 1/2 yard of fabric (I used faux fur, but you could use any type of fabric)
- Feathers or faux fur trim
- Ribbon or twine Cut your fabric into strips that are 1 1/2 inches wide and 12 inches long
Cut your feathers or trim into pieces that are 6 inches long. Fold the strip of fabric in half lengthwise and glue the raw edges together. Then glue the feather or trim to the center of the strip. Wrap the strip around your napkin and tie it in place with ribbon or twine.
23. DIY Simple Folded Fabric Napkins
This super simple folded napkin is a fun project that you can do with your kids. You can start from folding techniques that will dress up your tabletop without a lot of effort. Basic cloth napkins work best for these folds.
- Start with a square cloth napkin.
- Fold the napkin two ways into a square
- Fold the corner down evenly
- Fold the second layer down and tuck the corner behind the first layer
- Fold the third layer down the same way as the second layer
- Fold the left side back 1/3 of the square
- Then fold the right side the exact same way
24. DIY Fancy Folded Fabric Napkins

Create your own napkin that will make your dinner time feel like at a fancy restaurant. Opt for the red satin fabric for a fancier look, then complement it with the silver ring.
First, fold the fabric in half from corner to corner to create a triangle
Then, starting at the flat edge, fold the napkin inwards in two-inch folds, repeating until it is all folded
Next, fold the right side of the napkin 1/3 of the way towards the center on a 45-degree angle, repeat on the other side, folding the left end of the napkin 1/3 of the way inwards on a 45-degree angle. You should have about a 5-6″ flat edge at the bottom.
Finally, pinch the center of the folded napkin together and feed one end through the center of the napkin ring until it is halfway through the napkin
25. DIY Rolled Fabric Napkins
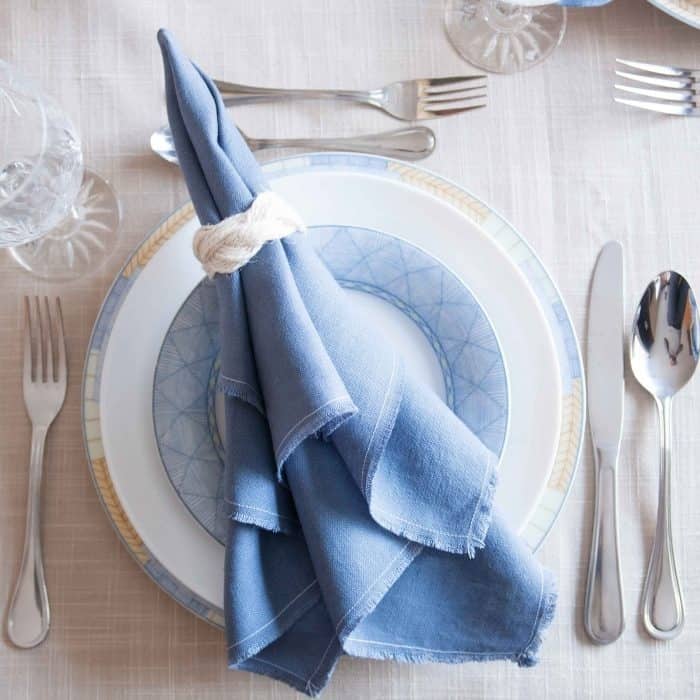
DIYing your own rolled fabric napkins is a fun and easy project that anyone can do. All you need is some fabric, a sewing machine, and a little bit of time. You can simply fold the fabric into a triangle, then pinch the center point of the napkin. After that, put the ring to secure the napkin to stay.
This napkin infuses nautical atmosphere, which would be perfect to complement your mealtime during the summer.
26. DIY Easter Bunny Napkins
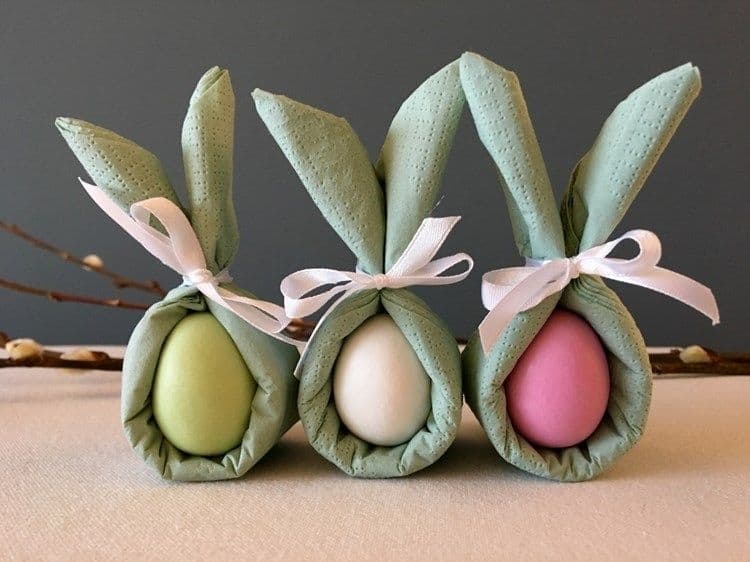
Make the Easter dinner look gorgeous look with these kinds of napkin. Gather the sage napkins and the small pink ribbon.
To make the bunny napkin, see the instruction below:
- Start at one corner, tightly roll up the napkin corner to corner
- Fold the roll in half, bringing the two ends up to meet each other
- Tie the roll with the ribbon part way up the folded end, leave a slight in the middle
- Trim the ends of the ribbon and place the egg in the hole in the center of the napkin, slightly folding the ends out to form ears
Napkins can be used in a variety of ways to add some personality and pizzazz to your dining table. With just a little bit of creativity, you can come up with napkin ideas that will make mealtimes more enjoyable for both you and your guests. So get started on those DIY napkin projects and have fun with it!