There’s nothing like a to get the creative juices flowing. It’s a great way to test your creativity and see what you’re capable of. Plus, it’s always satisfying to see a project through from start to finish, knowing that you did it all yourself.
It’s never too late to make your home feel like it was always meant for you. With just a few supplies and some elbow grease, you can create an that will perfectly suit the space in which it resides. Check out these 20 inspiring to get started.
From rustic to modern, there’s something for everyone.
Table of Contents
1. Repurpose a Wooden Crate
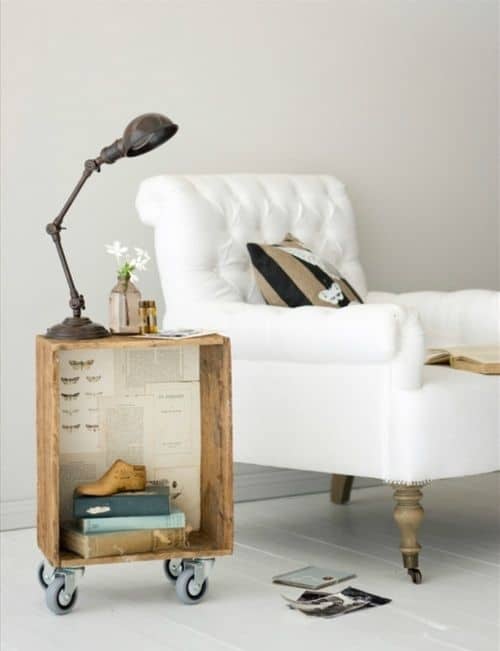
This is easy to do and only requires a few supplies. To start, sand down the crate to remove any rough edges. First, sand down the crate to smooth out any rough edges. Then, choose a or color and apply it evenly to the . Once the is dry, use a drill to attach some caster wheels to the bottom of the crate. This will make it easy to move around, even when it’s loaded with books or magazines. Finally, add a glass top to protect the surface and give the a polished look.
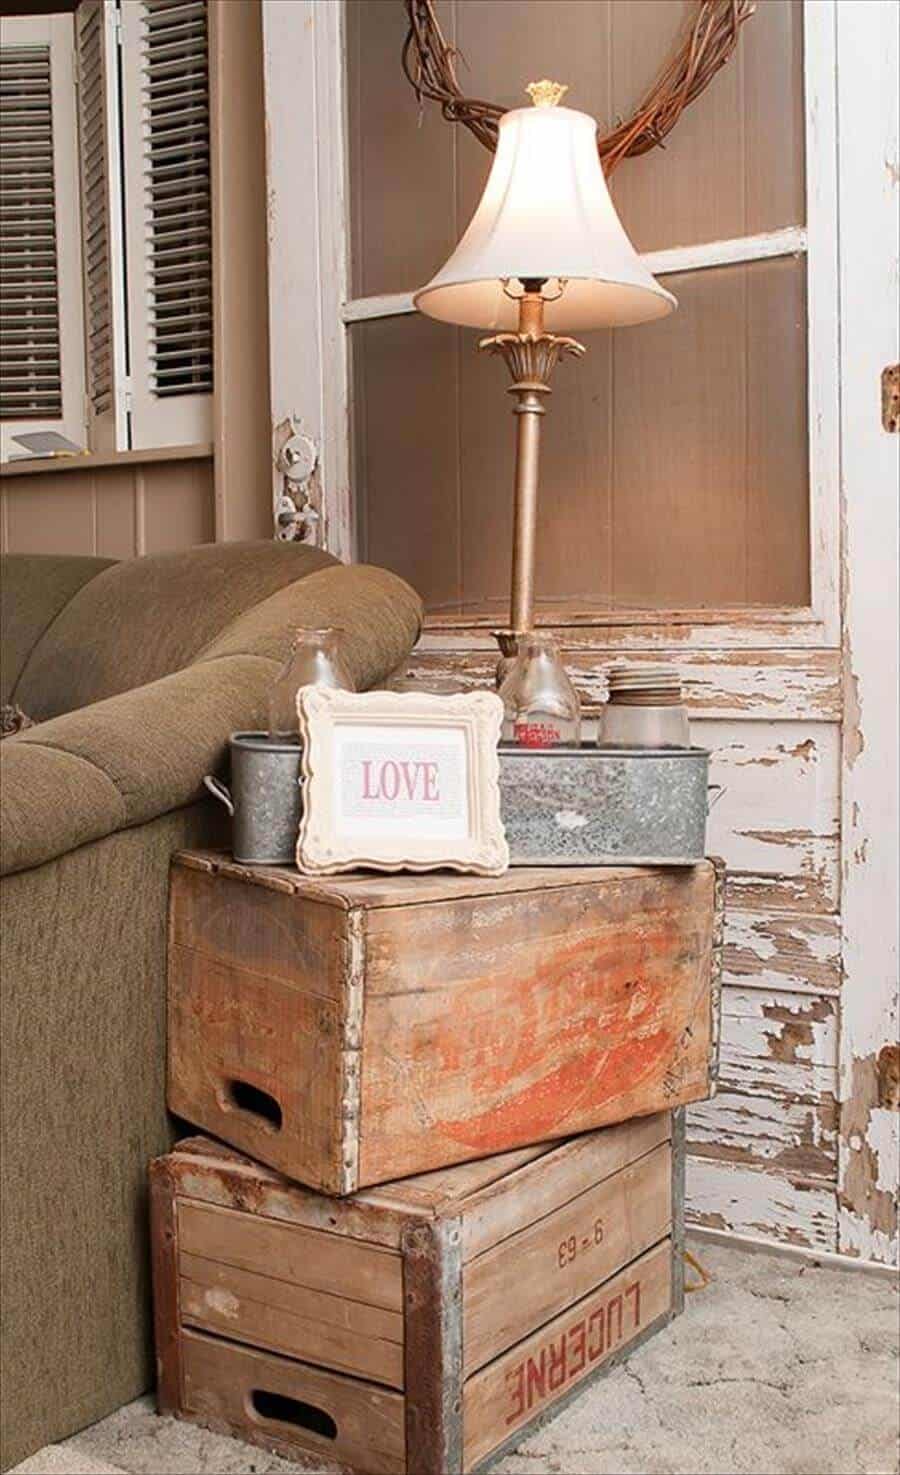
2. Use an Old Door as a Unique and Rustic
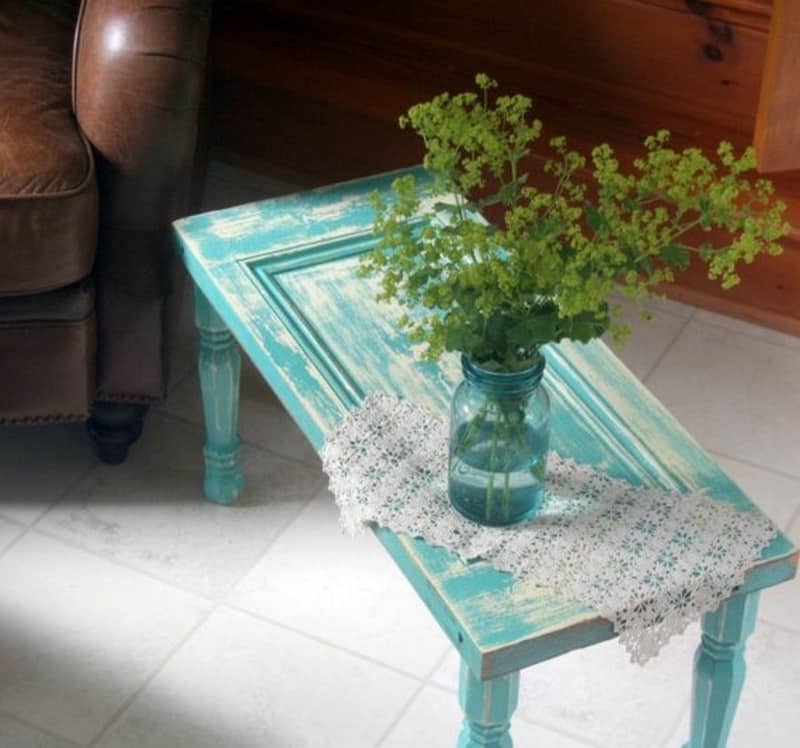
One of the great things about repurposing old materials is that each piece has its own unique story. And what better way to give new life to an old door than by turning it into a ? If you’re looking for a , that’s both stylish and functional, this is a great option.
To get started, simply sand down the door and legs, then apply a coat of or . Once the finish is dry, attach the legs to the door using L-brackets. For a final touch, add some decorative hardware to the door.
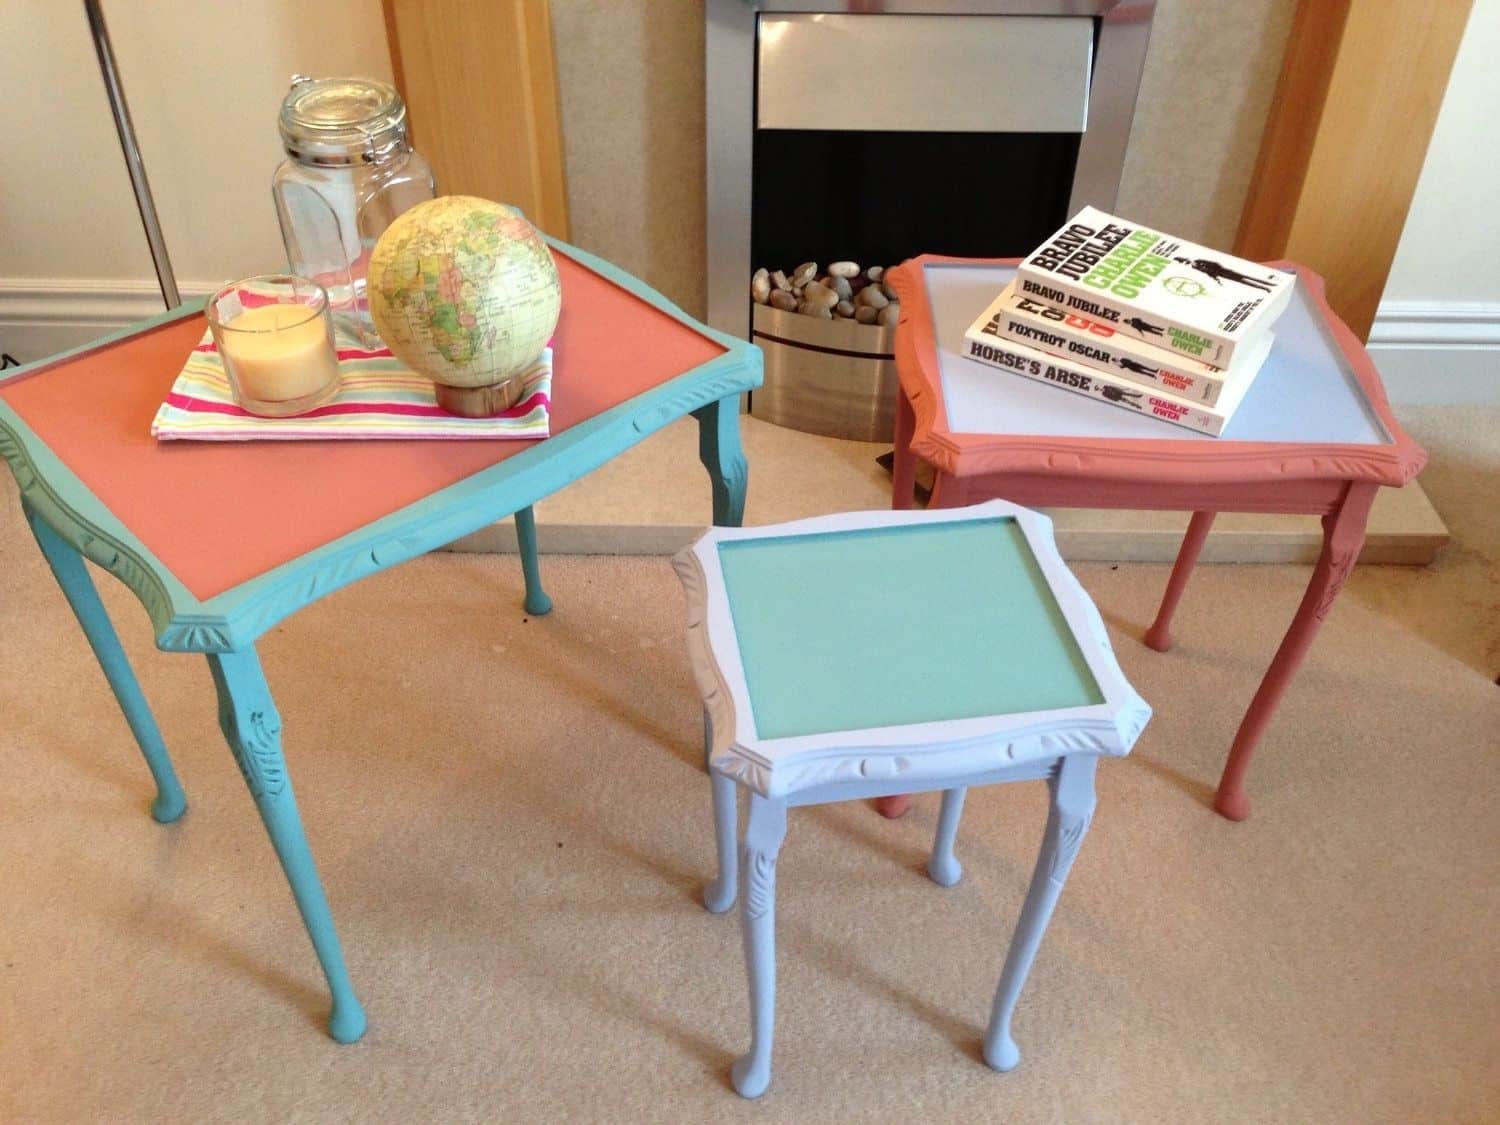
3. an Old in a Fun New Color or Pattern
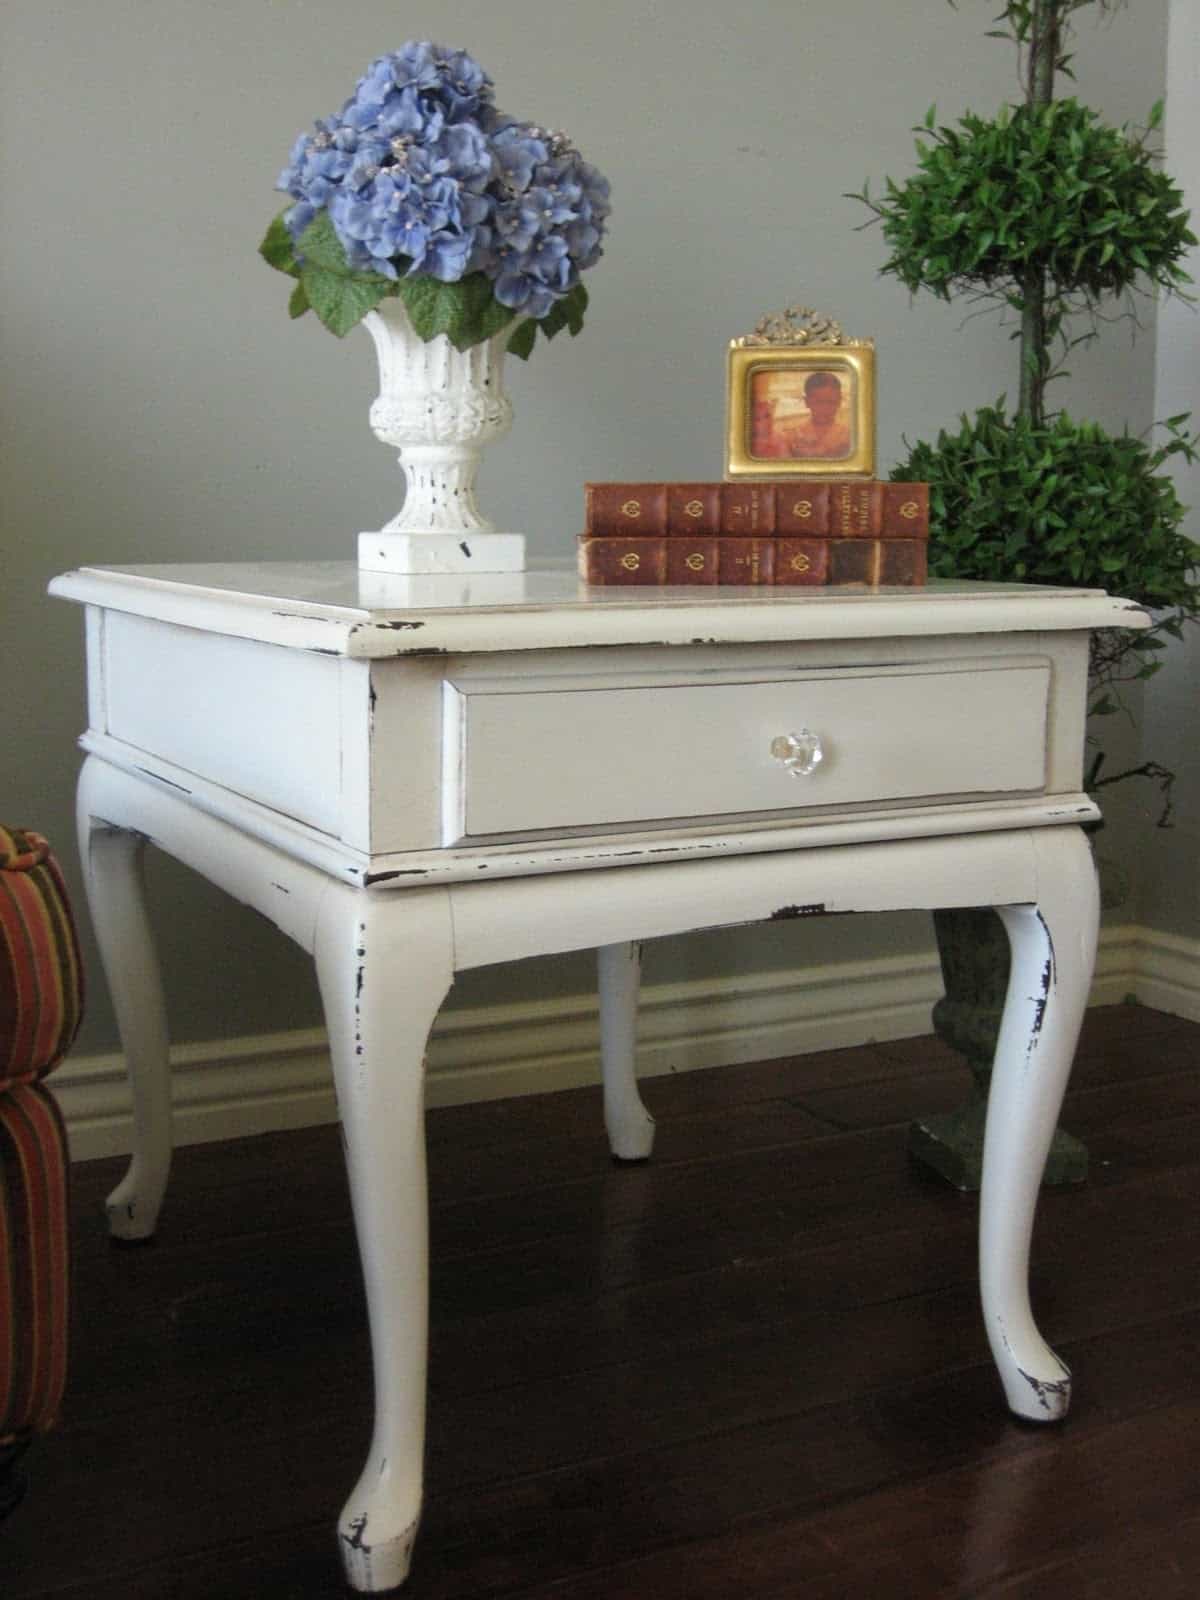
One of the easiest ways to give an old piece of a new lease on life is to simply repaint it. A bright, bold color will really make the pop, but you could also go for a more subtle look with stripes or other patterns.
This can be a great way to add a pop of color or pattern to a room, and it doesn’t require any major carpentry skills. Just make sure to sand down the surface of the first so that the new will adhere properly.
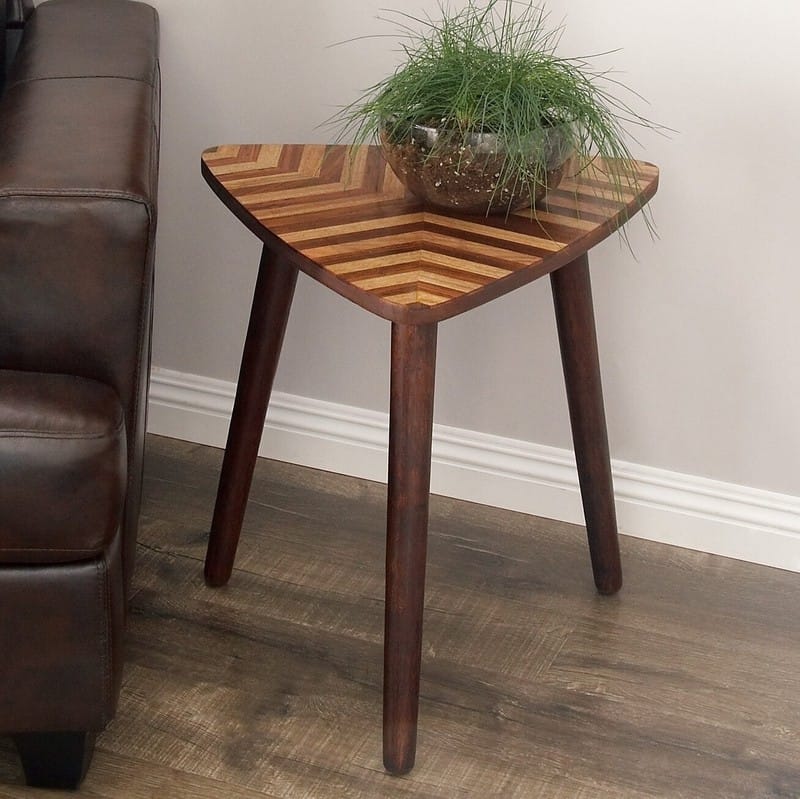
4. Create a Geometric Mosaic Tabletop Out of Colorful Tiles
Mosaics can be created using a variety of materials, but for this project, we recommend using colorful tiles. You’ll need to start by cutting the tiles into small pieces. Once you have a good selection of pieces in different shapes and sizes, it’s time to start creating your design.
To create a cohesive look, we recommend using a repeating geometric pattern. Once you’re happy with your design, it’s time to start affixing the tiles to the tabletop. You can use tile adhesive or grout to attach the pieces in place. Once all of the pieces are in place, allow the adhesive to dry completely before using your new .
5. Turn an Old Lampshade Into a Chic New Side
Don’t throw out that old lampshade-with a little bit of creativity, it can be transformed into a stylish new . This easy project is a great way to upcycle an old lampshade and give your home a fresh, new look.
6. Concrete Block for Industrial Style
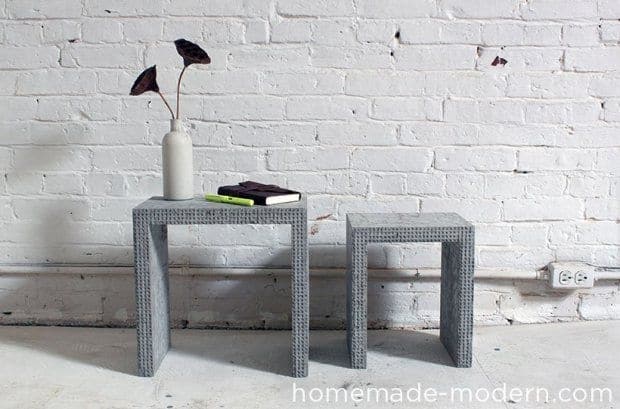
This industrial-style is easy to make, and it can be customized to fit your space. Plus, it’s a great way to upcycle some old concrete blocks that you might have lying around.
Here’s how to do it:
Start by gathering your materials. You will need some Lego bricks and Quikrete countertop mix. Then, build the mold up brick-by-brick. Mix the concrete and spoon it into the form. Let the concrete dry perfectly for 20 hours. After all, remove the Legos. Be careful not to scratch or bend the plastic bricks.
7. Make Use of The Material
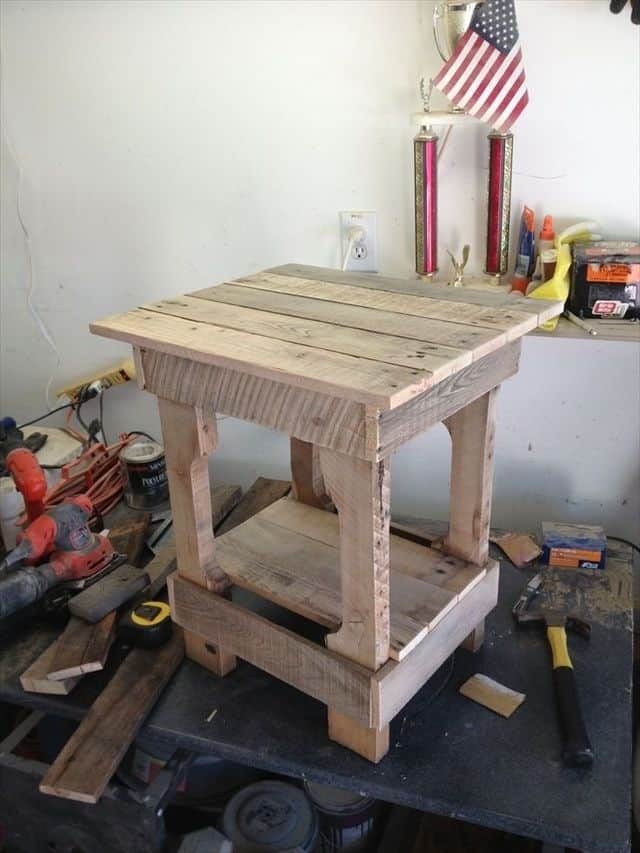
One inexpensive option for an is to repurpose a . Pallets are typically used for shipping and can be found for free or at a low cost from many businesses. To turn a into an , start by sanding down the rough edges. Then, add a layer of or . Once the is dry, add a protective sealant to help extend its life. For a more finished look, add some decorative trim around the edges or attach caster wheels to the bottom.
8. The Beauty of Tree Stump
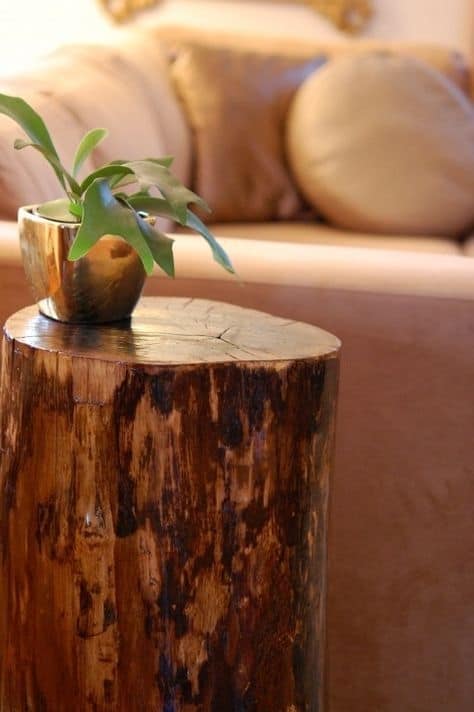
A natural can be created by using the tree stump material. This is easy to do and can be completed in just a few hours with the following supplies:
- Tree stump (preferably with a flat top)
- Can of sealer
- Can of (optional)
- Roll of sandpaper
First, find a tree stump that is the desired height for your . Then, sand down the surface to create a smooth finish. To give the a more polished look, you can or the stump. Finally, add a glass top to protect the surface.
9. Make it from a Stack of Books
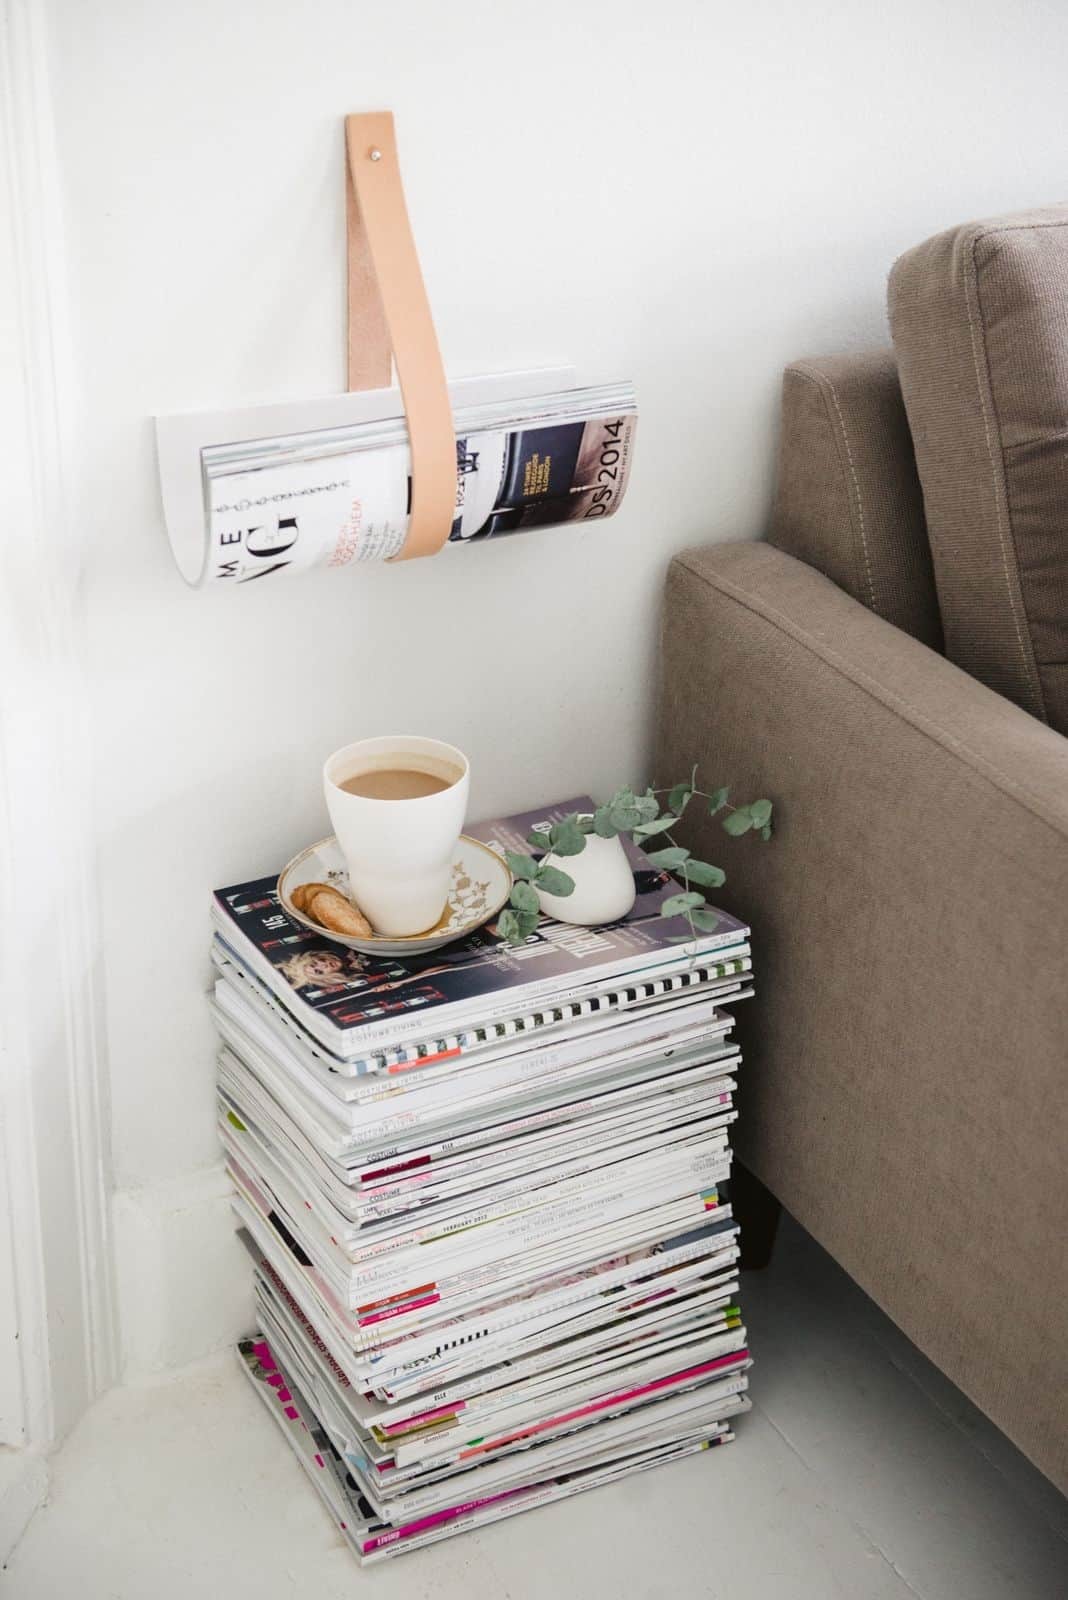
A stack of books is the perfect foundation for a . Choose a stack of books that are all roughly the same size. Once you have your books, find a flat surface to work on, like a or the floor. Start by stacking the books on top of each other, making sure that they’re evenly aligned. Once you have your stack of books, take a moment to decide how tall you want your to be and you can use it now.
10. Bring in an Elegant Hint Effortlessly
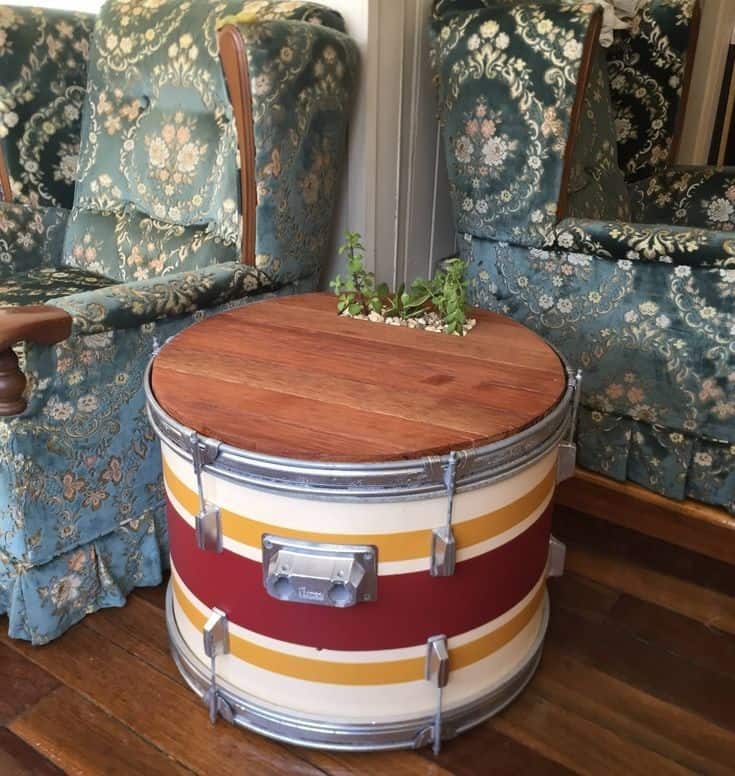
This type of can add a touch of fun and quirkiness to any room, while still being aesthetically pleasing. Plus, it’s easy to make yourself! Here’s what you’ll need:
- An old drum or similar container
- A piece of wood
- Screws or nails
- Drill
- Sandpaper
- or (optional)
First, clean the inside of the drum and sand down any rough edges. Then, measure and cut the wood to fit the top of the drum. If desired, you can also or the Drum before use.
11. The Vintage
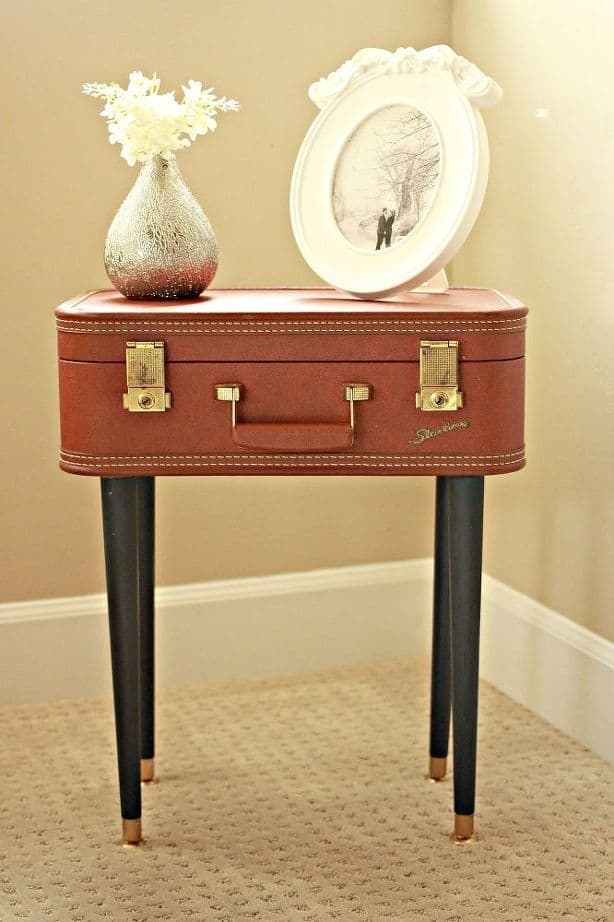
Bring in the versatile feature that infuse the vintage style to your living space with this suitcase . It’s a simple that anyone can do, and it’s a great way to reuse an old piece of luggage.
To start, simply choose a suitcase that is the right size for your space. You may want to measure the area where you plan to put the before you start shopping around for a suitcase, so you know exactly what size you need. Once you have your suitcase, give it a good cleaning inside and out. You may want to sand down any rough edges on the outside of the suitcase, so it has a smooth finish. Then, add some legs to the bottom of the suitcase.
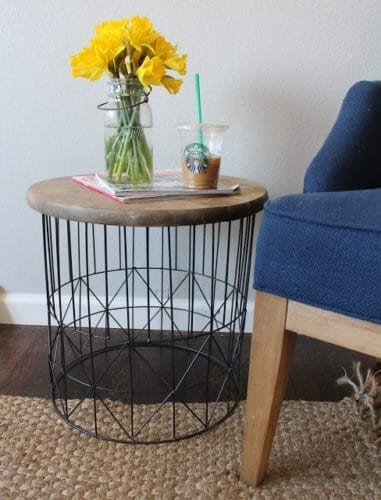
12. Basket
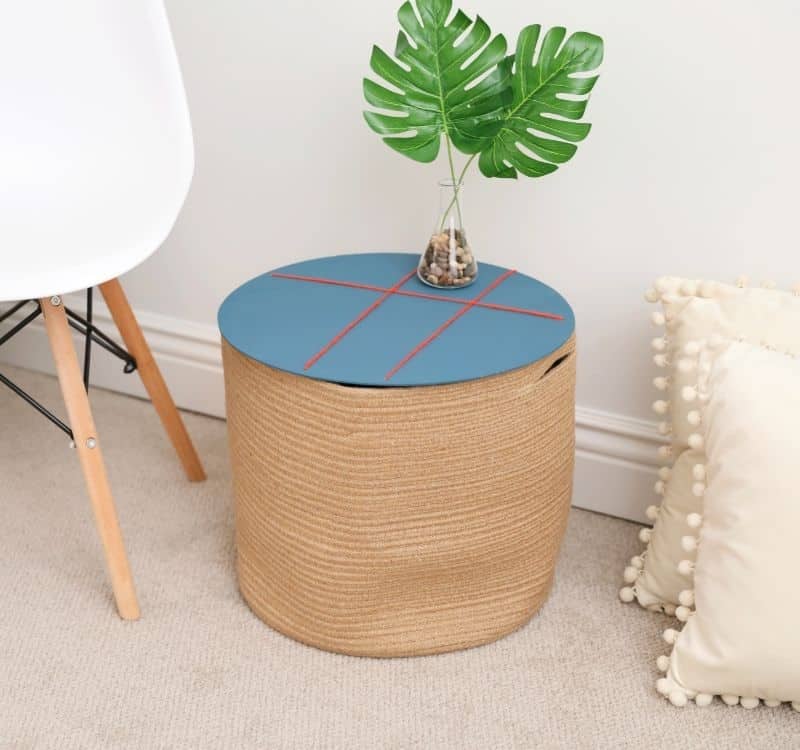
Make use of the basket that can be a functional to your living space that makes it more stylish. First, choose a basket that is the right size for your space. Then, simply put the sturdy lid. Fill the basket with magazines, books, or other items you need to keep handy. For an extra touch of style, add a natural-themed runner or place a potted plant on top of the basket.
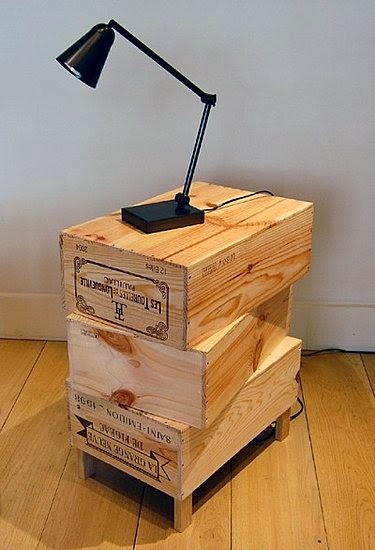
13. Stackable Crate
Upcycle the crates and transform them into a cool . Whether you use new or recycled crates, this project is an easy way to get the look you want without breaking the bank. To get started, simply stack the crates on top of each other, securing them together with screws or nails. Then, add a bit of sanding and .
14. Stenciled Tabletop
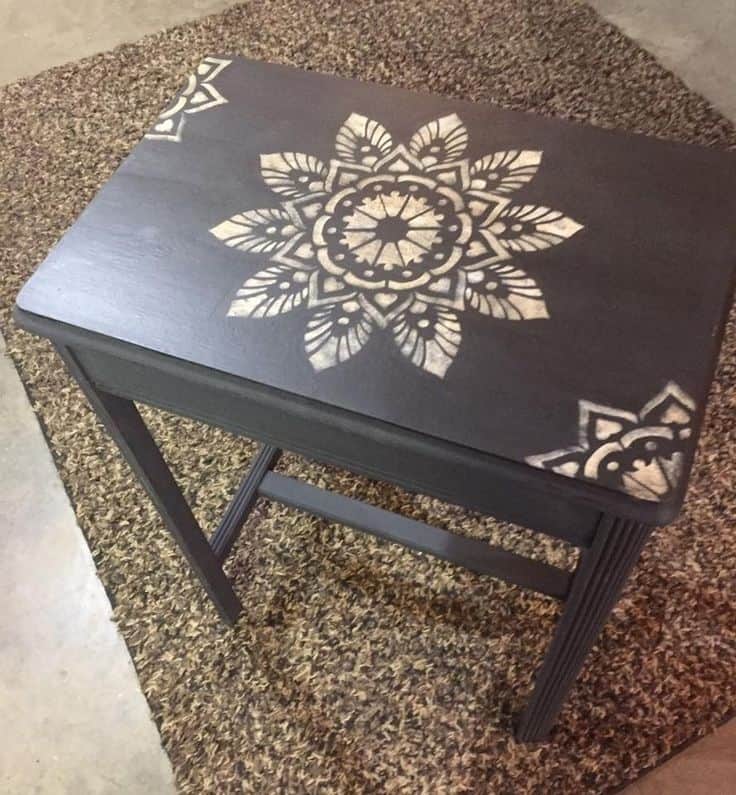
The stenciled tabletop is a quick, easy, and cheap , which is perfect if you are planning to make use of the old stuff and update the look. You’ll need an , some stencils, and your desired color. First, start by painting the entire surface of the with a base coat of . Once the base coat is dry, position your stencil on the surface of the and tape it in place. Then, using a foam roller or brush, apply over the stencil. Carefully remove the stencil while the is still wet and allow the design to dry completely.
15. Apply the Chalkboard
This project is easy to do yourself, and you can customize the design to match your décor. To get started, you’ll need a , some , and a few other supplies. Once you have everything you need, simply follow the instructions below.
First, sand down the top of your to create a smooth surface. Then, apply two coats of chalkboard , allowing the first coat to dry completely before applying the second. Once the is dry, decorate the top of your with a design of your choice. To finish, seal the chalkboard with a layer of clear varnish.
16. Upcycle the Wine Crate
Create the traditional ambiance to your living space by upcycling the wine crate and transform it into a functional . Start by sanding down the crate to remove any sharp edges. Then, give it a good coat of or . You can even distress the for a more rustic look. To make the top surface of the more durable, you may want to add a layer of polyurethane.
17. Pipe
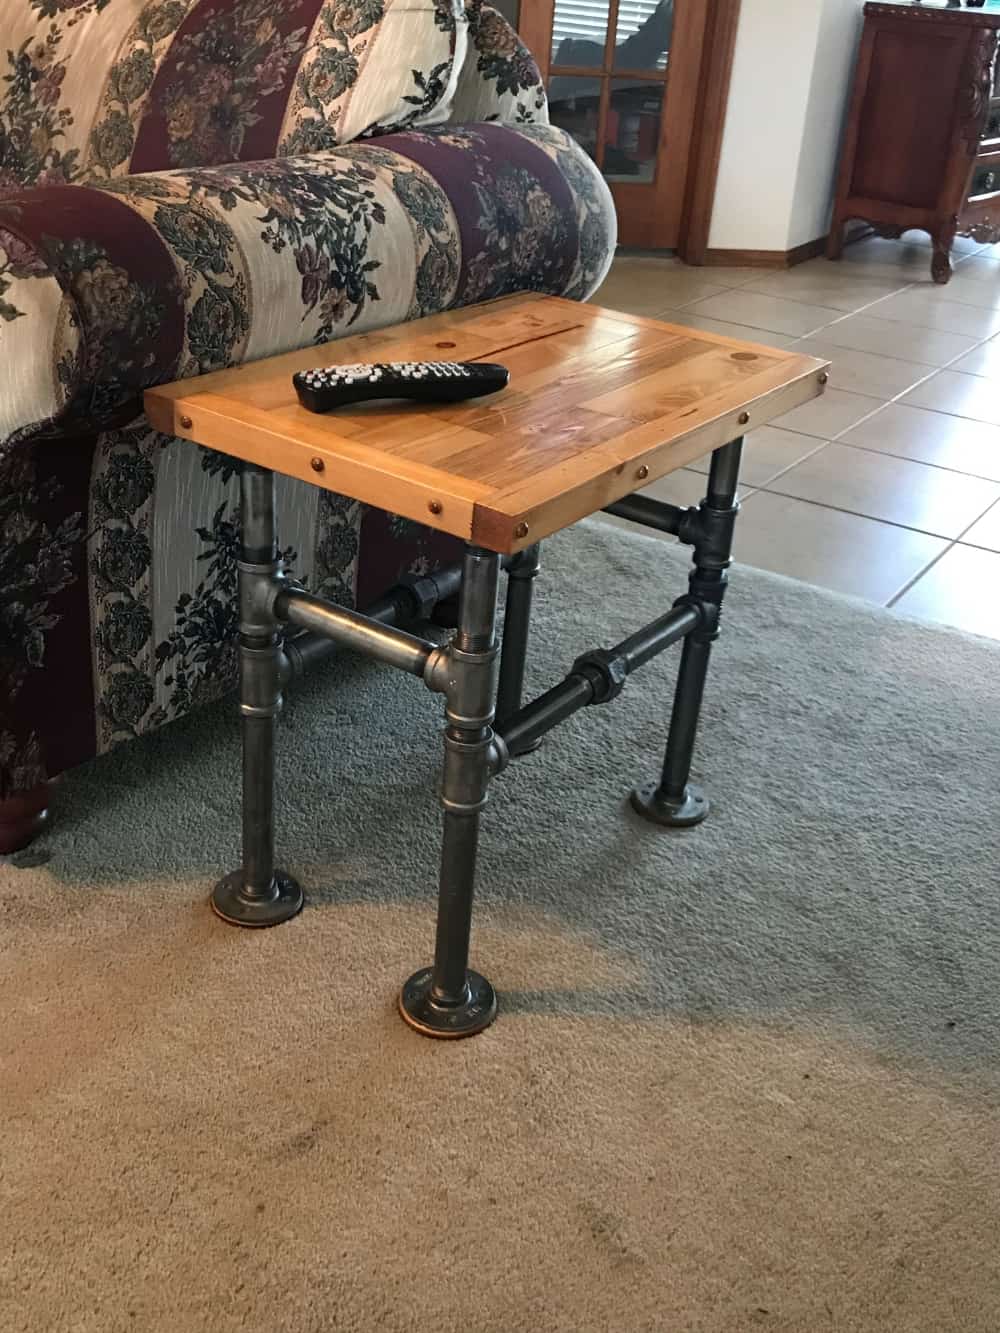
It is a sturdy, cool-looking piece of that can add a lot of character to your home. You can make one yourself with just a few simple supplies and some basic knowledge of woodworking. First, cut two pieces of to the desired size for your . Then, use a drill to create four holes in each piece of , evenly spaced apart. Next, thread sturdy pipes through the holes and attach them to flanges at the base. Finally, add a finish of your choice and enjoy your new .
18. Apply Marble Contact Paper Tabletop
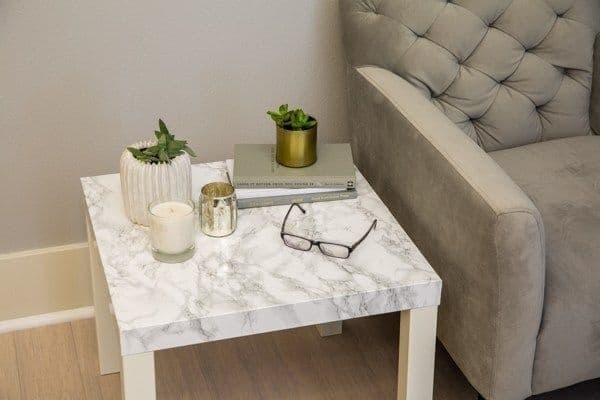
One simple and elegant way to do this is to use marble contact paper. This inexpensive material can be used to transform a plain side into a chic piece of . First, measure the surface of the and cut the paper to size. Then, remove the backing and apply the paper to the tabletop, smoothing out any bubbles as you go. Once the paper is in place, trim off any excess material and enjoy your new marble side .
19. DIY Gold Leaf for Elegant Touch
A gold leaf is an elegant addition to any room. It’s also a great way to add a bit of glamour to a space without spending a lot of money. This is surprisingly easy to do, and it will add a touch of luxury to any room. All you need is a , some gold leaf, and a sealant. First, sand the surface of the to prepare it for the gold leaf. Then, apply the leaf using a brush or your fingers. Once the entire surface is covered, seal it with a clear sealant to protect the finish. Allow the to dry completely before using it.
20. Faux Leather and
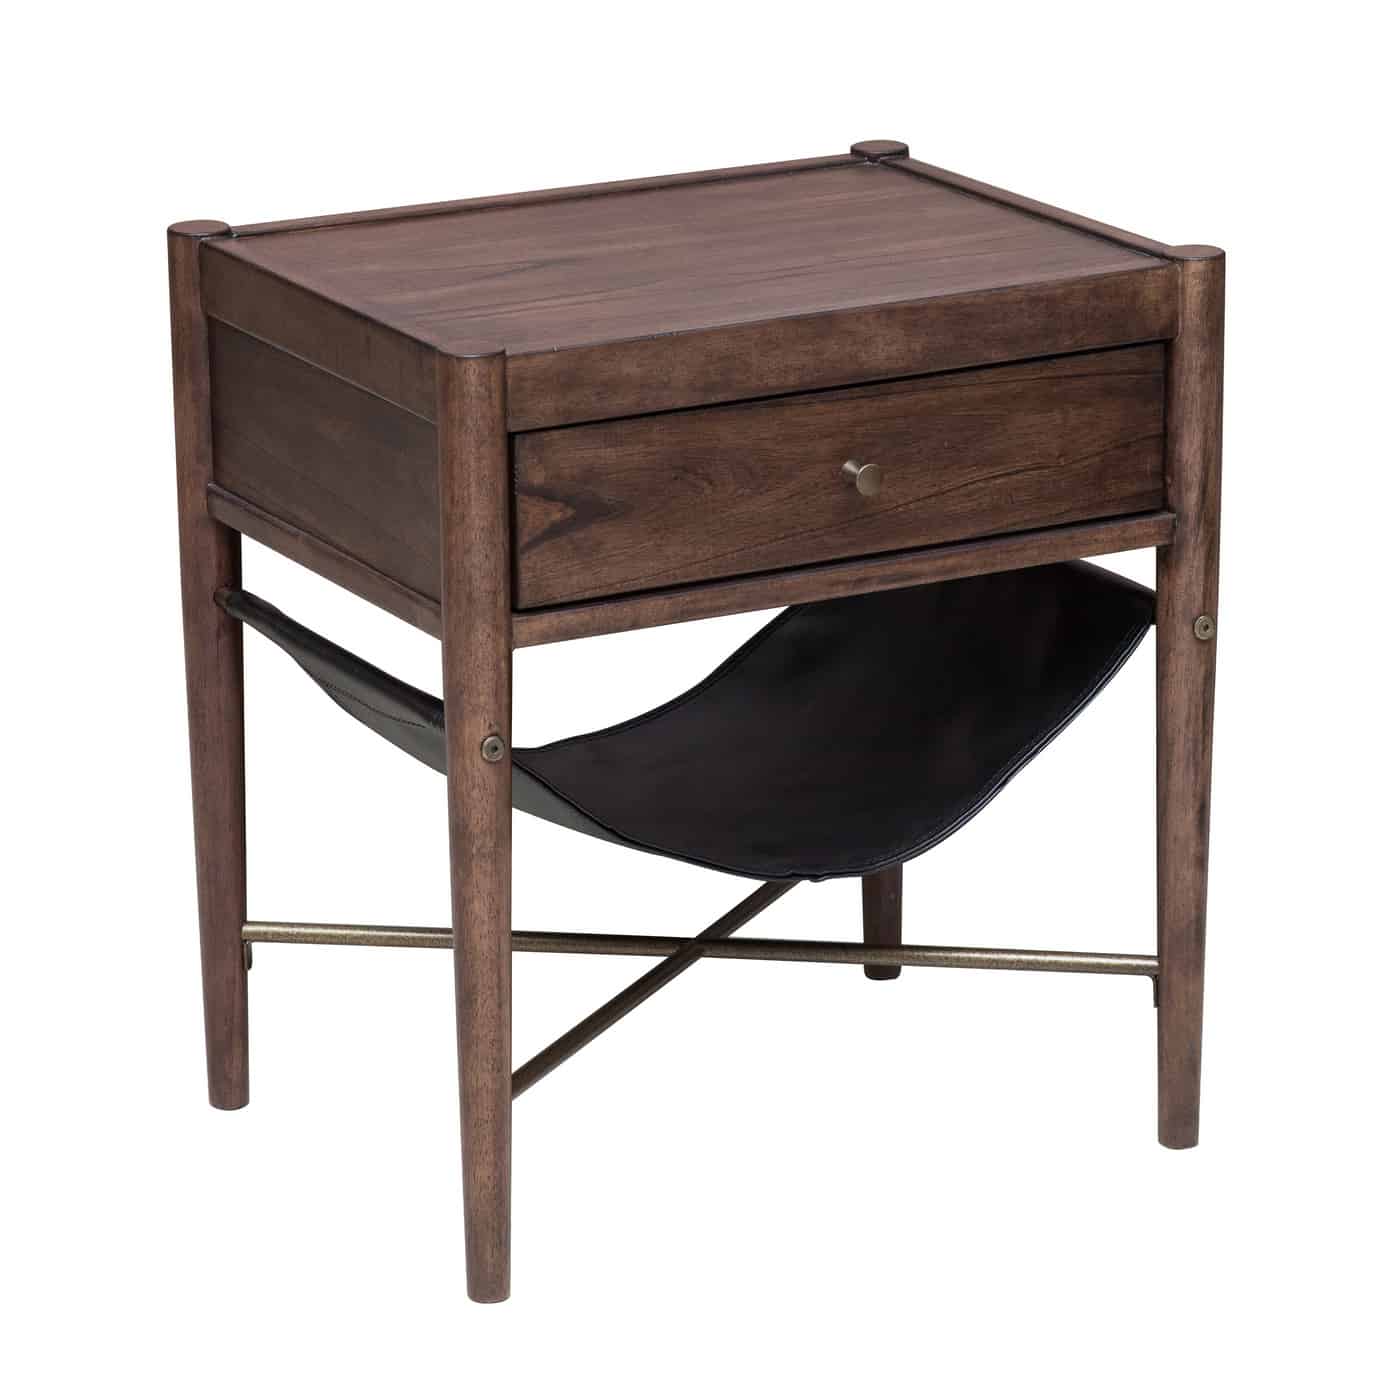
The faux leather top gives the a modern look, while the base adds a touch of warmth. To create this , start by attaching the base to the tabletop using screws or nails. Then, use a staple gun to attach the faux leather to the underside of the . Be sure to pull the fabric taut so that there are no wrinkles or creases. Finally, add a few decorative touches like throw pillows or a vase of flowers and you’re done.
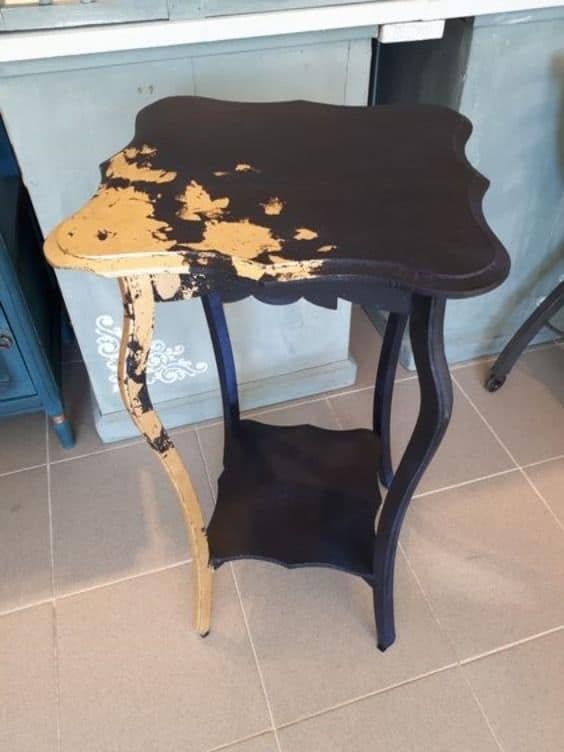
21. Two-Tone
A two-tone is a great focal point for any room. You can create this look by simply painting the top and bottom halves of your different colors. For a more dramatic effect, you can also choose to the entire one color and then distress the edges with a second color.
22. Painted Stripes for a Cool Appearance
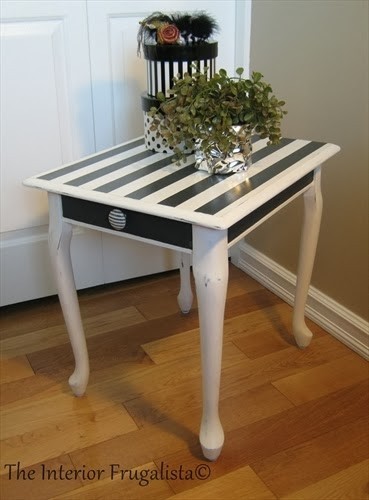
A striped is a great way to add a pop of color to your or bedroom. You can use any colors you like, but we recommend choosing three or four colors that complement each other. To get started, you’ll need to sand down the surface of your and apply a primer. Once the primer is dry, use painter’s tape to create stripes of varying widths. Then, each stripe with a different color. Let the dry completely before removing the tape.
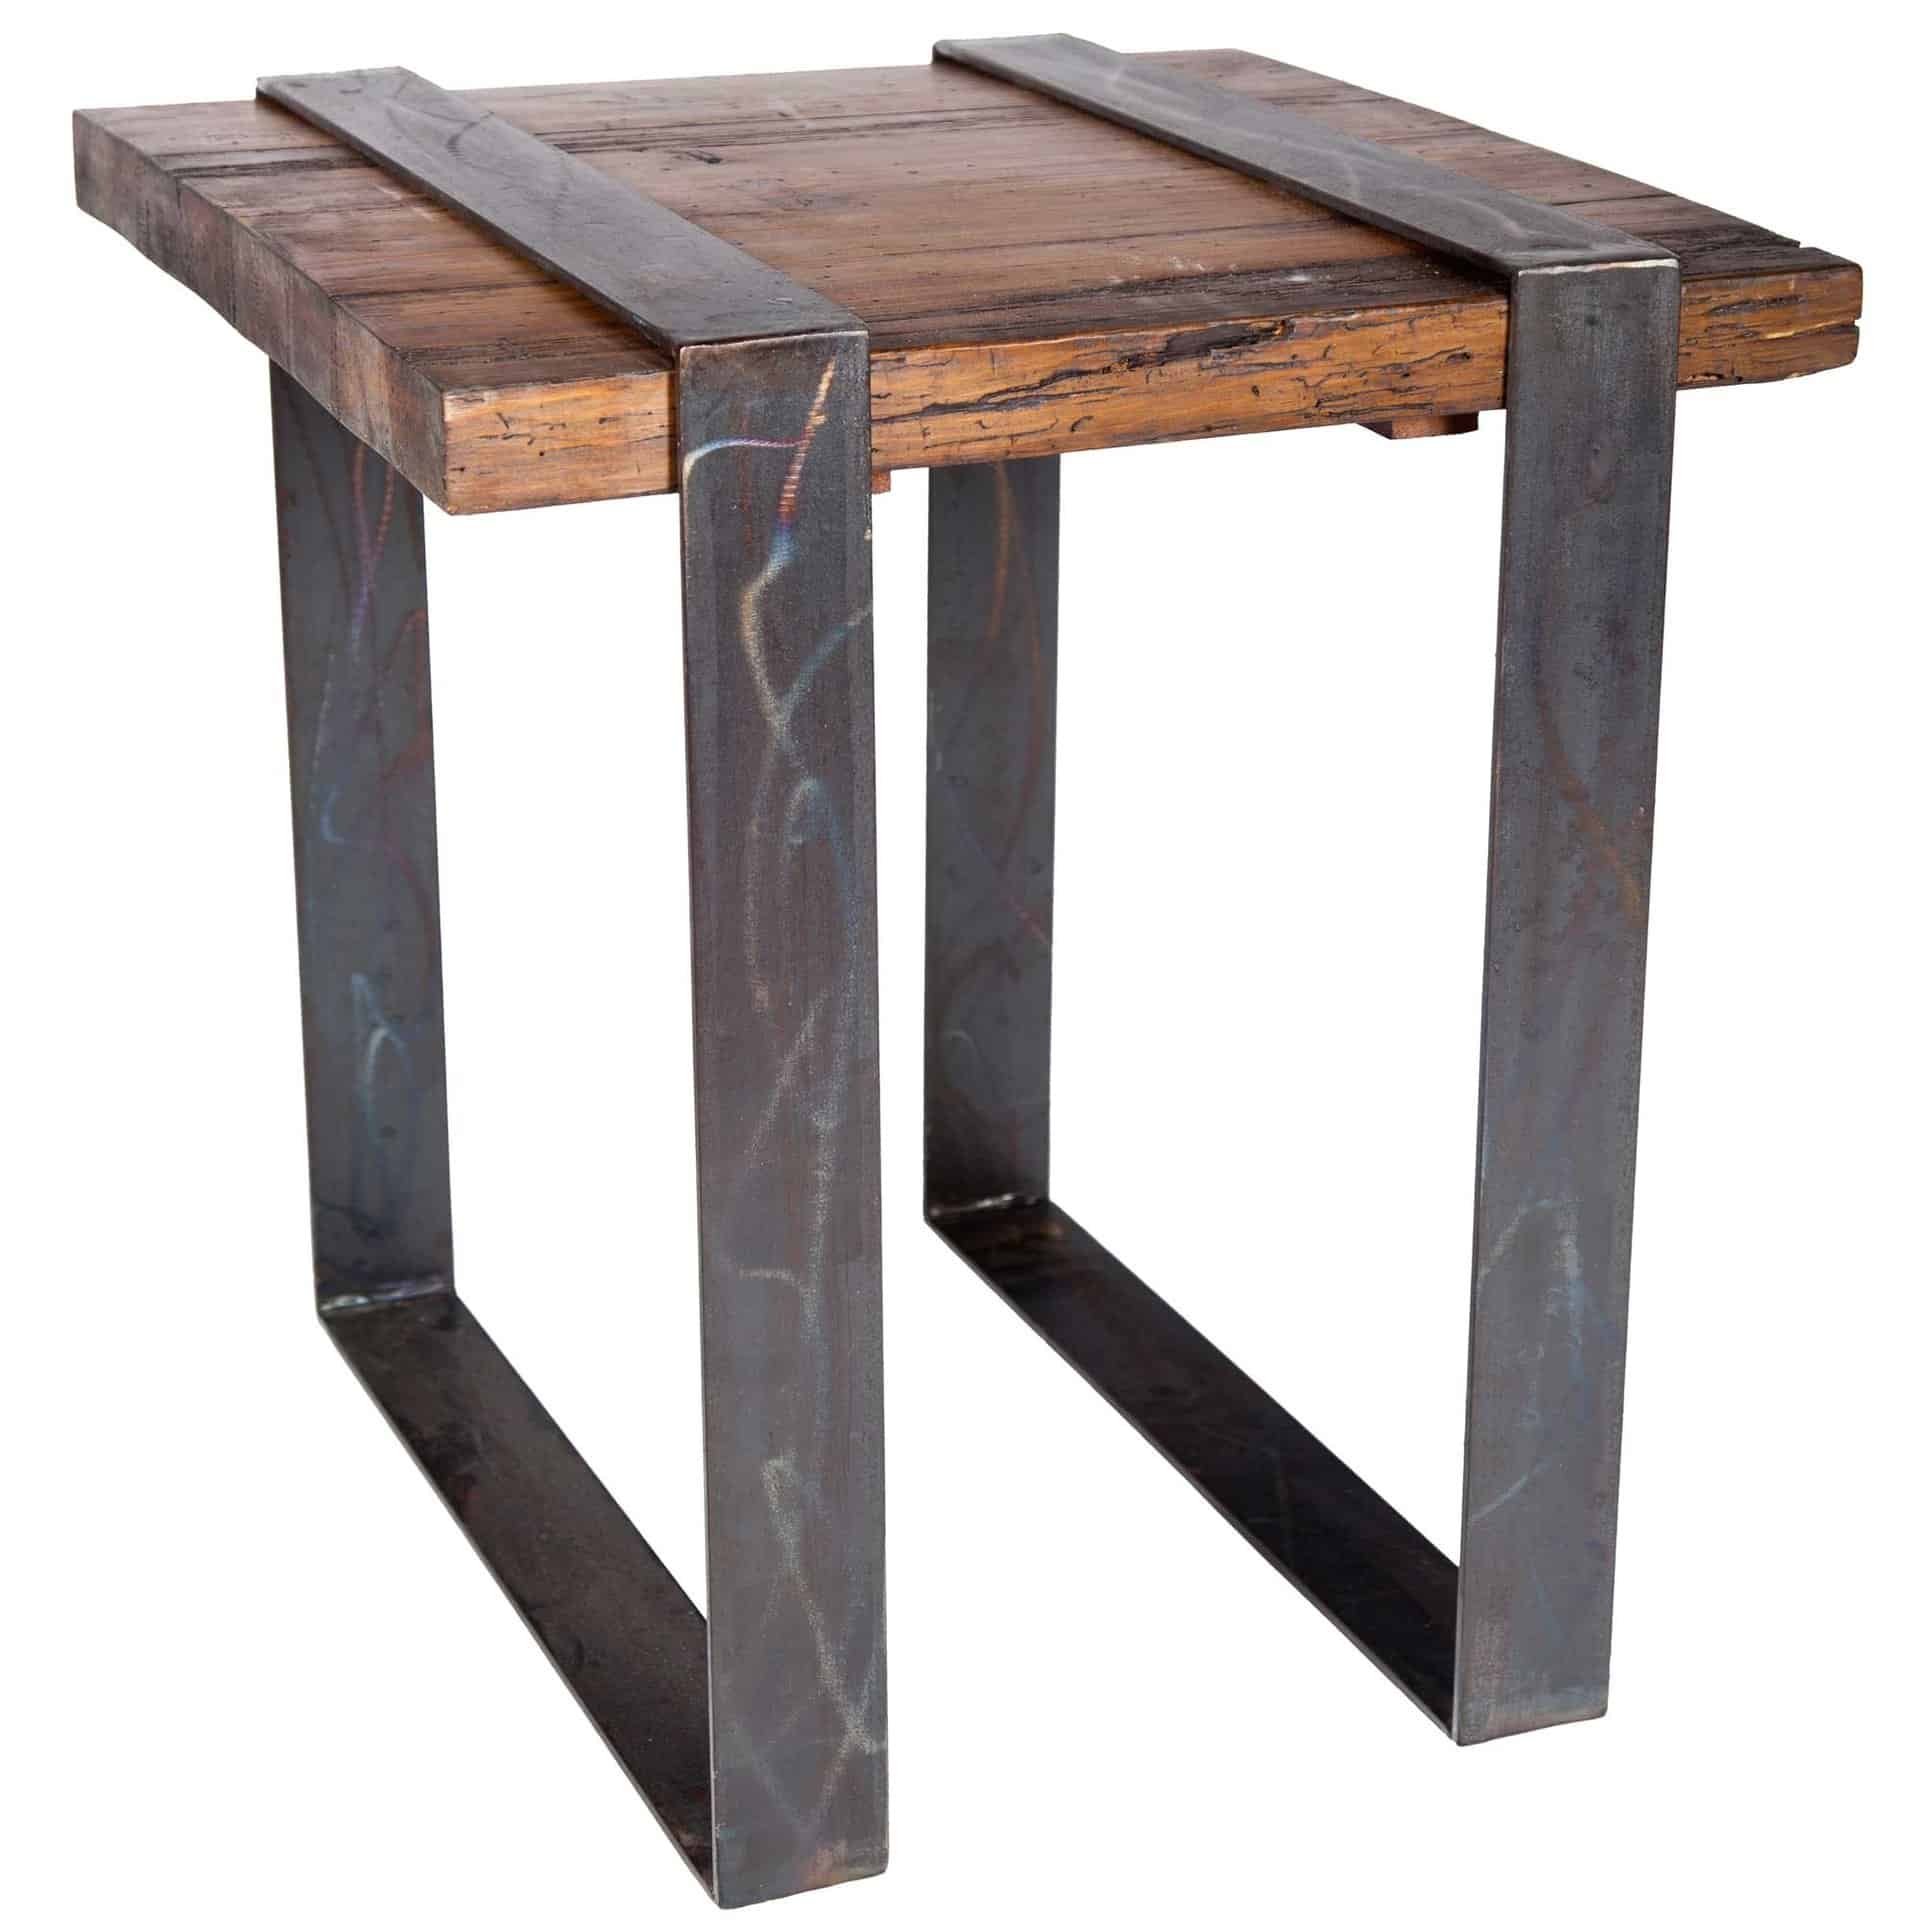
23. Distressed and Metal
To create this , you’ll need a piece of (preferably reclaimed or distressed), a metal base, and some basic tools and supplies. Once you have all of your materials, simply assemble the base and attach it to the top of the . You can then distress the using various techniques, such as sanding, staining, or painting. This would make a great addition to any room in your house.
24. White Washed Rattan Drum End Table
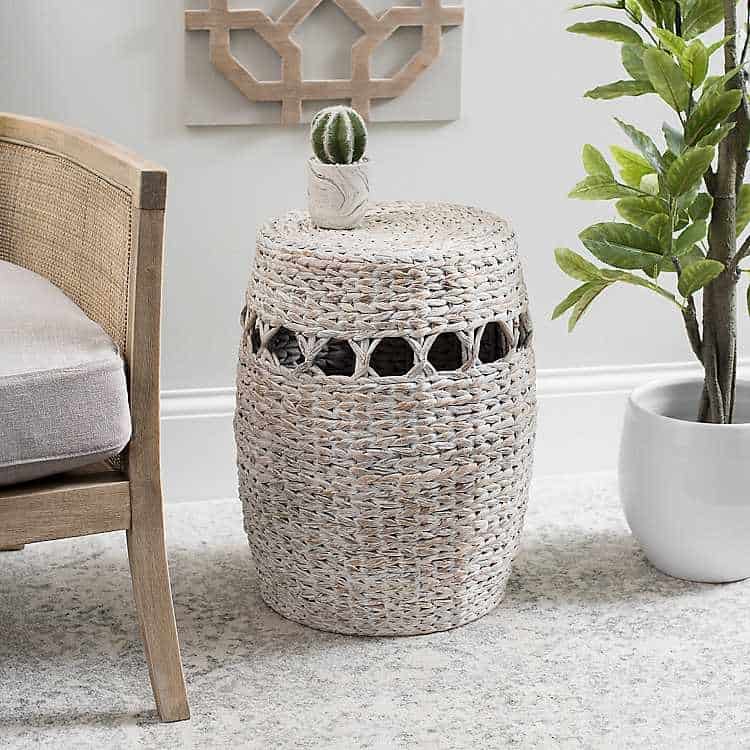
Consider repainting the rattan drum into an end table. It will make a statement to the living space without lots of things to do. Also, it is easy to make and can be done within hours. You only need to paint it with the white washed paint, then let it perfectly dry. Lastly, once it perfectly dries, add a few decorative touches, such as a small plant or a stack of books.
25. DIY Curved Side From a Slab of
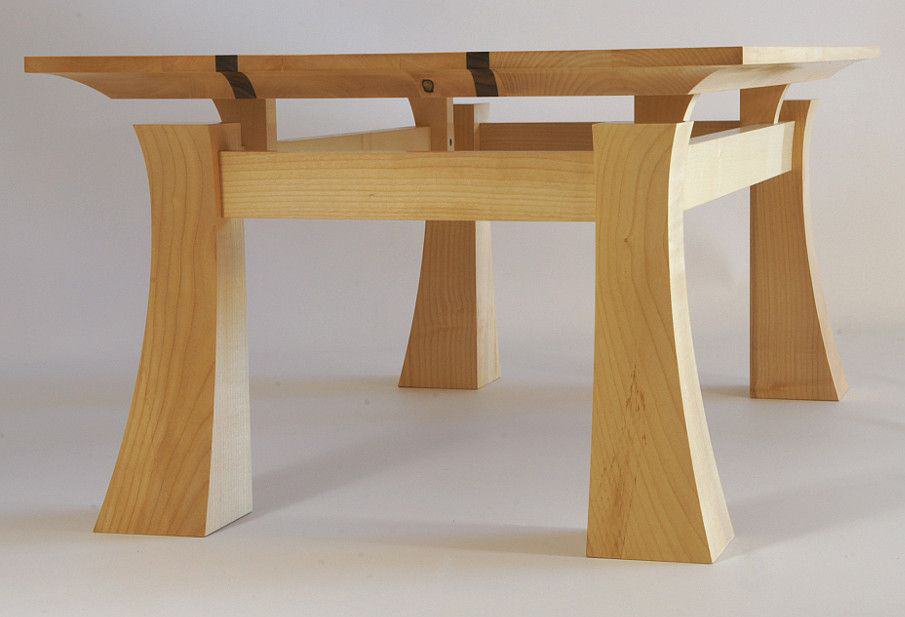
Made from a natural slab of , this features a live edge that gives it a rustic charm. The curved legs add a modern touch, while the lower shelf provides plenty of . This easy-to-build is the perfect way to show off the natural grain of the , and the curved legs add a bit of visual interest. Plus, the curved shape makes it easy to tuck into a corner or against a sofa. It is perfect for small spaces, and can easily be built on a weekend.
26. the Geometric Pattern
This is easy to do and only requires a few materials. You’ll need a piece of plywood, a jigsaw, sandpaper, , and or . First, use the jigsaw to cut the plywood into a triangle shape. Next, sand down the edges of the triangle until they’re smooth. Then, apply to one edge of the triangle and attach it to another piece of plywood to form a three-dimensional shape. Finally, or the and let it dry.
27.
Transform the old dresser drawer into a perfect . You only need to find an old dresser or with a draw that you no longer use. Remove the drawer and sand it down to create a smooth surface. Then, add your chose of or . For a more rustic look, try painting the drawer in a distressed finish. Finish off by adding new hardware, if desired. Place the drawer on its side and add legs or caster wheels to create an instant .
28. Gilded Branch Side
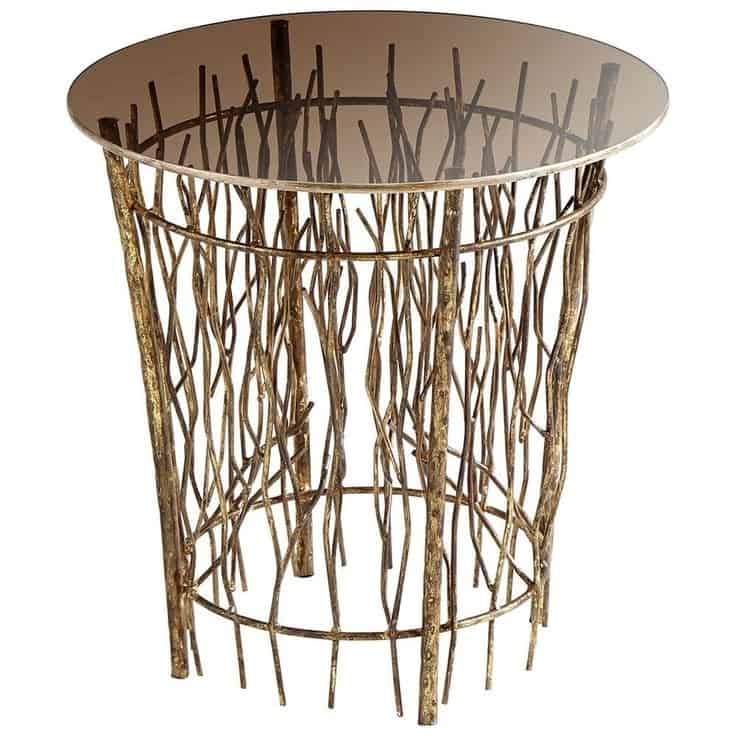
This gilded branch side is a modern twist on a nature-inspired design. It’s made with a gold-painted branch and a glass top. The clean lines and simple shape of the branch are offset by the glamorous gold finish. The result is a unique and eye-catching piece of that would make a great addition to any room. To create this side , you will need a branch, gold , and a glass top. First, select a branch that is the desired size and shape for your . Next, the branch with gold . Once the is dry, attach the glass top to the branch using or screws.
29. Modern Plant Stand
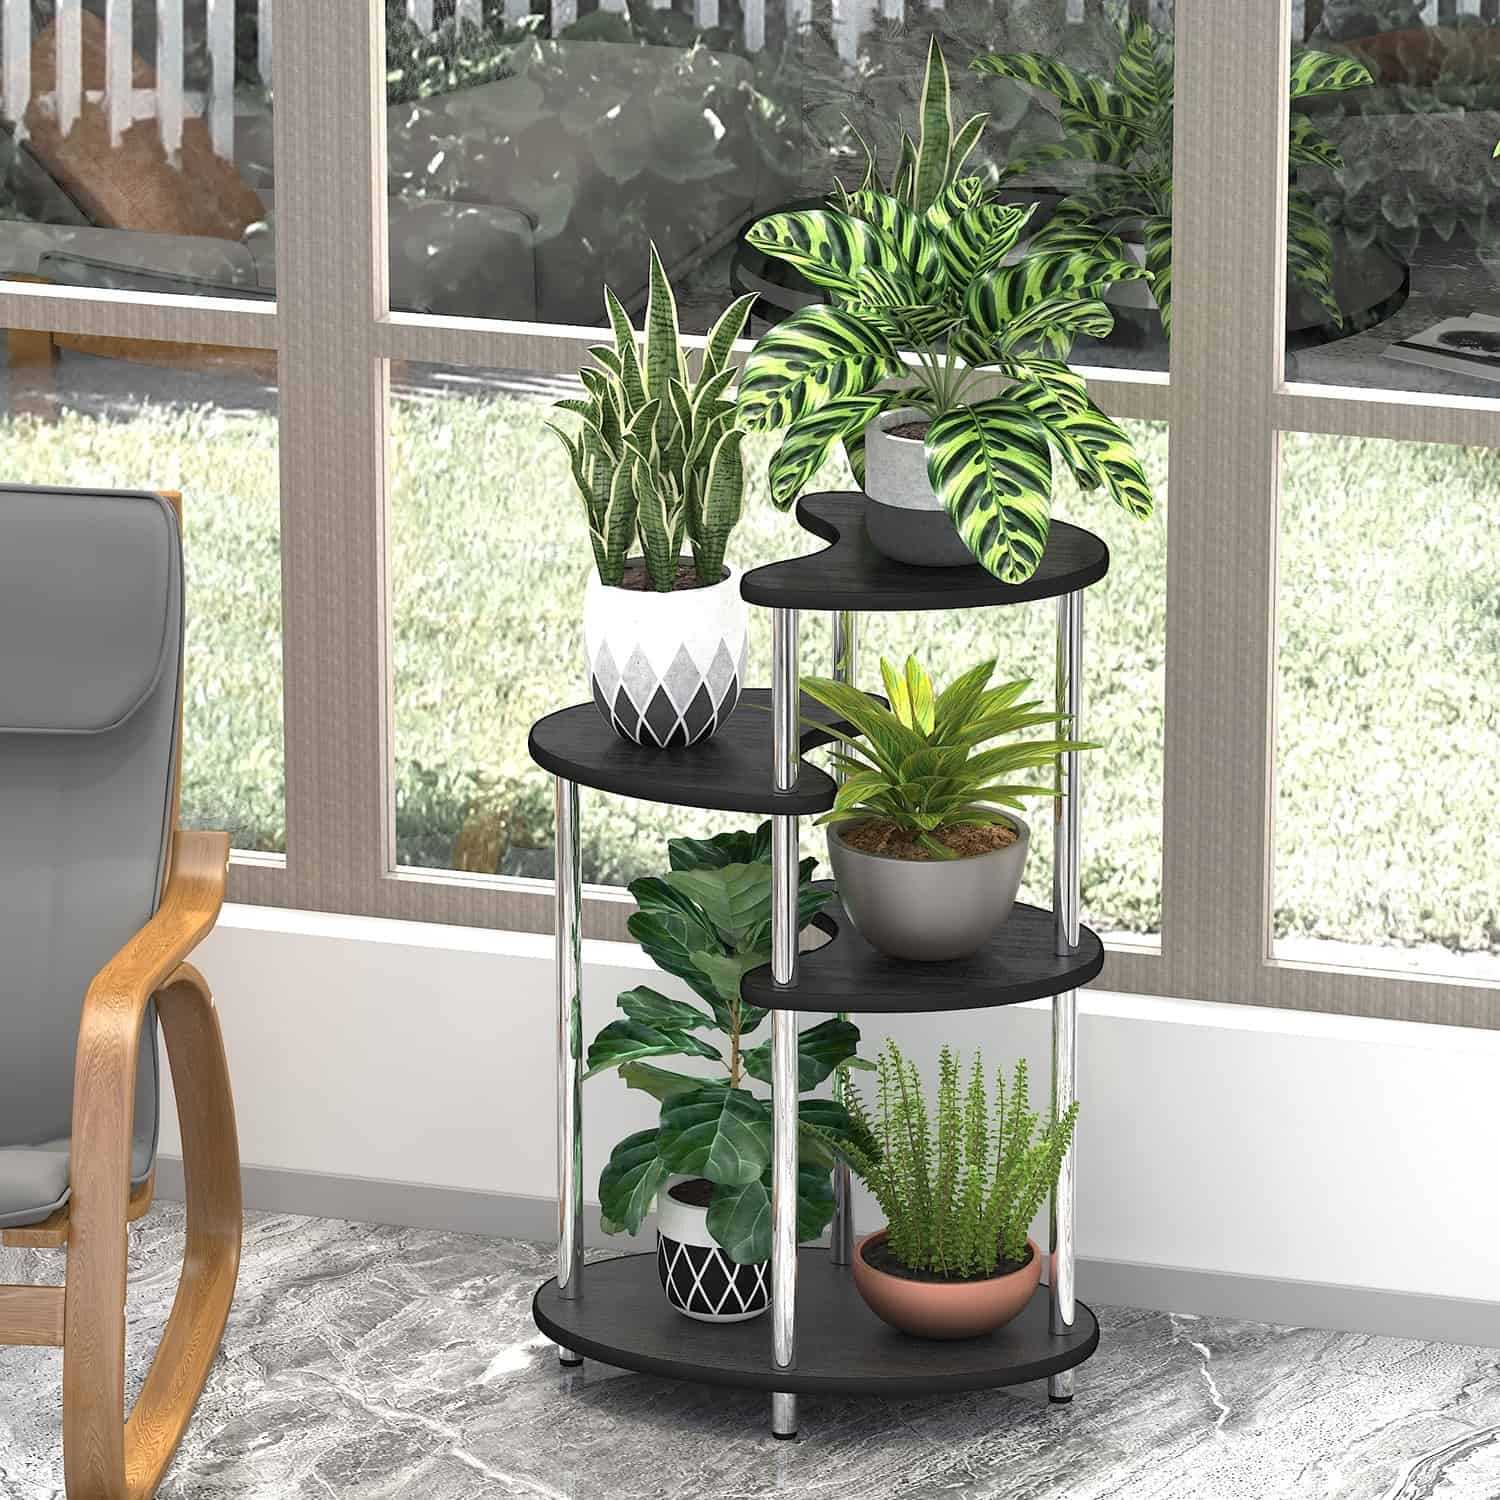
A plant stand is the perfect way to incorporate some greenery into your space. Plus, it’s a great way to display your plants in a stylish and modern way. There are plenty of out there, but this is one of our favorites. All you need is a plant stand, a plant, and some fresh flowers. Place the plant stand in the center of the room, and then top it with the plant and fresh flowers. That’s it! You’ve now got a beautiful, fresh, and modern that will spruce up any space.
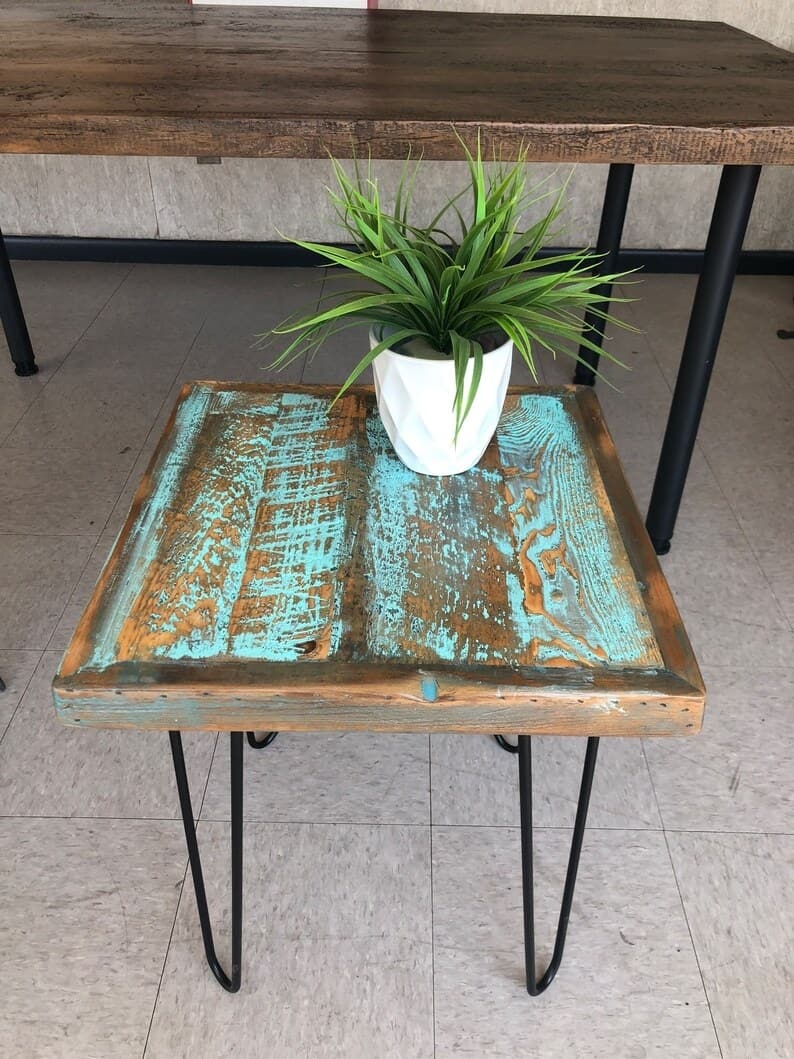
30. DIY Hairpin
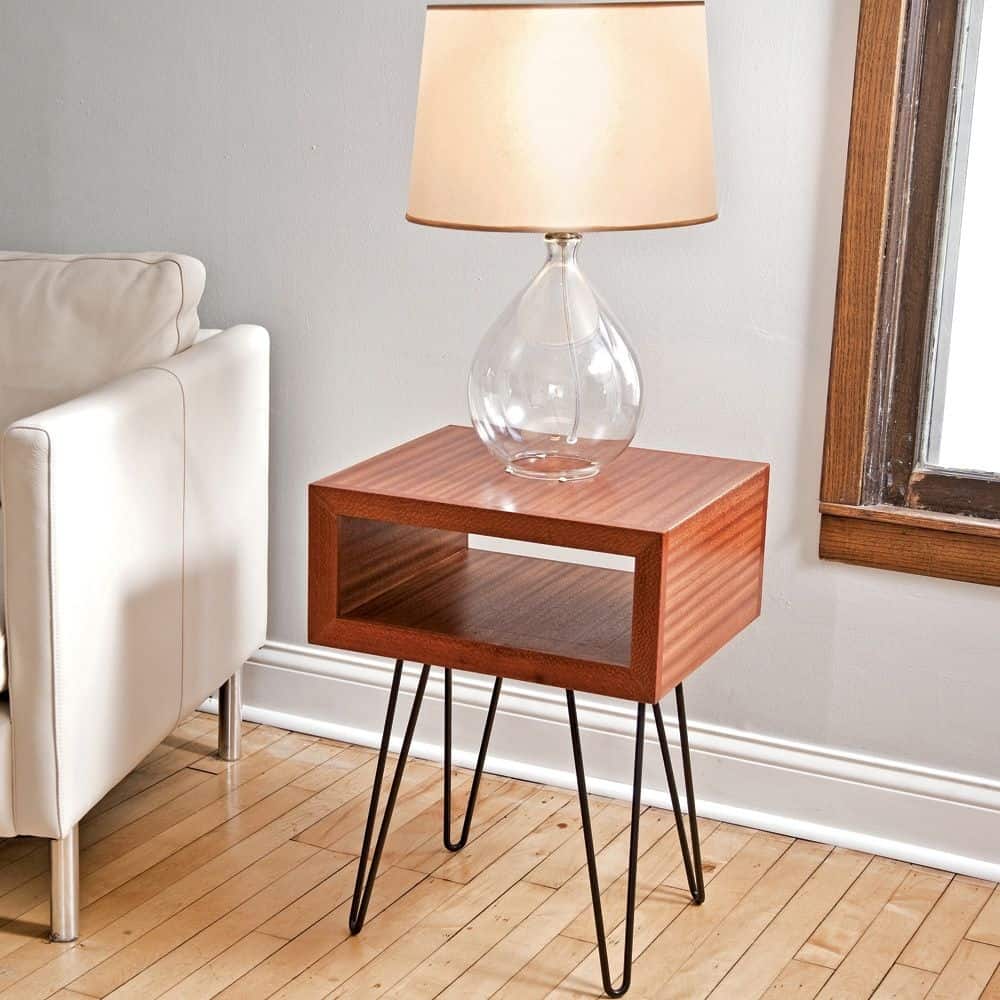
The hairpin legs give the a rustic look, and the top can be made from any type of . If you want to add a bit of personality to the , you can distress the or it any color you like. This project is also easy to customize. If you want a different size or shape , you can simply adjust the dimensions of the . You can also add storage to the by attaching baskets or boxes to the underside.
31. and Iron
and iron can create a beautiful and unique . For the top of the , look for a piece of that is roughly the same size as your iron base. You can distress the to give it an aged look, or leave it natural for a more rustic feel. Once you’ve found the perfect piece of , attach it to the iron base using screws or nails. If you want, you can also add felt pads to the bottom of the to prevent scratches on your floor. Once your is assembled, enjoy its rustic beauty.
can be a great way to add function and style to any room. With just a few pieces of , some or , and your imagination, you can create an that is perfect for your home. We hope these have inspired you to try out a project this weekend.